Oscar Gutierrez:
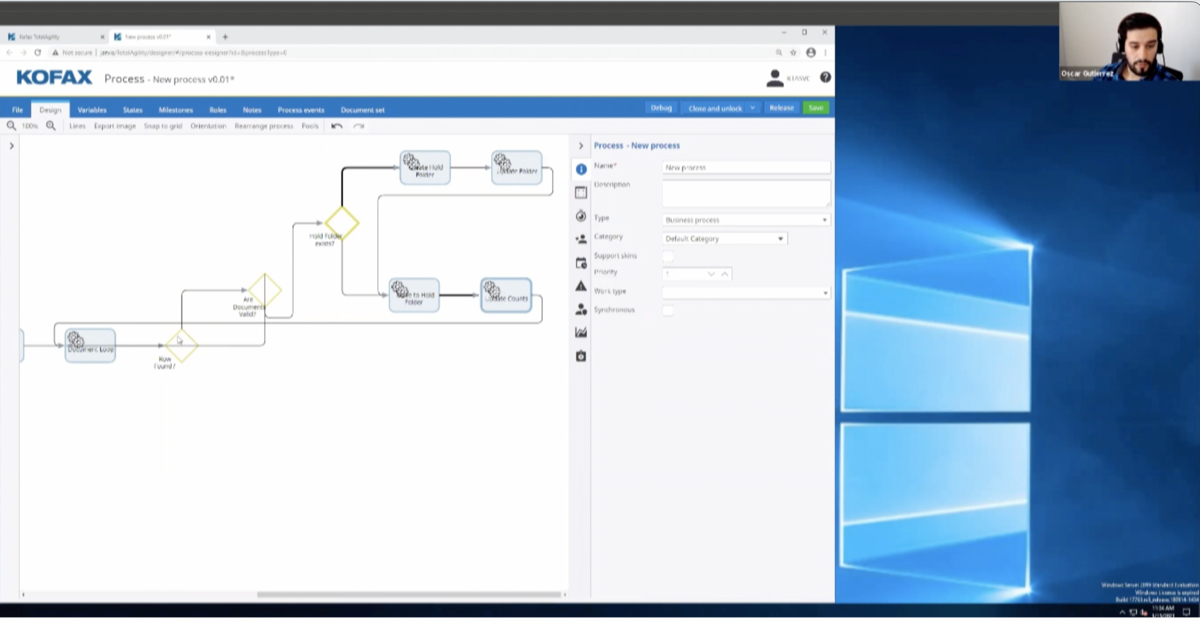
And… action. Hello everybody and welcome to today’s office hours. My name is Oscar Gutierrez I’m a senior consultant with RPA and today we’re going to be talking about the total agility designer. We’re going to take a deep dive into the workflow designer for the new KTA 7.8. If you haven’t upgraded already, we do have a webinar with what’s new in 7.8 and why you should be considering an… you can find that on our website if you want to take a look at it at a later date. I’m a senior consultant with RPI specializing in KOFAX TotalAgility, RPA, amongst other software’s so let’s get started. So within 7.8, we do have a new menu on the left side as opposed to the icons that we had before.
Oscar Gutierrez:
So today we’re going to be selecting workflow and business processes. I’ve gone ahead and taken the liberty of creating a new category for this demo so we can start fresh and we can keep track of each of the processes that we’re creating today. Oh, without further ado, we’re going to go ahead and create a new process designer, which will give us a blank slate within TotalAgility. One of the first, the first things that I like in my processes, is actually starting the process with a session note. So today, the processes that we’re going to be working with, it’s going to be a process that will be started from the scanner. So we were not any [inaudible 00:01:50]. Thinking annually, so everything is going to be done in the scanner, we will create a document and a folder for that. And we’ll get into that shortly.
Oscar Gutierrez:
One of the things that I like to do is having a decision node initially to kick off your workflow, and this will make sure that we don’t have any blank pages, or any process [inaudible 00:02:16] created without actually having any pages. Before a scan user can click several times the scan button because the page was not loading and they created a couple of jobs that had no documents and yet up into suspended mode. Then they [inaudible 00:02:35] that those jobs… they didn’t know why they would be suspended. So one of the things is I’m going to go ahead and call this folder empty just because we are [inaudible 00:02:49] scanning in into a folder and we want to make sure that there’s actually any type of documents for that. Before we actually get into that, we’re going to go ahead and create an extraction group with just a couple of fields so that we can mimic the document creation, the folders for our process.
Oscar Gutierrez:
So again, I’m going to go ahead and select the new one and I’m going to be putting all of these within my office hours category. I’m going to go ahead and before I forget. I’m going to take my category, and I’m going to select my office hours category. I’m just to be a little bit self-explanatory, further down the line is going to call my folder, folder. So I’m going to go ahead and save this one and release as well to make sure that will be available to our process. Then we’re going to be creating a new extraction group as well. Again, I’m not going to touch up too much on the fields that we’re going to be utilizing for this extraction group because we do have another office hours scheduled for next month that you’ll be able to sign up and we can actually go in and setting up the fields and working with transformation designer. So today, I’m only going to take a few fields just so we can get an idea of what it would be creating an extraction group.
Oscar Gutierrez:
Again, one of the first things that I do because this is something that I tend to forget at times is changing the category. So we have the route document type. I’m going to create my document type one today. The initial demo is going to be a an invoice processing solution. So I’m just going to go ahead and call this my invoice document. We go ahead and create a field group. I’ll leave the name default for this one and one of my first fields that I’m going to be creating, again, this invoice number. Then I’m going to create invoice [inaudible 00:05:26] customer name, invoice amount, I’m going to make this a number and I think for now, that will be okay. Invoice number, we’re going to leave it as text just because in some instances, some of the invoice numbers do have alphanumeric characters. Invoice date, I’m going to go ahead and change it into a date type. Customer name, again, that’s going to be text just because of the type of fields that we’re going to need, then we’re going to have our invoice amount and the number type.
Oscar Gutierrez:
So again, I’m going to go ahead and lease this extraction group, close and unlock. And now I’m going to create the classification group for it. Again, I remove… I take them off the default category and I do my office hours category. Classification group, this is going to be my invoice classification group and I’m going to go ahead and add the extraction group that we just recently created. I’m going to go ahead and select OK. And at least this should now be available to our project. We do have… we can see the invoice the classification group, and we should see the group one. I’m actually going to go ahead and rename this just because group one is not very descriptive so I’m just going to call it my invoice extraction group.
Oscar Gutierrez:
I’m going to go ahead and save it and release. One of the nice features of about 7.8 is if you want to rerelease any associated classification groups, so we are going to hit yes. Now we don’t have to manually go in and release the classification groups again. That’s one of the newer features that has been attaches to later versions of KOFAX. Now we see our invoice extraction groups, so we can definitely go back over toward our new process, we’re going to go ahead and start creating some variables.
Oscar Gutierrez:
So, one of the variables the first variable set, I’m going to go ahead and create one to be my folder variable. Again, I’m just going to call it folder because I want it to be descriptive for what it is, at least for this purpose. It’s going to be my initialization variable because that’s what we’re going to be utilizing and scan and we’re going to go ahead and change the type into a folder.
Oscar Gutierrez:
We’re going to go ahead and select the default, one that we just created a couple of minutes ago, and we’re going to go ahead… now we have a folder. For this purpose, I’m also going to create a document variable that’s not going to be initialized because we’re going to be utilizing that throughout the process. But definitely, that’s something that we can touch upon a little bit later. Again, I’m just going to call this document and we’re going to be calling our… it’s a document type variable, you go over to our office hours category, and I’m going to select my document type.
Oscar Gutierrez:
I’m going to go ahead and select my invoice document. Now whenever we take a look at those, we will be able to see some of the values that they have. So in our first node, which is our folder empty variable, one of the things that we’re going to be doing. So we’re going to go ahead and add a rule for our variable, we’ll go to our folder, the system, and we’re going to check that the number of documents its greater than zero. You can validate, it’ll make sure that [inaudible 00:10:06] the initial folder, which we’re scanning [inaudible 00:10:12] have any comments, there’s going to be two actions. One is going to be that we’re going to end the process, we don’t want this to move forward [inaudible 00:10:23] to get suspended and the other one would actually go into our actual process.
Oscar Gutierrez:
So, if we have our… if the number of documents is above zero, we’re going to go ahead and have it go into our activity three, which will be our true selection. If not, that’s going to go… and like I said it’s going to go in and end the process. So far are every three… one of the things that we first have to do, at least with the type of documents and just general extraction and classification, we’re going to change this from an ordinary activity to a classification activity. We’re going to go ahead and rename this to classification.
Oscar Gutierrez:
The import folder again, it’s going to be our folder variable that we just created and we’re going to utilize… I’m just going to utilize a single page classification separation profile for our classification so no big deal. So again, one of the things that I do like to do within our knowledge is having the name be something descriptive because once you’re into the double digits of nodes, having some generic name or activity name, that’s not descriptive of what it’s actually doing, can get a little bit confusing and you have to go in and open up all of the other nodes and make sure that you’re selecting the right one.
Oscar Gutierrez:
We’re going for… and the next step, which is going to be a… let’s call that… let’s do an extraction activity now that we have our documents that are classified, we’re going to be able to extract those and get the fields that we want. And documents still [inaudible 00:12:21] we’re still going to be utilizing art for the processing. Again, we’re utilizing folder processing just because we want to group everything together at least for the classification and extraction. After these few steps, we’re going to be separating the documents and doing a couple loops, just so that we can actually examine each and every one of the documents in case that we need to reject a single document.
Oscar Gutierrez:
We want to go ahead and create another process for the rejected documents and so that way we don’t have documents that are either approved or rejected that are moving along with the same process. And we can actually streamline the process of the rejections being corrected, and the ones that don’t have any errors that can move forward into the rest of the process. So in order to do so, I’m going to create a new activity and this is going to be a loop, we’re going to be checking each one of the documents make sure that the extraction was corrected, or it was correct. Actually, before we get into the loop, I’m going to go ahead and set a manual activity.
Oscar Gutierrez:
So, we’re going to be doing a validation activity so that the user can go in and validate. We’re going to be assuming that the user is validating and rejecting the documents based on the values, pretty straightforward. In some instances, we could check to make sure that the PO number is not blank. If it is blank, we mark the field that the invoice as a non-PO invoice. But for this purposes, we’re just going to be allowing the users to do the validation and make sure that the documents are valid before moving forward.
Oscar Gutierrez:
Again, we’re going to be utilizing our folder and that should be a very simple classification, extraction and validation. We can do validation or we can do a document review node that will allow the users to make sure that the documents are just… that they scan correctly, they extracted correctly, but we’re going to allow them to do a validation. That way, if the system didn’t extract the workflow…. the data correctly, they can correct it before it actually moves for forward.
Oscar Gutierrez:
So now from here, we are going to start our loop so that we can actually start working with single documents as opposed to the folder variable. And the reason why we are… again, one of the reasons what we’re doing a folder as opposed to a document since the beginning is because we don’t want to have validations for each one of the documents, we have a validation for all of the documents within that batch and the users can easily jump from one document to another and validate a little bit quicker than if we were creating a validation form for each one of the documents.
Oscar Gutierrez:
So, we’re going to go ahead and create a loop. In order for us to be able to utilize this loop, we’re going to have several variables filled out here. And I’m going to go ahead and create those right after I change and add a descriptive name to my loop type. So let’s call this document loop. All right, as far is the variables for our documents we’re going to need a couple of variables to be created. One of them is going to be the loop start index, this is where the loops going to start and we can actually do this as a short number with a value of zero. And then we would have a loop Boolean, we need a Boolean in order to for us to be able to see if there’re any documents left within that folder.
Oscar Gutierrez:
So, I’m just going to call this document found and I’m going to call this…[inaudible 00:16:48] going to be a… again, it’s going to be a Boolean with a default value of false. So we can go back over to our designer, the complex variable that we’re going to be utilizing, it’s going to be the same folder that we had, that we’re working with. So we’re going to be going into that folder, we look at the system variables that are attached within that folder and we’re going to be selecting the documents that are within that folder.
Oscar Gutierrez:
So now once the initial index that we’re going to be utilizing for this loop, is that loop start index variable that I just created is centromeric variable that starts at zero. And depending on the amount of documents that we have, that’s going to be incremented each time that there is a document. So again, the current index is pretty much a starting value and in the updated index, we’re going to be utilizing that same variable just so that we can start incrementing because we will need that later on. And then now if we found a row for that loop, that means that there is a document found within that folder, we’re going to be selecting the document found Boolean.
Oscar Gutierrez:
So now we’re going to be selecting only a single column for a for our loop and when we set the column, the mapping for this is going to be an actual document variable that we created earlier today. So now, we have a very simple process that’s going to have a classification, extraction, validation and document loop. So since we want to make sure that the documents are valid within this process, I’m going to go ahead and create a decision node and I’m going to call this documents valid. Let’s call it our documents valid. So we’re going to be… actually, before we do that we have to make sure that there’re any rows.
Oscar Gutierrez:
So, we’re going to be… row found and we’re going to be selecting our row found variable and we’re going to select equals true, we validate it. So now we’re going to have… now that there’s still rows and we’re going to go ahead and now actually have another decision. Again, this is where we’re actually going to be checking if the documents are valid. And we’re since now we have the loop word working at a document level, we’re going to be open up our document variable and we’re going to go into the system variables available for that and we’re going to be utilizing the valid.
Oscar Gutierrez:
Then we’re going to go ahead, again, set it equal to true, we’re going to go ahead and validate it. I’m going to leave it the true path empty just for a second that we can actually create the… the processes are going to be created. So now we’re checking to see if the document is valid. If it is valid, there’s nothing really much that we want to do with it. So we’ll go ahead and just loop it back into our document, loop just to make sure that we can go into it, go back to the loop.
Oscar Gutierrez:
So, if the document is valid, we don’t want to touch it right now, we’re just trying to get those documents that are invalid at the moment. If the document is invalid, we’re going to have another loop right here, set up, just so that we can actually move these documents to a separate folder. So we’re going to create another folder and the documents that are invalid are going to be moved into that folder and we can create a process with that, for that rejected document. But at this point, we’re just going to move them into a specific folder.
Oscar Gutierrez:
So, we will have another decision node attached to this, I’m going to move this a little bit higher just so we can keep on… And we’re going to check if the whole folder exists. Okay, so we’re going to… so now that we have that, we’re going to go ahead and take our…. we’re going to need to create a couple of variables as well as in order to check with the whole folder to see if it actually exist or not. So we’re going to create a variable that’s going to be called hold folder count.
Oscar Gutierrez:
There’s going to be another numeric variable that’s going to start at zero and we’re going to be utilizing this for our decision node right here. And we’re going to be calling that and we’re going to be checking to see if the hold folder count is less than or equal to zero. If the hold folder count is zero or it doesn’t exist… if it doesn’t exist we’re going to have a node that it’s going to be creating that new variable that we wanted. Okay, so we’re going to be calling this… create hold folder.
Oscar Gutierrez:
This is actually going to be… we’re going to be utilizing the dotnet activity that KTA has, then we’re going to go ahead and configure it, we’re going to be utilizing the TotalAgility SDK, and we’re going to be utilizing the capture documents service, and we’re going to create a folder. For the session ID, we’re going to go into our server variables and we’re going to go into… we’re going to take our system session ID.
Oscar Gutierrez:
So, we don’t need much more information than that. The only thing that we’re going to be utilizing now is going to be the return parameter of the holder as that folder is going to be created. For this, we’re going to need another variable that’s going to have the ID for that folder. So I’m going to go ahead and take the create a new variable, which is actually going to be called hold folder ID and that’s going to be a string. So we’re going to go ahead, add the variable and that’s going to just go in and create the… as the case so that’s going to go ahead and start creating our folder for us. We need to… after this we need to update the folder ID. So even though it was just created and if the folder had been changed, we still need to update the folder right here.
Oscar Gutierrez:
We’re going to go ahead and create a folder and that would be an expression for us to be able to update the folder. I’m going to come back to the configuration of this in a little bit. So now the next step that we would need to do for this, I’m going to create another node which is actually called the node that’s going to be doing the moving portion of it. And I’m going to go ahead and put it down here because if the hold folder does exist. I’m going to go ahead and route it directly into the move folder as opposed to actually having to create the hold folder. We’re going to call this folder and this will be another dotnet activity. We’ll go into the configuration again of this in a second.
Oscar Gutierrez:
Now the last step for this process for us to be able to move those documents into the hold folder, we’re going to need the annex and other expression activity to update the accounts. And this will be another expression activity. So now that we’ve gone ahead and moved it out of our regular folder and into the hold folder, what we will do is we need to close out the loop for this section. So we’ll go ahead and take this all the way back to our document loop. So again, just to give you a little bit of overview what this part of the process is doing, is the loop is opening up the folder and checking each one of the documents that are within that folder, and seeing if the document… first, it’s going to check to see if that that folder does have any documents or if there’s another row found within the document.
Oscar Gutierrez:
If there is, let’s say it’s the first document that’s being opened up, it’s going to go ahead and then check to see if the documents valid and if the document is valid, it’s going to go ahead and go back over to the loop, no issue with that document. If the document is not valid or if it was rejected, it’ll go into another decision node where it will check to see if the document hold folder… or if the whole folder exists. If it doesn’t, it’s going to go ahead and create the hold folder, update the folder and move it to a folder and then update the counts.
Oscar Gutierrez:
If the whole folder does exist, we’re going to go ahead and skip these two notes that we have right here and move directly into the move… to hold folder activity and the update counts. So if the row is found, we’re going to go ahead and move it over to the documents valid node. Now if the document is valid, we would move it back over to the loop. If it’s false, it’ll go over to our home folder excess. Because there’s logic that we’re doing, we can modify this so that we can have different statements but for the whole folder if it does exist, if this situation is true, so if the whole folder count is equal to zero or less than zero for that matter, that means it wouldn’t exist.
Oscar Gutierrez:
So, we go over and the true statement for this is going to be the create hold folder for us. Okay, so we have the create hold folder created, now the update folder. Again, this is a little bit of a repetitive process but we’re actually going to select that a… we’re going to go ahead and create another variable. Now that’s going to be a hold folder. This is going to be a folder. A folder variable just so that we can hold the documents and we’re just going to leave the default valid blank.
Oscar Gutierrez:
So, we select that, we go back over to our designer, and the update expression for our configuration with target variable is going to be our hold folder and we’re going to be selecting the whole folder ID. And what this will do is it will tell that the whole folder that we have here has this ID, we’re going to go ahead and test that, everything’s valid. Okay, so now we actually have a new folder defined within this work session section of the node and we would move over to the dotnet activity to actually configure that node. Again, we’re going to be utilizing the standard activity… TotalAgility SDK that we have and we’re going to continue utilizing the captured document service. Except for the method today, right now we’re actually going to be utilizing the move document.
Oscar Gutierrez:
Again, we’re going to be selecting our server variable so that we select change our category, and we select our system session ID. The next thing that we’re going to be doing, we’re going to be putting the document ID here, the document that we want to move, so we go back over to our process variables and we select our document. Then the hold folder ID that we’re going to be selecting is going to be the hold folder ID variable that we have, and the insert index, it’s going to be… that’s going to get incremented it’s going to be our hold folder count so that it knows and into which step is going to be put into.
Oscar Gutierrez:
So, we have this and now the kind of counts that we need to update, we’re going to update the hold folder count against an expression, we’re going to be updating that count. So we will go into our hold folder count, we select the whole folder count variable, and since we want to be… for to increase, we can just do plus one. That way it will take the current value of our hold folder count and add one to it. Again, we test this and we validate the expression and we can go ahead and add it. So now our system is actually creating a process where it’s actually going into each one of the documents in the loop checking to see if it’s rejected. If it’s rejected, it moves it into a different folder.
Oscar Gutierrez:
So now that we have that we can actually go back into our main process and we can actually go ahead and we’re here. We would need to still [inaudible 00:33:16] select since we’re… again, we’re trying to work with folders just so that we can minimize the amount of processes that get created and the validation users to get to be more efficient with the validation we’re not creating a single process rejected process. For each one of these, we’re going to be utilizing a single process for all of the rejected documents within that folder.
Oscar Gutierrez:
Now that we have here, one of the things that we want to do is we want to go ahead and create another decision node. And to see if the rejected documents exist to see if the whole folder actually has any documents. So we can call them hold empty. Okay, and again have the whole folder if it’s greater or greater than zero we validate this. So now is the holder count that we got updated here is above zero, definitely we are going to go ahead and create a new process. We will create the… we would create the rejection process.
Oscar:
If not, if the whole folder doesn’t have any rebels, we can actually go ahead and start our process to either connect to an earpiece system via the SDK and API or any direct integrations or just do a direct export. For the purposes of this, I’m just going to go ahead and create an export activity and I’m going to go ahead and select my export activity for these documents. So now that we have this, we would actually go ahead and select create new job.
Oscar Gutierrez:
For job type, we’re going to create new job and we would… I’m going to utilize a preexisting production process that I already have just so that I actually… we can demonstrate this. So now we’re going to be selecting the hold folder. So we’re going to create a new process within the home folder so that all of those documents that have been rejected can then go into the rejection process and we move forward. The documents that we still have in our folder are going to go ahead and get exported within the configuration of this one.
Oscar Gutierrez:
So, I’m going to go ahead and select the folder document, the folder variable, and export order by document holder. So we will need a couple of variables as the export success editor document is not exported and [inaudible 00:36:39]. So I’m going to go ahead and create those. The success indicator, it would be… document exported. Again, it’s going to be a Boolean, we’re going to [inaudible 00:37:00] and that will hold the information as to whether document was exported or not and then we would need a complex variable for the documents that did get exported. And another complex variable with documents not exported [inaudible 00:37:32] created.
Oscar Gutierrez:
So, you go back here, we select document exported, documents not exported, we go again with our complex variable and the documents exported, we go to our complex variable. Before the export actually happens you can introduce a PDF activity if you want to create your PDF out of those invoices. Again, KOFAX works best if whenever you’re extracting and classifying your documents, you have a TIFF image. And so that would mean if you are receiving it through a PDF through an email inbox, it’s always best to transform it into a PDF and then create the PDF after the fact if you need to export it as a PDF.
Oscar Gutierrez:
So, from here the only thing that we’re missing is we’re going to need an EndNote for our process. So again, once our documents are exported we can go ahead and export it as well. So if the whole folder is not empty, if the value is greater than zero, the [true 00:38:43] is going to be create the rejection process and then it’ll end it. Actually, we would create the dread rip rejection process. But if we do have any holds, we don’t want it to create the rejection processes and then end it because those documents that were still in our folder, the on rejected documents are not going to get exploited this way.
Oscar Gutierrez:
So, I’m going to go ahead and remove the connection to the end node, and I would still do a connection through export so that it will create the rejection process, we move those documents that are in the hold folder to a new process. But we still want those documents to… that the valid documents to export. So we go in from the rejection process over to your export and then to the unknown. So I’m going to go ahead and move everything here to the front and again, this is just a very, very simple process that will allow you to [inaudible 00:39:49] extract, validate your documents, make sure that all work correct.
Oscar Gutierrez:
The purpose of the section up here that we have up here of the hold folder count would just be if you need to streamline the process of separating those documents that were rejected or that needed any type of correction from the ones that documents that were extracted and validated correctly. We wouldn’t want to bog down the documents that got extracted successfully, until the hold… the invalid documents get corrected because that can delay the payment process for invoices or the purchasing process depending on purpose. So definitely want to go ahead and move those documents to another folder.
Oscar Gutierrez:
That way we can create a rejection process that can be handled in a timely manner but the documents that are valid are going to go ahead and move forward to the process of going to a different ERP or going to a little bit… to just an export location immediately after validation. Again, this process of actually creating the hold folder and creating the rejection processes, everything’s automated process that’s going to be a matter of seconds. So it wouldn’t delay the process of those documents to being rejected. So again, I’m going to go ahead and save my process, see if there’re any errors.
Oscar Gutierrez:
We didn’t map any classification groups so let’s go ahead and do that and we didn’t change the new process name. Okay, so we’re going to go ahead and the classification group… so we would need to go into the process so we’re going to call this… let’s call this office hours invoice processing, we’re going to move it into our office hours category and we’re going to be selecting our classification group that we created earlier in our office hours category. Okay, so we have everything here, go ahead and save it. Process actually now saved successfully, so we can go ahead and release it.
Oscar Gutierrez:
So, all right guys, so now we have a very basic process that’s going to do classification, extraction and validation, then it will move all of the invalid documents to a separate hold folder and create a rejection process for those rejected documents and export the valid documents without any delay. The purpose why we’re moving the rejected documents to a different folder in a different process is because we don’t want to hold the valid documents until the invalid documents get corrected or addressed. Therefore, we create a separate process so they can get the handled in their own timely manner but the valid documents can move forward and your process can continue on its way whether it’s paying the vendors or paying your suppliers.
Oscar Gutierrez:
We’re ending today with an export, but you can definitely add more nodes here to connect your ERP system, utilize an API, or continue adding more logic depending on the needs of your business. But for today, we’re just going to be exporting to a file to our file system that we have right here. Depending on when you’re watching this, we will have a separate office hours dealing with the extraction through transformation designer. So stay tuned that might still… that might already be on our website or coming up, thank you.