Speaker 1:
In this demo we’ll be looking at how to create a basic lifecycle inside the on base studio. The lifecycle we are going to create, is an AP vendor invoice approval workflow. We begin in on base studio. From the start page I’ll select create a lifecycle to begin. I’ll provide the workflow a name, vendor invoice review. And ensure that I’ve selected the create a unity lifecycle as this provides additional functionality from the most basic of lifecycle workflows.
For the purposes of this demonstration, we are only going to have three workflow cues. By default, we are provided the initial cue. So I’ll create two more. AP review, and AP manager review. On the next screen I’ll select the AP vendor invoice document type, and add it to our lifecycle. The last configuration here is access.
I’ll add two different user groups to this lifecycle workflow. AP associates, and manager. After clicking next I can see a summary of this configuration as a final opportunity to notice any mistakes, or changes that might be required. Clicking finish will create our new lifecycle. Now that the lifecycle exists we need to set up the cues in a logical way.
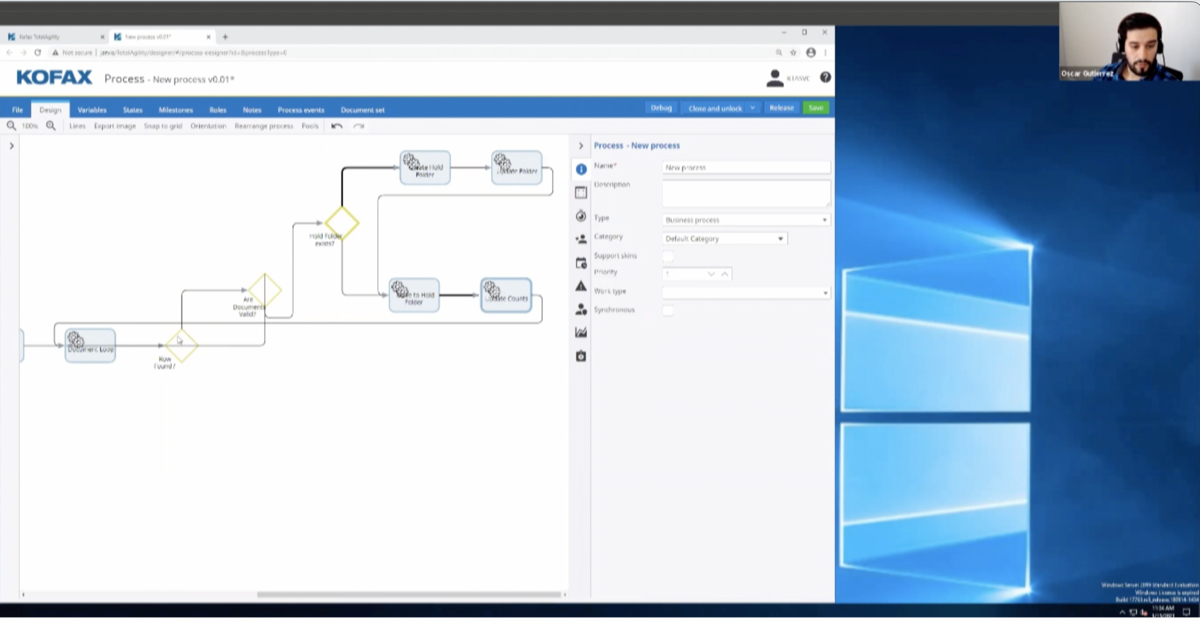
We begin with all of our cues stacked on top of each other. I will align them in a nice triangle setup, so we can easily see each cue, and understand the flow begins at the top with the initial cue, and then flows down to the others. To configure a cue I just double click on it. This brings up the properties pane for the cue on the right. I will add a description, and help text for the initial cue. After that I’ll go to the icon tab, and select a unique icon for this cue.
Since this is an automated cue that is checking for the invoice amount, the analyzed icon should work just fine. I’ll then save my settings. It is important to save your changes often. Next I’ll select the AP review cue, and configure it by entering a description, and help text. I will also select a unique icon for this cue. It is a standard user cue, so I’ll select a nice person icon.
I want to do the same thing for the AP manager review cue too, except provide its own description, help text, and unique icon. After configuring both user cues, I will save my changes. Now I want to connect my cues with transition routes. This is done from the design tab on the ribbon. I’ll select transition, and then insure that I have the initial cue selected.
Then I will drag, and drop the transition route from the initial cue, to the AP review cue. After it’s set, I’ll select transaction again, and draw the route from the initial cue, to the AP manager review cue. At this point we can begin setting up the custom configuration for each cue beginning with the initial cue, which we noted in the description as an automated cue.
In this case I’ll navigate to the repositories pane on the left, find our vendor invoice review lifecycle, expand the initial cue, and select system work. I want this cue to route documents based on the invoice amount, so we need a rule. I can create a rule by accessing the lifecycle tab on the ribbon, and selecting the rule button.
I will name the rule, is this invoice at, or over $1,000? Pressing enter will submit that value. With the rule created, I can configure its properties on the right. First is the rule type. We want this rule to evaluate the invoice amount, which is a keyword. So I’ll select check keyword value.
The keyword type in question is, invoice amount. And the operator is going to be greater than, or equal to. Finally, I’ll enter 1,000 into the compared to field. This configures my rule to check the invoice amount keywords value, and determine if it is equal to, or greater than $1,000. I’ll save this configuration. With the rule configured, I need to determine what happens after the rule is evaluated.
I’ll select true from the pane on the left, and return to the lifecycle tab on the ribbon. From here I’ll select the action button. I will name this first action send to manager. Over on the properties pane, I’ll set the action type to transition item, which essentially means to route the invoice. The destination cue is going to be AP manager review, because that is where we want the invoices to go, if the invoice amount is equal to, or more than $1,000.
I will save this, and then select the false condition. With on false selected I can add an action called send to AP review. This is also a transition item type, but I want the destination to be the AP review cue. For invoices under $1,000. With the initial cues configuration now complete, and saved it is time to set up the approve, and deny tasks on the other two cues.
Ad Hoc tasks in this case will allow users to approve, or deny an invoice. I will begin with the AP review cue by selecting Ad Hoc user tasks under that cue on the left. On the lifecycle section of the ribbon, I will select the Ad Hoc tasks button. Here I want to create a new ad hoc task. I will name it, and provide help text.
I will assign all our users to it, and finish the creation of the task. With the task created I’ll set the icon. This task is for an approval. I’ll select the check mark, and save my changes. Next I need to set up an action for this task. This action will replace the status keywords value with a [inaudible 00:06:50] before.
I also want the invoice to exit the lifecycle after this. So I’ll create a second action called exit workflow. This action type is remove item from lifecycle, and the lifecycle in question is the vendor invoice review. I will save my changes.
Now it is time to set up the deny task, and actions. It’s going to be very similar to the approve. I will create a new Ad Hoc tasks called deny. I will assign our users. And set a unique icon. An X mark since this is a deny. Then I’ll create new actions for this task. The first deny, will set the keyword status value to denied. Clearing out whatever value was there before. Similar to the approve task.
However, instead of creating the exit workflow action all over again, we can reuse the one we created for the approve task. All we have to do is create a new action under the deny task, but instead of entering a name, select the drop down, and choose the exit workflow action. This feature allows us to reuse different actions when they are needed in multiple scenarios.
We can take this a step further in the AP manager review cue. Instead of creating a new Ad Hoc task, I’ll select use an existing Ad Hoc task. Doing this displays the two tasks we created for the AP review cue approve, and deny. I will select the approve task, and finish that. It is added with all of its actions, and configurations.
I will do this a second time, but select the deny task. This is a quick, and efficient way to reuse configurations. I do not need to modify the tasks, or actions for either of these approve, or deny scenarios. I will save my changes before closing out of the on base studio.
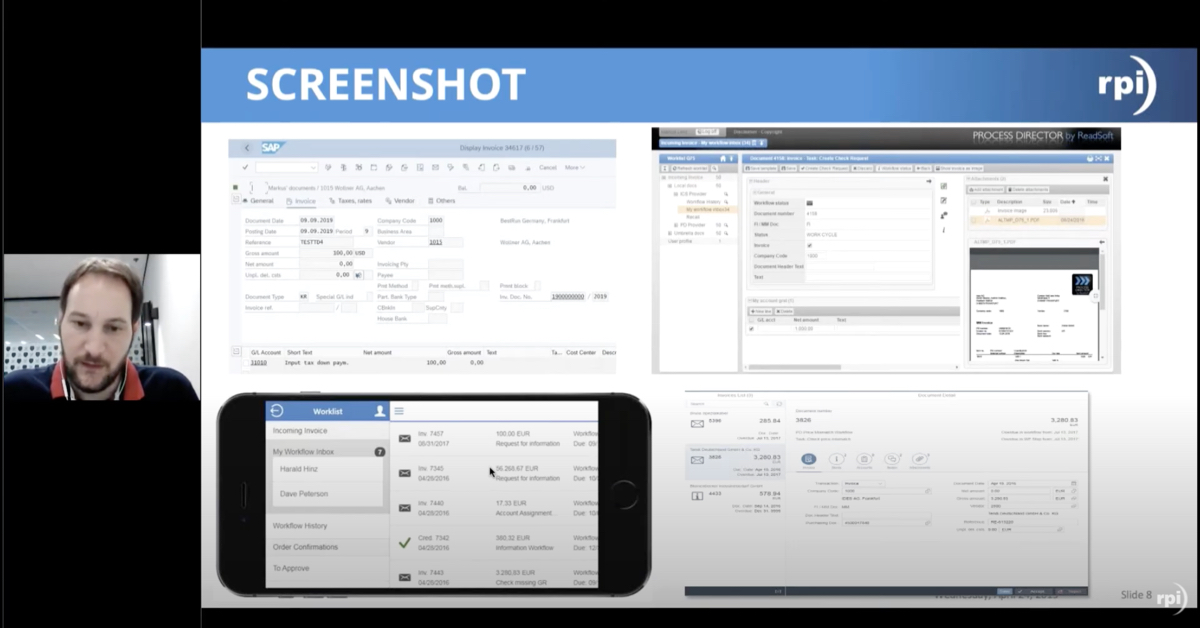
Now, let’s say you were a user, and need to review invoices for payment. We can do this from the unity client’s workflow section, which I have up here. I’ve got an approval workflow selected, and you can see there a single document currently resides in the AP manager review cue for this lifecycle. Why? Well, the invoice amount is for $1,183, which is more than the $1,000 rule we had put into place during the earlier parts of this demonstration.
With the document open I can review the image, its data, and even the notes that’s applied to it. There is a note here, and it points out that the PO is missing for this invoice. That’s a significant piece of information. I now can either approve, or deny this invoice. Given that it is over $1,000, and we have no matching PO, I am going to deny this invoice. Per our design the document is set to a status of denied. And finally, it is removed from this workflow lifecycle.
This concludes our on base workflow demonstration video. Thank you.