Speaker 1:
Hello, and thank you for joining the OnBase Unity Forms demonstration. In order to design an OnBase Unity Form, you would have to log in to the OnBase Unity Clients. Once you log into the OnBase Unity Client, you would then need to select file, administration, form designer. You’ve many options on the toolbar, but to create a new form, you would select create, you would then select the Unity Form, or you could select image form if you were creating an image form, but today we’re going to do a Unity Form. You can filter by the document type groups, and I’m going to pick an insurance claim. From there, then you can filter by the document types. And today, I’m going to select this claim for the incident scene diagram. You can then type in your template name. This is the name of the form that users will see when they go to select the Unity Form that they’re filling out. I’m going to just name my form a Scene Diagram.
You have options to select different themes. There are some preset themes, and then there are themes that you’re able to create on your own. The ones that are preset, we’ll say system next to them. And I’m just going to use the first one here. And then the last thing I want to mention is there’s this checkbox to add keywords. If you check the Add Keywords check box, then any keywords that are associated with the document type of insurance claims will automatically be added to the form. So, I’m going to go ahead and check it for today and select, OK. My Form Designer will then open and you’ll notice that the keywords associated with the document type have all been listed on the screen already for me. So, we have Insured Name, Policy Number, Claim Number, and Date of Loss. When you create a new Unity Form, the submit button will also always be on the form, but that is something you can go ahead and remove at any time.
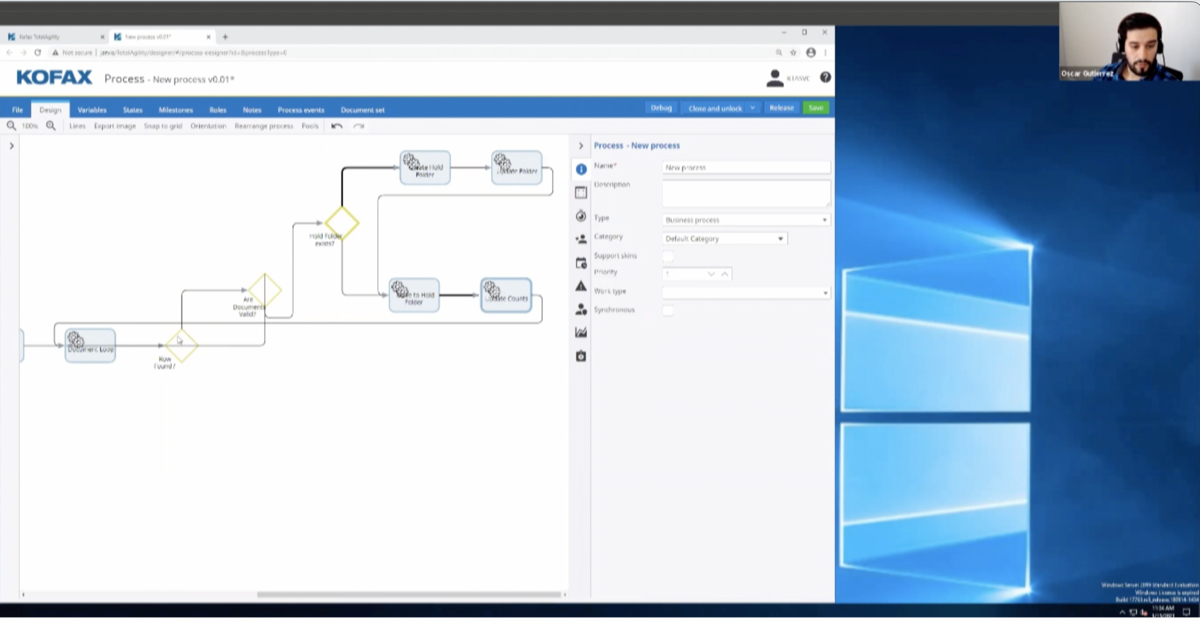
First, I’m going to select a section so you can hit the section button and then slide it onto your form. You’ll notice right now; this section is called untitled section. So, let’s go ahead and change that information or label to name it, claim section. Then ID field also, we should probably add some type of information because we want it to be able to see what ID we’re using when we’re creating a custom action or any report. So now, we’ve created our claim section. On the section, there’s a couple of options. We can make it read only, so people are able to see this section, but not able to fill it in. We can set the default visual state so it can be expanded. So as soon as they open the form, they see everything in the section, or we can make a collapse where they would have to hit the section to expand everything.
In this scenario, we’re going to leave it expanded so everybody can see it. And we’re also going to uncheck the box, so nobody’s able to collapse this section. So, that way all the information will always be visible on the form when it is open. You can also set security around a section of who’s able to fill it out or see that particular section. You can add panels to a section area, all I did was click the panel button and then clicked on the area within the section where I want to add the panel. Again, we should really change the ID type, just be something else. So, we can call it claim panel.
And then right now we’re only seeing one column in our section. In order to add multiple columns, let’s go ahead and click the edit pencil next to the columns, select how many columns we want. So, for today we will select two columns and you’ll notice there’s a message in the preview window saying that the total width cannot exceed a 100%. So, if you did the math, column one and column two are over a 100%, so that’s why that error is popping up. So, for this demonstration, let’s just make them both 50% so they’re equal, but you can make the width of these columns any length that you would like. And now let’s move some of the keywords that pre-populate on the form because we checked that box into our panels on our Unity Form.
So, I have moved claim number down to the claim section and I have moved the date of loss keyword down to the claim section as well. Now, we are left with our insured name, which is a select list option. And we also have our policy number, which is also a select list. We have our date of loss text box and our claim number text box. Next, we can go ahead and add check boxes to our form. So I’m going to select the check box option and drag it on the form where I want. I can label our check box anything we would like. So, let’s just say, we’re going to make a check box to identify if the driver was 16 years or older. I’m going to go ahead and type that into my label area. And now I’m going to add another check box. So, it’s the same thing, I want to change the label of this check box to be something else. So, let’s name it, Driver 21 and older.
And just for less confusion, actually, let’s name it Driver 16-20. And again, let’s go ahead and update that ID box, so that way, if we’re doing any custom actions, we know what check boxes we’re looking at for both of these check boxes. So now we have two check boxes on our form for drivers that are 16-20 years old and drivers that are 21 and older. Let’s test drive this form before we move forward. So you’ll notice if I check the box for drivers 16-20 and driver 21 and older, I’m able to submit the form without any issues, but that doesn’t make a whole lot of sense, because I can’t have a driver who’s both 16-20 or 21 and over. So, in order to get the check boxes to work where if you select one, the other one cannot be selected, you would have to use a custom action.
Custom actions are great for these types of scenarios. However, it does add a lot of extra work. So, let’s go ahead and add a radio button group instead. So, I can create radio buttons for my different options. So, I’m going to create three radio buttons. Again, one could be maybe labeled, let’s see, what should we label this one, 16-20, and then maybe another one could be labeled 21-30. And then the last one, we can go ahead and label this one to be over 30. When we have them all configured, we would go ahead and hit Enter, and then Finish.
Now, you’ll see, I have radio buttons. So, if I did a test drive on these, if I select this 16-20 radio button and then I try to select the 21-30, the 16-20 radio button is no longer checked. So, radio buttons are great when you only want one value to be selected. It’s a lot easier than creating our custom actions when using check boxes. So, let’s go ahead and close our test drive.
And let’s go ahead and get rid of these check boxes because we’re not going to need them any longer, because we created the radio button group instead. And like I mentioned before, it’s always best of course, to change the label of the radio button group. You don’t even have to leave the radio button group in the label, you could call it anything you wanted. And then again, let’s update the ID, so that way we know when we’re creating custom actions or any type of reporting, what this idea is actually for. I do also recommend making the first letter of every word capitalized, just because it’s easier to read. So, Driver age, Radio button group is a lot easier to see than if you had everything lowercase, because you cannot add spaces in the ID field. There’re some other options here. You can change the orientation to be horizontal. So, if you wanted the age or the radio buttons to go horizontal on the screen, instead of vertical, I kind of like the vertical look for this form.
If you needed to change anything, you would select the pencil next to the configure radio button to update those values. But I think everything looks okay on the radio button groups. So now let’s go ahead and make the claim number required so that way when we fill out the form, we have certain criteria that’s needed before we can hit the submit button. So now that I’ve went to the bottom of a text box here and check the Required button, you’ll see a red asterisk next to the claim number. And I can do that pretty much on any field that are on my Unity Form. The next thing I’m adding is a paragraph. Paragraph is nice because you can add just exactly what it says, a paragraph. This is some additional information on the form. So, I’m going to go ahead and add the paragraph to the top of the Unity Form, hit the edit button next to the empty paragraph. And then I’m going to start typing in what I want my paragraph to say. So maybe this is a legal document between company X, and the driver.
This is a really nice view, and this looks very similar to how most word documents look. When configuring a paragraph, you can add a hyperlink, so maybe it’s going to take you to the insurance company’s website. You can go ahead and change the font color. Let’s select this pretty tealish blue color. Maybe I really want to call out that it’s a legal document. So, I can make it bold, I can underline it. I could have italicized it. I can change the font size. I can even change the type of font. So again, all the functions you’re used to when creating a document. And then of course we can cancel if we don’t want to save what we just did, or we could go ahead and save these changes to this paragraph. So now it’s at the top of the screen. It looks exactly how I just built it in my edit area.
We do have an option to add an image. So, if we would like to add an image of something. Maybe you want to add your insurance company’s logo or some other type of image, you could go ahead and select that. The images do need to be uploaded into OnBase prior to selecting them on this form. We could also add a signature under our Unity Form, which is probably a good idea for making a claim because we would probably want the signature of the driver. So, let’s go ahead and add the signature area up where it says insured name and policy number. So again, I’m just clicking in the box where I want it. I could update my label to say driver’s signature or just driver, anything I want to call it.
I can update my ID information again, maybe capital, sorry, meant to put a D, not enough. Capital D for driver, capital S on signature. I could also remove the 19 if I wanted, that’s not necessary. And then for this instance, I did make it required, so you’ll see the asterisk. On the Unity Forms, there some other options like Calculated Field. So, let’s just say I’m adding all the amounts of damage that’s done. So, I need a new windshield for $500. I need a new mirror for $200. All these different amounts in these fields could then be calculated to a total. So, if I had five things, each a $100 apiece, they could calculate to $500. There’s a submit button, so you can always remove the submit button on the form and add a new one. There’s an option to be able to print this form depending on how you have your environment set up.
There’s a drawing capability. So, on an insurance form, that might be a good idea because you could have a drawing of a car and then you can allow the users to draw on that image. So, they could mark up where the damage was done, or maybe you want an attachment option. So, you can attach pictures that you’ve taken of the damage to the car. There’s a barcode reader, which really does not have much value to probably an insurance form right now, but maybe there is a use case for that. I’m sure there is for hospitals. And then of course, there’s also the logic to capture if this is a computer or a person filling out the form.
So, let’s go ahead and test drive this one more time with our required fields on here now. I’m only going to use the radio group button, submit the form and everything that is in red is required. So, let’s add a claim number. Let’s go ahead and add a signature, which does not really look like one. Let’s apply our signature. And now let’s go ahead and submit the form and you’ll see that the form was submitted, and everything’s been processed correctly.
If I’m happy with this form, I can go ahead and publish the form. I can assign user groups to it, who I want to be able to see it. I could create a URL if I wanted to be able to access this form externally or even just outside of the OnBase Unity Clients. But for today, we’re just going to actually go ahead and look at an existing form that’s already been created in the system. So, I went to my home screen and my personal page. I can then select forms to create a new form. You’ll see here, I have quite a few forms to choose from. Some of them say image form, some of them are just the regular forms. So, let’s see what one I want to choose. I have HR, Employee Relations, Information Systems. What was back at the top? Accounts Payable and Contracts?
I think I would like to go with this Vendor Incident Report Form. I’m going to go ahead and select that. I can go ahead and type in a short description. I don’t see any required fields on this form, so technically I could submit this at any time, but let’s go ahead and fill out the fields here. I have a vendor drop down. So, the select list, and I’m going to go ahead and pick Fast Travel for my vendor. And what type of issue did I experience? So, let’s say this is a billing issue. Maybe I was over-billed or who knows some type of billing problem. And this is associated with PO number, 123456. When I select the date of incident, I actually get a calendar to view, which is a lot easier than having to remember a date. Now you have that visual and I can check if this is emergency. So sure. Why not? Let’s check that. I can put in a little bit more information into the description. So, this is a multiple text box.
So, I can type in something like that they overbilled me for my travel, or just overbilled me, whatever you want to write in here. It is a free text box. I don’t want to put anything in the admin area, so let’s go ahead and submit the form. I get a visual that my form has being saved and now I’m all set. So again, to access the OnBase Unity Form Designer, you do have to go through the Unity Client as of right now. In order to fill out a Unity Form, you have multiple methods. You can log into the Unity Client to fill out a form. You can fill out a form on the Web Client, and you can also use a URL to open a form. Thank you so much for joining me today. And I hope you have a great day.