John:
I think we’re going to get started. So normally, I have no problem with these presentations running over but personally, I have something right after this. So, I want to maximize our time together. So, today’s office hour’s presentation is on Microsoft Power Automate. Power Automate is also known as Flow. Flow appears to be the old name and Microsoft is going through a rebranding effort. However, Flow is used pretty heavily in a lot of places, especially you’ll see it on the side of Microsoft Teams.
So, we’re going to walk through building a couple of simple flows. Of course, these office hours presentations are meant to be very interactive. So, if you want to see something or you want me to expand on something that you see that you want to know more about, please feel free to chime in. Easiest way is to use the questions pane instead of GoToWebinar. Additionally, I hope to finish the core of my presentation in about 30 minutes so that if there is something that you want to try and build or we can explore together, then we can do that.
So, what is Power Automate? Well, first thing we can do is, and I am sharing my screen. Okay. I might go to window so I can see questions if they come in. Looks like we’ve got one. Yes, is this recorded, can this be shared later? It is recording. All of our webinars are shared, you should receive an email after the presentation is over. These are also always on our YouTube and available on our website rpic.com. So yes, great question.
Alrighty. So, the place to start is to go to flow.microsoft.com. So, like I said, they are going through a rebranding apparently. I actually think Flow is a better name than Power Automate but it does bring them in line with some of their other tools, Power BI and Power apps. Anyway. So, what is Power Automate?
Power Automate is, I would describe it best as workflow. So, I’m trying to get the questions pane to work properly. I would call it digital workflow, it’s also a process automation. I wouldn’t necessarily call it RPA or robotic process automation. It is that but if you compare it to other tools that call themselves explicitly RPA like UIPath or Kofax RPA which we work with quite a bit, it isn’t exactly the same.
And they seem to fit in a little bit different niches. The primary difference is going to be that most of the core RPA products approach automation from the standpoint of user activity automation. And it approaches it from the standpoint of desktop automation. If it’s not necessarily using desktop APIs, maybe it’s just using all web APIs, maybe it’s doing web service calls, whatever. Most RPA tools are built from that perspective, at least most the ones that we’ve worked with.
Well, on the other hand, I would describe it as being more of a workflow tool and really, more of an integration tool. And so, they can do a lot of the same things and like we always tell people as part of a digital transformation effort, there isn’t necessarily any one tool that’s going to solve all of our problems. A combination of process automation tools sometimes is the recommendation to solve different types of problems.
The main reasons that I really like Power Automate are that number one, in its current iteration, it is all SaaS. So, if you have Office 365, anything but I think the most basic level, you should have access to what I’m showing you today and you can build that and I believe it’s free or at least you get a certain amount of processing included with your subscription. There are some premium things that cost extra which I’ll show a little bit. But for the most part, if you are an Office 365 subscriber, especially as part of any enterprise or a small business, you should have access to this.
So, there is no incremental costs to getting started. It’s just your time. Whereas even the cheapest RPA tools, you’re probably going to be buying a license. Maybe there is a trial, but this is free to use until Microsoft finds a new model to start charging for.
So, that’s awesome. I also like it because it is…so, it’s all SaaS, it’s all Cloud. It’s gooey, the user interface is really good. There are some things I don’t like about it, but we’ll talk about that a little more. But more than anything, it has a huge library of prebuilt integrations, especially with Microsoft’s own products but it really doesn’t stop there.
So, you’ll see there is prebuilt integrations for Trello or Gmail or virtually any major tool that exists. And there is more coming out all the time. And like I said, the real power, I think, is the prebuilt integrations with Microsoft products. So, you can link together, fill the spaces between Outlook 365 and Teams and SharePoint and Planner or Project or whatever tools you’re using. And I think it’s just really, really easy to get started. So, we’re going to jump in.
Making sure there aren’t any questions. No. I don’t know what’s going on. For any of the…if the organizer is still on, my questions pane is all goofy and I don’t think it’s actually showing. So, if I do get questions throughout, please ping me on Teams or just chime in. Okay.
Speaker 2:
We got it.
John:
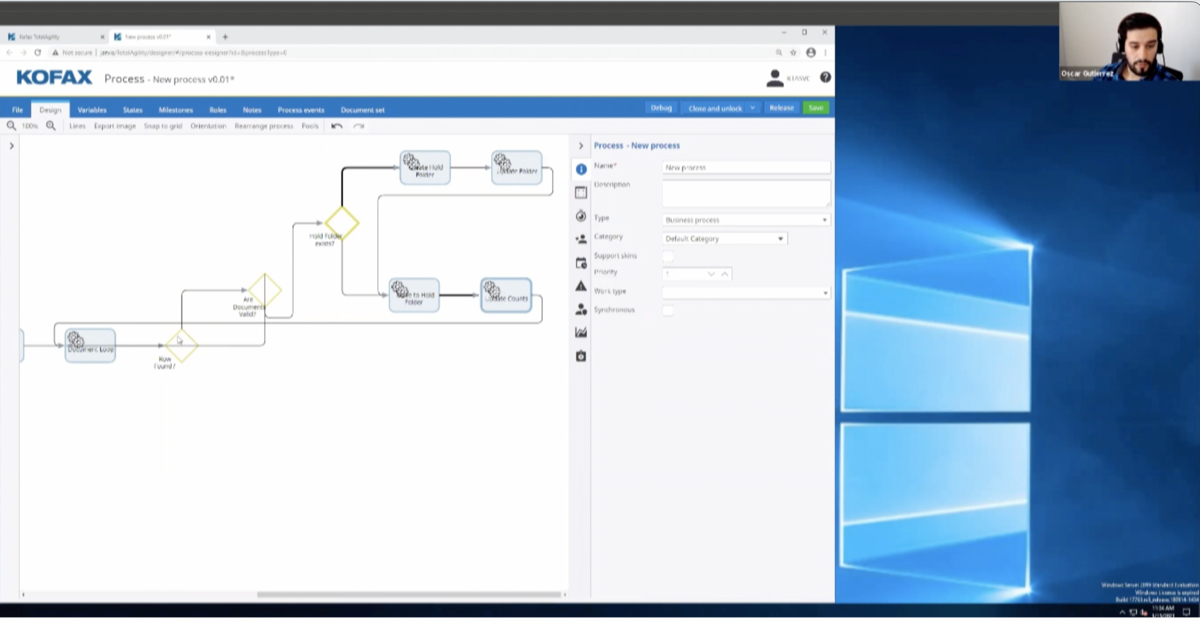
So, flow.microsoft.com. There is a lot of stuff over here on this toolbar. We’re not going to dive into every single thing on this webinar. We’re going to go directly My Flows. And under My Flows, you’ll see that there are a few things I’ve already built. And if I didn’t mention this, I have built multiple flows to be used internally at RPI for systems automation. It is so easy to get started that I just jumped in and started automating and I have connected our…well, I’ll save these cases until after we walked through what it can do.
So today, I’m actually going to build a simple customer service app so that when a customer service ticket or request or complaint or something comes into our system, that it gets assigned to a customer service representative. And this isn’t necessarily…I’m building this very simply as if you don’t have a ticketing system or something like that. But this can be used even on top of that. So, if you already have a help desk platform or something of that nature where you’re receiving those tickets, you could still do the same kinds of things I’m doing today to help further automate. So, it’s not exclusive of those who already have a platform.
So, what we’re going to start with…you’ll see that there are My Flows, Team Flows, Business Process Flows, UI Flows. I talked a little bit about how this isn’t necessarily an RPA product from the standpoint of desktop automation. Microsoft has other products for that. So, there is something called Win Automate which is a more traditional desktop automation tool. You can use that in combination with Flow, we’re not going to touch on that today.
They also just acquired another robotic process automation product. I can’t remember the name of the top of my head. But the intention is to merge all of these together to be a more comprehensive single automation tool. However, even without that, I think that this is great. So, the primary ones we’re going to focus on…so UI Flows are part of that as well. Primary ones we’re going to focus on are My Flows and Team Flows. Really, the only difference is My Flows are personal to me and restricted to being accessed and used only by me. Team Flows, I can take one of My Flows and promote it up and share it with other people.
So, Team Flows are anything that have been shared with anybody and it could be shared with a group or an individual or anything like that. So, Team Flows are shared with you, right? So, we’re going to stick to My Flows. We’re going to do a new flow and there is a lot of options here. I’m going to just talk about a couple. Instant is triggered from a button. And that button can be published inside of other applications such as inside of Teams, you can have a Flow page that has Power Automate buttons on it. You can do it from an app. So, I have the Power Automate app on my phone and I can use it to trigger flows or we receive notifications or participate in flows.
And so that’s instant. Automated is what we’re going to use. So, I’m going to talk about that a little more in schedule to schedule. So, you can set it to be on a timer. And these are not mutually exclusive, you can have some combination of them but for the most part, which you’re probably going to be wanting to use are either automated or scheduled. We’re going to use automated.
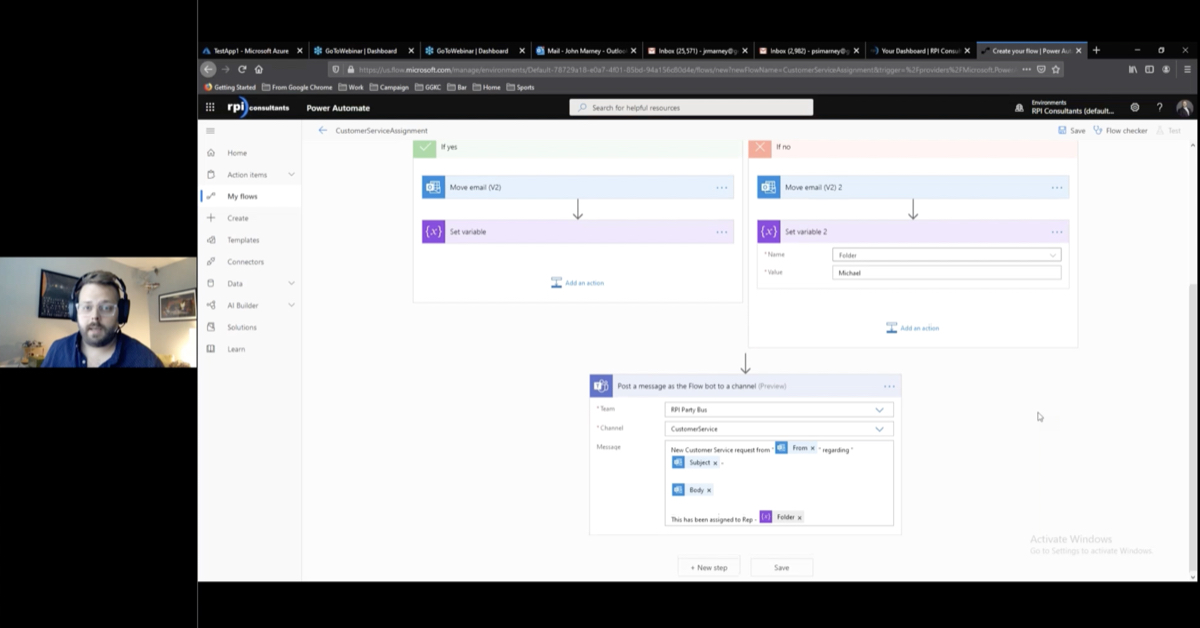
And so, I’m going to call this customer service assignment. So, every flow starts with a trigger. And we talked about some of the trigger buttons, schedules, those are triggers. The automated flows have more specific triggers. And in this case, they have some examples for you to choose from right here, things like when an item is created in SharePoint and you can specify when an item is created in SharePoint in this folder.
We’re going to use when an email arrives into a folder in Outlook 365. And that should be in this list. And this is not comprehensive. We can go to the next screen to get the full list. See, there is outlook.com which is different than Outlook 365. When an email arrives V3. So, I’m going to select this as my trigger and click create. You can also skip that step and just add the trigger here. So, you’ll see that this is a step. This is my trigger, the very first step in the flow and as I built this, it’s going to cascade down the screen, left and right, depending on conditional logic and things like that.
So, this is automatically connected to, since I’m signed in as myself, it automatically uses those credentials for this inbox. So, I have my folders in here and so I can see inside my inbox, I set up a flow folder. So, we’re going to start with that. So, when an email arrives in my flow folder, we’re going to trigger this flow.
You can use a separate set of credentials. In fact, you can use multiple sets of credentials if you want to interact with multiple inboxes. I believe that’s done right here, the little hamburger menu if you will, the three dots, the ellipsis menu. You can see, you see how it says my connections and it’s currently using my email, that’s the default because that’s how I’m logged in. You can add a new connection.
And I’m not going to do this now but there are actually ways you can add connections that you yourself don’t have authentication for and ask someone else to authenticate for you for things, if you want to build flows say for other people in the organization like your boss or whatnot where you wouldn’t necessarily have access to their inbox, but you want to help automate around it.
So, I’m going to start with this. So basically, just mapping out what I want to do. I’m going to based on the from address of the email, so someone is submitting an email to this customer service inbox, I’m going to add some logic to decide which of two customer service representatives I want to assign this ticket to. One is John, that’s me, and one is Michael which is my coworker.
So, I’m going to add a condition. I’m going to evaluate this email. And I want to check the advanced options here, I don’t think there is anything I want to do. So, you can do all sorts of criteria here as well. But I’m going to save that criteria and do it in the next step. So, I’m going to do a condition. And this condition, and you can use this box to search across all sorts of different actions that you can do, you can use these different categories. You can see that I can perform actions on Excel files, Teams, Outlook et cetera. But I know what I’m looking for. These built in are more of the actual Flow logic components like your pseudo code.
So, you can see, I’ve got loops like do until, I’ve got switches, I can terminate the flow. Things like creating variables to be used later. I have a condition though I’m going to add, and you see how it immediately creates this evaluation logic up here and then a yes and no column for what happens if that condition is true or not.
So, I’m going to choose a value and here is where Flow gets awesome immediately. When I click into that value that I want to evaluate, you see that it has this dynamic content. Dynamic content is any information used previously in your flow can be immediately referenced in future steps. And you don’t have to add any code, you don’t have to do anything special. What I want to do is evaluate the from address of the email that’s been sent into my inbox.
So, I just select under this when a new email arrives, that’s the step up here, and you know what I should do? Just as good practice since I’m doing a training, I should rename this step, so customer service email arrives, so that’s the name of the step.
Now, I’m going to rename the condition, evaluate from. Okay. So, I’m going to choose a value. See how now it says, “CS email arrives.” That’s the name of that step. I am going to select the from address, and you can click these to collapse them, that helps keep this readable. I’m going to say contains and I’m going to say rpic.com. So, if I get an email from any email address containing rpic.com, it will go to the true condition, otherwise it will go to the false condition.
So, under the true condition, I’m going to move it to another folder. So, there is another prebuilt action to move email for Office 365. Now, the parameters it wants me to use for that email are the message ID, so I need to specify what specific email I want to move and what folder to move it to. Well, the message ID is the same email that we started with, right?
Well, fortunately due to this dynamic content, I can reference that very easily. You see there is a message ID right here, boom. I don’t have to know, it’s dynamic. Folder, I can either use dynamic content if there is something as part of the previous message or previous steps that I want to use to assign to a folder. Or, I can select using this button from a list of folders in my account. And that’s what I’m going to do in this case.
So, I’m going to go back to inbox. Oops, I don’t actually want to use inbox. I want to use inbox, flow. Right? And then if it’s false, I’m going to do the same thing. Move, email, CS email arrives. So, I need that message ID and I’m going to select a different folder. Michael, okay. So true goes to John, false goes to Michael.
So, I could go ahead and demonstrate that but I’m going to add one more wrinkle. When this happens, so this rule, as stated so far, could just be built inside of an Outlook rule. You could have it be based on an email address into a folder. But, if I wanted to start bringing my automation into one place, let’s say that when this happens as part of collaboration, as part of notification, I want to write a message to our shared Teams channel to say, “Hey, we got a new email from so and so, here is the subject line, here is the body, it was assigned to this person.” And that’s useful for a number of reasons. Maybe if that person has stepped out, someone else can fetch that out of the inbox, the shared inbox and work it themselves. There are a lot of reasons.
But this is where it gets really cool, to do all of this in one flow. So, this is the logic and I’m going to go add a new step that’s outside of the logic tree. So, let’s going to evaluate this, do the yes and no and then it’s going to move on, regardless of which path it takes. I could continue to build it inside of the yes or the no, but I don’t really need to do that here.
So, I’m going to go to Microsoft Teams. I’m going to…there is a lot of options and we’re going to dive into this a little deeper because it has some cool stuff. Where is it? I want to just post a message as flowbot to a channel. I’m going to select RPA Party Bus, that’s my team that I have set up for this, that’s my business. And so, you might imagine a party bus generating a lot of customer service complaints. And then I select the channel, customer service. And here is the message, here is what it’s actually posting.
And so, I want to say, “New customer service request from, put in quotes. And I don’t have to put it in quotes, that’s just to make the message neat. And then I’m going to use that dynamic content. Now, this one is moving the email. So, I have three actions that I can reference dynamic content from and it’s all the same email, so I can use whichever one I want. But just to be consistent, I’m going to use the original action. So, you see I have the CS email arrives. I’ll say from, so you didn’t put it in my quotes, regarding, then I’m going to do the subject and then I’m going to put the body in there. And then I’m going to say, “This has been assigned to rep and then. Oh, I have a little bit of space.”
So, when I was building this last night as a test, I thought for sure I would be able to reference the input of which folder I could use in a future step in the flow. Turns out, you can typically only references outputs. So, I can’t say if it went to Michael, automatically say Michael here, not that directly. And there might be a way through some little chunks of code to go back and fetch that. But just to keep this simple, gooey-oriented. What I’m going to do is show you that you can use variables to do much the same thing.
So, I’m going to go back and create a new variable to store this information. I’m storing which folder it actually moved to inside of my inbox. So, I’m going to insert it right after the email arrives and I’m going to search for variable and I’m going to say, “Initialize variable.” I want to give it a name of folder, the type, these are data types if you’re familiar with any type of software program, there is different data types like strings and numbers. This is just a string.
And the initial value is blank. And then I’m going to go back into my evaluate statement. So, if yes, and it goes to John, I’m going to add an action immediately after that to set that variable. Folder to John. And I’m going to do the same thing under the false or the no action. So variable, folder to Michael.
And then, back in my message that I want to post out to Teams, I’m going to say, “This has been assigned to rep folder.” Boom. That’s it. So, what I’m going to do is I’m going to kick an email out to myself, I’m going to save this. And actually, right before I do that, I’m going to walk you through this one. So, if you go back, so this is your dashboard for this bot, flow, whatever you want to call it.
And history is kept here and you can actually see the execution history of every single time it’s run, you can see failures, you can see any errors it generates, you can see the action that it performed. So, this is important, not just for testing and troubleshooting but for auditing. Is it working the way I expect it?
So, we just turned on this button to turn it off or turn off, it’s on. You can see, I have two different API connections that it’s utilizing or authentications on there. So, I’m going to pop over to my Gmail, send something to myself. Customer service complaint. I had a terrible time on the party bus. All right. And I’m going to send it.
Now, this is going to go to my inbox. So just for staging purposes, for demonstration. I didn’t have it automatically go into that Flow folder which is what actually triggers the action. It’s a little easier to demonstrate what happens if I do it that way.
Okay. So, pop over to my inbox. You see I’ve got my complaint here. I’m going to drag it into my Flow, and you see it’s sitting there and if everything works correctly, boom. So, it went over to Michael folder which is what we would expect because the condition is if the from address contains rpic.com, then it will go to John, if it doesn’t, it should go to Michael.
Then, see if this worked. I can’t see my other screen. Here is the Flow message posted out to my customer service channel in RPI Party Bus Team. And if you look at it more, you can see the Flow bot said, “New Customer Service request from me regarding customer service complaint, that’s the subject line. I had a terrible time on the party bus. So, this is the whole body of my email. This has been assigned to rep Michael. And we can continue to build on this flow to do all sorts of things if I want to send a response to the person who submitted it after I successfully posted in this channel then I can do that. We just add another step to the flow to send a reply.
However, I’m going to take this in a little bit different direction. But before we do that, I just want to give you an opportunity to ask any questions about what I’ve done so far, anything I can clarify? Anything that you find really interesting that you’d like to see more of? Feel free to throw it out there. I got a…Microsoft acquired Soft Motive. So that’s their very latest acquisition. That was just a couple of weeks ago, thank you for that. Very clear instructions. Thank you.
And I’m not the first person to do a webinar on Flow. There are a lot of videos out there. However, I think in future iterations of this, I’m going to be showing some ideas on how we can do integrations with systems that you use and so I’d like to hear what those use cases are. Primarily, I’m looking at doing some things with Perceptive, with OnBase, with Kofax. And a whole host of other stuff.
Okay. So, no other questions so far? No. Shut off my Blizzard Client, I’ll probably shut off Steam too. Okay. So, I’m going to show you another really cool thing and this is where I think you will start to get the wheels turning on some of the cool things that you can do with Flow but also just with all of your products.
I’m going to incorporate what’s called an adaptive card. And the adaptive card is a message similar to this into Teams. However, it’s interactive. So, what I’m going to do is now put on a different hat. Now, I’m customer service manager and when a request comes in, I want to see what that email body is, and I want to select which representative it goes to.
And therefore, the flow now is interactive and it’s waiting on me to interact with it to continue. So, I’m going to minimize my Teams and I’m going to delete this email. It’s not of any consequence, I just keep it clean. And I’m going to go back to my Flow and I’m going to turn this one off. And I’m actually going to copy it because I want some of the stuff that I started with.
And I’m just going to call it customer service assignment manager. And this one is off by default. So, actually, before I do that, I need to copy something really quick. This is what I sandboxed just last night, just to make sure everything was going to work. And I want to copy…I’m going to walk through this, I just don’t want to lose my…I have to do this in the middle. Okay. All right.
We’re going to edit this guy. So, the trigger is the same, I still want this to happen when an email arrives in the inbox. And I still probably need the variable because I still am ultimately going to be evaluating a condition. But my condition is actually going to change. Now, I’m going to use an adaptive card to evaluate which path to take.
So, I’m going to insert a step right here. And I’m going to go to Teams. And in here, there is a couple of different options, you can post adaptive card directly to user which in the case of a manager assignment you might do so other people can’t click on the action in the channel. Just for demonstrative purposes, though, I’m going to use the channel action.
So, you have posted an adaptive card to a Teams user and wait for a response. I’m going to do post an adaptive card to a Teams channel and wait for a response. Now, in the real world in a sort of a manager decision making scenario, you probably wouldn’t, like I said, post that to a channel, a public one. However, that might start you thinking, “Well, what if I want to do some sort of collaborative decision making where whoever gets to it first self-nominates or something.” Maybe multiple people can select what action happens.
And that’s definitely something you can do. It’s almost liked this adaptive card, again, I have to select what team. Okay, Party Bus. I select the channel which is customer service. So, this is the complicated part of the adaptive card. Adaptive cards have a specific template and a specific format to specify everything that is inside of them. What buttons, images, URLs, content, so whether it’s a header or a body. It’s a little webpage that appears inside of your teams.
And it’s actually, if you’re not familiar with JSON, it might be a little intimidating up first. But it’s actually pretty straight forward to do a simple card. And I’m not going to walk through every variable. There is a ton of documentation on these and in fact, there is even a little newer tool that I just found yesterday that’s like a drag and drop visual builder for the adaptive card and it gives you the code that you need. So that’s pretty cool.
I’m going to paste this in. So, this is my adaptive card. And it’s basically just a whole bunch of text between some curly braces. And the important parts here are that I’m defining a few objects which I’m populating with information. So, I’ve got a container, so I’ve got a type, a body, and if I scroll past a bunch of this stuff, I’ve got actions. Those are the three core points. It an adaptive card, it has a body with some text in it and it has some defined actions as to what we’re actually going to do or allow users to pick.
The rest of this is just text. And there is actually a million different ways that I could approach this. I mostly copied it from a template. But I have some text saying, at the top, “A new customer service ticket has arrived, medium size, it’s using word blank.” And then I’ve got blah blah blah blah, please assign a representative in bold. Then I have a couple of columns where it actually…I want to show you what these are, but it actually shows a little information about the representatives themselves, a couple of images. Then two actions, one is assigned to John, the other one is assigned to Michael. And importantly, they have an ID, these are action IDs. Something to keep in mind.
All right. So, that is the adaptive card. The builder, just for reference, designer. Yeah, so I’m not entirely sure whether this is a Microsoft tool or not. Oh, it says Microsoft so we’re going to say yes. This is what it’s going to look like. You see this card right here. And this is the template I started with. So, it looks pretty similar.