Quinn Huntsman:
All right, again, thanks everyone who is joining us here today for another one of RPI’s Office Hours. Today, we are going to be showing some cool automation with Kofax RPA and Microsoft Excel. First, I want to tell you a little bit about what Kofax RPA is just in case you don’t know. It is an RPA tool, which means robotic process automation. It has an awesome single or simple to use drag and drop interface designer. You don’t really have to know how to write code or anything to interact or build with it, and it eliminates manual tasks that end users would be typically doing like logging into websites, exporting data.
It can write reports. It can read from reports, all kinds of cool stuff. Today, we’ll be focusing on using the embedded Microsoft Excel driver and fewer in the design studio here to interact with Microsoft Excel. Without further ado, go ahead and dive in here. We want to tell you about some of our upcoming webinars in Office Hours. We have a digital signing solutions webinar coming up here shortly, May 6th at 11:00 AM Central, followed by a 1:00 PM webinar, what to do with SharePoint, and then we have another Office Hours about halfway through May on digital signatures.
Then at the end of May, we are going to circle back around and do another RPA Office Hours on data integrations, which I really look forward to doing that. That’ll be working with APIs, writing to databases, that kind of thing. If you like this one, we hope to see you at all the webinars and including the end of May one on RPA as well. We also wanted to tell you about we host a Kofax RPA workshop. This is an on-site engagement. That’s only one day long, but we cover quite a bit in it. It includes some post on-site documentation, and road mapping gives you and your organization an idea of what you could do in the future with RPA.
We do help set you up with a one-year development license from Kofax for RPA. This is really easy to obtain. You can fill out a form on Kofax’s website, and they will send you the installers for Kofax RPA and the licensed file and help me get going there on that. We’ll also demo some products up and training as well as do some actual robot building and prototyping to show you how RPA can help provide some automation within your organization. If you are interested and would like to schedule or ask more about the Kofax RPA workshop, please do contact us at [email protected].
A little bit about me. My name is Quinn Huntsman. I’m a business analyst with RPI. I’m about halfway through my second year. I’m a certified Kofax technical solution specialist for RPA. I love working with RPA. It’s a lot of fun to build with RPA, and you’ll see that today. I also have experience in perceptive content upgrades, administration and troubleshooting. A fun fact about me is I’m a lover of Queen as you might be able to tell by the shirt. I love robots, food and playing video games with my friends.
We want to use this opportunity to remind you that this Office Hours for Kofax RPA and Microsoft Excel is meant to be interactive, so we encourage you to submit questions, challenges, any kind of specific product functionality that you’re curious about during our Office Hours presentation. We’ll do our best to field those questions as we go here. A little bit more about Kofax RPA before we get started. It allows you to build software robots that never stop working and never make mistakes depending on how you built them, obviously. It allows you to replace manual tasks, decisions and activities such as signing into web portals and desktop applications.
There are two different kinds of robots you can decide to build, depending on if you’re working with a desktop app or a web portal. You’ll see that here in a bit. It allows you to perform front-end activities, functions and lookups, and work with APIs and relational databases as well. It also comes with the awesome drag and drop designer, where you don’t really have to know any code to build robots, and then it’s also part of the overall Kofax Intelligent Automation Suite such as total agility.
Again, there is a free trial license you can obtain from Kofax. You’ll submit a form, and they’ll provide you with the installers as well as the license file. You can use that to develop pretty cool stuff for yourself. I encourage you all to check that out. A little bit about what we’re going to do today specifically, we’re going to demo reading and writing data into and from Excel. We are going to have a vendor data sheet. These vendors are a mix of active and inactive vendors. What we’re going to do is split out the active from the inactive into two separate spreadsheets.
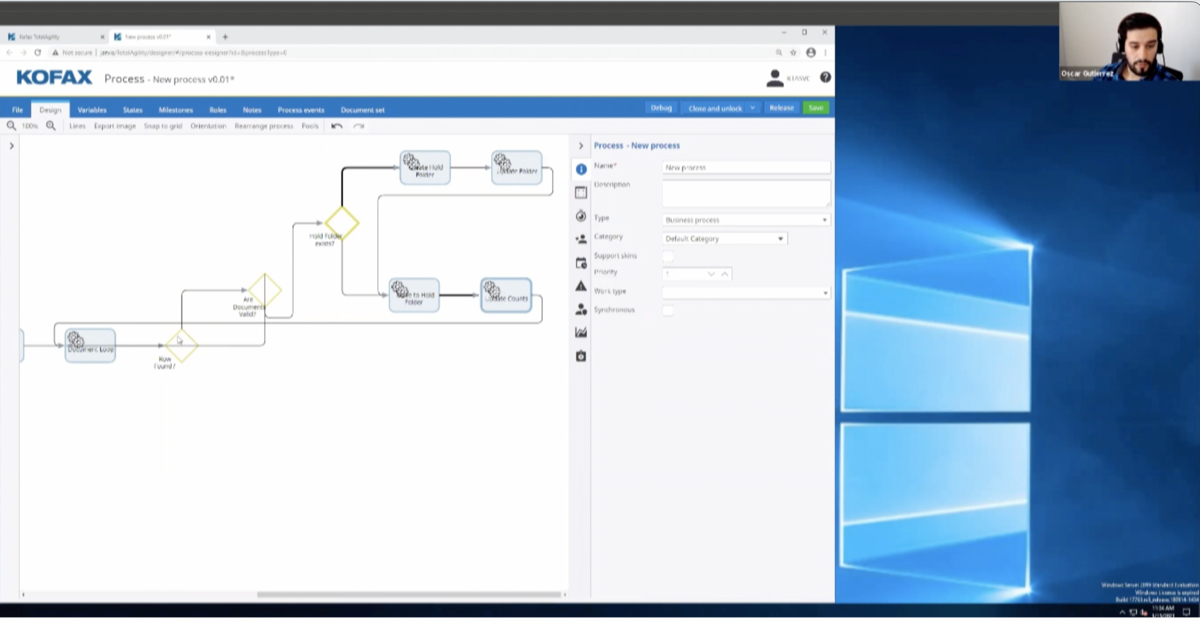
We’re going to write all of their pertinent metadata as well to that spreadsheet. We’re actually going to have RPA save those files on our desktop. It’ll show some of the decision points that RPA can handle. It will show some of the Excel capabilities on where RPA can work with reports, all kinds of cool stuff. Just one second, switch over here to our sandbox, and we can get started. Alright, so here is the RPA workflow designer. This is the IDE called Design Studio. I want to give you just a quick tour of what you’re seeing here, because I know it can look like a lot right out of the box.
On the left over here, if you’ve ever worked in something like Visual Studio, this is our project view. This is how we stay organized by different projects here, and then all the components that make up these projects such as the robot files themselves, different types, which are like the data model backbone of what you’ll be working with for variables, and then other things that we probably won’t get into today too much such as database mappings and device mappings, which allow you to point to different databases or remote devices so that you can use the desktop automation service to hook into those.
Here in the very middle is the workflow designer. As you can see, it is comprised of all these different boxes and shapes. These are steps or group of many steps. The lines here show the progression of the robot and the flow of it. You can see there’s some different branching here, which demonstrate the decision points and logic that you’re able to implement with Kofax RPA. At least, I think, it’s very user friendly, easy to pick up and learn quickly. Again, you don’t have to know any code really to work with this. There are points where that’s a benefit, but you don’t need to know it at all.
Down here in the bottom middle of the screen, it’s showing our different tabs that we’re working with. If you’re working with a website, it’ll show the website here that you’re working with, or if you’re working with a desktop application. Here, in our case, we’re going to be working with three different Excel sheets, so you’re going to see a tab for each of those. Once we get started here, it’ll show it as we go in real time. Over here on the bottom right, we have our variables pane. You can see that we are going to be working with and storing some vendor data.
This vendor variable has been created from a type which again is like a data model. These are all the different properties of a vendor that we’re going to be extracting, storing and working with here. The main thing that we’re going to be working with is a vendor status, which will show us either A for active or I for inactive. That’s what we’ll be using to have RPA perform some decision point branching. All right, so first, I want to show you the finished product here, talk a little bit about it, and show you it run just so we can see what we’re going to be building and what you can expect.
We have three different spreadsheets that we’re going to be using to put data out into when we’re done. One of those spreadsheets will contain all the active vendor, and then one of the spreadsheets will contain all of the inactive vendors. Sorry, I thought we had a question there. It’s just the other notification. Get back on track here. You can see there’s some steps. We’ll build these in a second, so I’m not going to click through all the configuration for each of these yet. There are some steps for opening these different spreadsheets using these variables over here.
These are variables of an Excel type. That might sound confusing, but really, what that means is we have this container that RPA is expecting to be able to output an Excel sheet from or for you to work with as an Excel sheet when you are developing here in Design Studio. I can click through them here to start giving you an idea. We’ll prepare our execution. That allows us to start working here in design mode. You can see highlighted on this open active list step, that’s going to open my blank Excel variable to start giving us a sheet to work with, and then we have some steps for each of these to set the headers for the Excel sheet.
This is the data. These are the column headers that we’re expecting to write data into the sheet for. We’re going to do this process twice to give ourselves two Excel sheets. You can see them pop up here in the window. We have an active list we can write to later on, and an inactive list we can write to later on. From there, I’m going to open up my full vendor list. This is the Excel sheet that contains both active and inactive vendors. What it’s going to be opening here is literally this xlsx we have on my local workstation here.
As you can see, there’s a mix of active and inactive vendors here. This is what we’re going to use to read from and split all these vendors out. We’re going to come in here. For each one of these records, we’re going to extract the data for all of these pieces of metadata such as the ID of the vendor, their name, address, so on and so forth. We can actually see that happen here as we go through it. It’ll be hopefully pretty cool to watch for you. Once we have all of our Excel sheets open, we are going to create a loop here. Again, we’re going to build this fresh in a minute, but I just want to demonstrate a high level of what the robot is going to do.
Everything that happens beyond this loop step is going to execute under the context of a loop. It’s going to iterate through each row in this spreadsheet. It’s going to take…we can do all those steps after for each row we have here. There’s a big step group here in the middle that I’ve condensed for the sake of cleanliness and organization here. These are our extraction steps. If we click here to extract vendor ID, it’s going to step into the first iteration of this loop. You can see here in our window that it’s working with that full vendor list.
It’s highlighted on the first row…well, second row, because we’ve excluded the header column row, which we’ll show how you do that. You can see there’s a little gold line here that is actually highlighted on the vendor ID cell. You can see that it’s going to extract what you want. What’s cool about these loop steps is before you actually execute your robot in debug mode, you can use these clickers here to either jump to the next iteration or the last iteration or the previous iteration or the first iteration.
If we want to make sure that…well, I can see it on the first vendor row here that it has the correct node, but we want to make sure as we go, it’s going to go through each vendor ID. Then you can click next, and you’ll see that it’s highlighted in the next row on the same node and so on and so forth. To jump back to where we were, I’m going to preset this to the first iteration. I’m going to click past vendor ID. This is something I want to show you here. We’re looking at our vendor variable over here in the variables pane, and you can see that as we click past the extract vendor ID step that the 135 vendor ID here was actually set from that first row.
This vendor variable is going to update for each iteration of this loop, so as we click pass vendor name, you’ll see Abbott Labs get populated here and then the address info. They don’t have any additional address info out there, so we’ll jump down to the city, state, zip code and country information. We can see that’s all being extracted how we want into the vendor variable. Now, again, this vendor variable is going to be updated with the data as we go through each iteration of the loop here. That’s the high level on extraction there.
Then minimize that. This is the really cool part of it. RPA allows you to implement some logic into your workflows here. You’ll see there’s this little test variable step. What this is going to do, let’s take a quick look, is it’s going to analyze the vendor status variable. Again, that is whatever vendor record we are on, so whichever iteration of the loop, it’s going to analyze what it extracted, either A or I, from vendor status. Then what it’s going to do is if the condition here is not satisfied, so meaning if vendor status does not contain the character A, then it’s going to do what’s specified under error handling.
When we look at that, it’s going to try the next alternative step. What that means…you can see it in the workflow editor here, there’s an arrow pointing back to this little diamond. That diamond is what you’re seeing right here, and this is called a try step. If the vendor status is not A when this test variable status executes, then it’s going to point you back here and execute the lower branch. I’ll show what we’re going to do beyond this test variable step, regardless of what the vendor status is. Really, what we’re doing is just deciding here which spreadsheet I’m writing to is.
Are we writing to the active spreadsheet, or are we writing to the inactive spreadsheet? We’re on the first iteration of the loop. I know that this is an active vendor. When you’re in design mode, these tests variable steps, when you try to click past them, if you fail the test, it will actually throw an error. We’ll see that here in a second, but that’s how it’s designed to be. You can still step past those. You just have to click down to the appropriate branch based on what your logic is you have implemented.
Since this is an active vendor, we can click to our next step, and we’re going to set the window. What that means is we have three spreadsheets open here. We want to set to our active vendors list because that’s the one we’re going to be writing to. We don’t want to be writing to the full vendor list or the inactive list. We know this is an active vendor, so we’ll put all their data there. We are going to insert a row. You can see some line too of the spreadsheet here, and then we’re going to set the content of that row from all that vendor data we extracted during our extraction process here.
If we jump back here to our test variable step, and we jump to the second iteration of the loop, we then have an inactive vendor. If I try to click to set current window here, you can see that it’s failing to get to this part of the branch because it didn’t pass our test, if you will. We can click back here, and then down into the other branch here, and then you’ll see that we can click past on the set current window. You can see that we’re in the inactive vendors list.
We’re going to create a row. We’re going to set that content with the second vendor record from the spreadsheet, and you can see all that here as well. The last thing we’ll be doing as part of this robot is actually saving these output results to a real spreadsheet on the machine. That’s cool, because that can allow you to later take that spreadsheet, do whatever you need to do with it. Email it to someone. Use it downstream for another process, and there’s really infinite possibilities. As you can see, we’ll have another vendor sheet here with only inactive vendors in this column.
Then we’ll have an active list with only active vendors. We’ll minimize these. I’m going to run this one time in debug mode just so we can see it actually create our two spreadsheets here. I’ll delete these first because this is the location, I pointed it to run. Let’s switch over to debug mode, and then just press the blue caret up here to get it to run. It’s saying that I started my execution in design mode, so I just need to switch it over here to run debug. You can see it is lightning fast here. I mean, it’s iterating through almost 1,000 rows in about eight seconds, so that’s pretty quick.
If we open up that directory where those sheets get outputted to, you can see that it created our inactive vendors list and then our active vendor list as well. Another thing I want to show you here is that it does have an embedded Excel view. Over here on our left, I’ve set this robot to return values. The value I’m returning for each of these steps are either the active list or the inactive list, so it’s just going to be an embedded spreadsheet view of all the vendors that found to be inactive or active. If we go to active here and click View, it’s similar to the Excel sheet that it output. It’s just an embedded view of that.
What we’re going to do is go ahead and build this fresh. I’m going to leave the version we have here and start a new one. I mentioned earlier that in RPA, you can build either a robot to automate desktop applications or one to automate web applications. Really, the way it works is you can use your desktop automation work robots still in the context of a web application robot. You would just need to add a step to call your desktop automation process you have built from the web automation one. Today, what we’re going to use…
Since we’re just using the embedded Excel viewer, we just need to build a web automation robot here. We’re going to right click our robots folder here. We’re going to create a new robot. Let’s call this RPA Excel. Sure. During the robot’s setup, here, you can see that you can point RPA to start from a URL. If I was working with a website, I could put in google.com here. What that would do is out of the box, when I click finish for my robot here, it would build a what’s called a load page step, where it’ll load google.com for me.
I don’t need it to do any of that right now. I’m just going to click Finish. You can see a blank robot has popped up here in our design window. What we need to do before we get into it is we need to build sort the backbone of the robot, so the data models, what we will need so that we can build variables for the robot to use. To build variables, for what we’re doing, we’re going to have a vendor variable and two excel sheet variables. That’s the active and inactive list. I have three variables I need to create. They’ll be similar to these three you’re seeing here, but I’m going to leave those so that it doesn’t mess up my other robot.
We could reuse these for the sake of showing you creating a new variable. We’ll just step through here. I want to create a new type. We’ll just call this new vendor second type. Click finish. We’re building a data model for all the vendor data we want to collect for each row. One at a time here, we’re going to add some attributes. So, first thing in our spreadsheet. What I’m doing here is just building a container for each one of those columns in the spreadsheet. The first one we have is Vendor ID, and then we can choose a type for this attribute.
We’re not doing any math with this Vendor ID or anything like that. Then a good rule is that if the length of the string that you’re extracting can fit on one line, then use short text. We’re going to use short text here. I happen to know that all these vendor IDs are six characters long or so, so we don’t need to worry about it being inconsistent. Give it a name, a type. Here, we can just click OK. Do the same for vendor name. This one, I’m going to do long text just in case, and click OK, and then here’s the important one. We’ll do vendor status.
Now, you can do Boolean variables and RPA, but from what we’re doing, we know it’s either going to be an A or an I, so we’re going to just put this into a short text type. We’ll be able to evaluate and do what we need to do based on that. Click OK there. Then we’ll collect all their address data. These are split up into four different address columns, so we should be good to use short text here for each of them. Almost done, we just need city, state, zip and country.
All right, let’s take a quick look here, and make sure we have a type for each column we want to extract here. It looks like we’re all good to go. Our vendor container is done, so we can now go into our robot. We can add a variable. Click prepare execution first. The way we add variables is just doing this little add caret here at the bottom of the variables’ pane. You can give it a name. You can select it as global or an input variable, which we’ll talk about here in a second, and then you can select the type. I’m going to skip giving it a name, because I’m building this based off this vendor type.
All I have to do in this case is select my new vendor type here in the drop down, and then it’s going to say when I click OK here that I’ve not given it a name. Do you just want to create the name based on the type? We’ll click yes. You can see it’s been called new vendor for us, and it has each one of the properties we’ve associated or told it to expect here for each vendor in the spreadsheet. Next, what we want to do is create two more types. We need a type that’s going to be our Excel container for our inactive vendors, and then a type that’s going to be our container for active vendors for both the Excel.
When you right click this, let’s go down to type here. Let’s call this active sheet. We only need to give these one attribute, which will be of the type Excel. For this, I’ll just call it list or something. How about that? Save this. Head back to our robot. We’re going to add a new variable for that. Again, we’re going to leave this blank and just let it create a name for us. Duplicated these, so I’m trying to find the right one here. What do I call it? Active sheet, okay, it’s the top one. Here, we want to mark global.
What that means is that the variable can keep its value throughout the entire execution of the robot from multiple iterations. This is going to allow us to write multiple records to the active sheet throughout the execution of the robot for each iteration. Our new vendor variable we created, as you might have noticed, we didn’t check as global. That’s because we need the vendor container, the variable to update for each iteration of the loop. Here, we’ll mark global. It is going to be a fresh Excel sheet. You can actually just point it to an existing Excel sheet, which is what we’ll do for the folders that contains both active and inactive vendors.
But for this one, we’re just going to mark it as global, select the active sheet type, and click OK. Again, we’ll just let it create a name for us. You can see it’s got a green little icon. This means it’s a global variable. Finally, we’ll do the same thing for the inactive sheet, skip the attribute a name, and then select the Excel type. Then this is how we tell it that this type here is going to expect it to become an Excel variable, and so there are some shortcuts here.
We can actually just right click in the variables view and do add variable of complex type and resettling to add our inactive sheet so we can select it. It’s pretty much just gone through some of the legwork for us here. We just need to select global and click OK. You can see it’s the same as adding it manually. Finally, we need to add a variable to contain our full vendor list here. What we need to do for that is just right clicking here. We’ll select our variable type as Excel. Call it all vendors.
This one, we don’t need to mark as global because we’re just going to open it and read from it and extract data from it. We’re not going to be updating it in any way for the loop or anything like that, so we don’t need to worry about that. What we do need to do is you can see this as new Excel data. We need to click load, and you have a couple different options. We’re going to actually use file here and click Browse. You can see our vendor data. This is the full one, so we’ll select it. Click OK. OK again, and then it’s created that variable for us.
With all of that out of the way, we’re ready to go ahead and start building the first couple steps. What we’re going to do is open up our blank Excel sheets for active and inactive vendors, and we’re going to set the column headers for those. We’re going to do that before we get into the loop, because we don’t want to have those steps executing each time or for each iteration as we do for the extraction steps. If we take a look here, we can take a little shortcut. We can right click our variable here.
Interesting. We can actually just insert a step this way. In many cases, you can right click here, and actually…oh, there it is. Insert step, open variable, and do it that way. I was just not highlighting the variable, so don’t make the same mistakes as me. We’ll open our active list first, and you can always configure these to be a bit more explicit in what they do. I just right clicked the step here, and clicked the Configure and went over to the basic tab. We’ll call this open active Excel. Here in the details of what this step does, you can see that it’s opening a variable, and the variable it’s going to open is that blank active sheet that we created.
If we click past that, we can then see that it’s opened this for us here. What we need to do next is set the column headers for each of these sheets. The way we do that is we want to click the cell here. We can click modify set text. I’m just going to call this Vendor ID. We’re going to repeat this process here for each column header and for both sheets, so bear with me.
In the meantime, I wanted to ask our lovely moderator, Mike, if we’ve had any questions flow in yet. This might be a good chance to answer some.
Mike:
Yeah, just really quick, probably a couple of easy ones. Can RPA also write to a database table instead of an Excel file?
Quinn Huntsman:
It certainly can. You would do that by creating a database mapping. You would need all the connection, typical connection string info that you would need if you were just doing this in a custom application to connect to that database, but yes, and it’s a great question because we’re actually going to be showing that at the end of May. We hope to see you for that one as well.
Mike:
Awesome, and then another quick one. Can the bot email a completed file at the end of a run?
Quinn Huntsman:
Yep, it sure can. Pretty easy to set that up. You just need the SMTP, the server details for the email server. It can take a little tinkering just to make sure you have all that right, but I think most of that stuff’s pretty standardized. It’s a little bit about knowing the email server settings. Yep, it’s pretty easy to build a send email step. You can actually even attach files to it and whatnot, so that’s pretty cool. State and then zip.
Mike:
One more just came in. Can I have the bot perform multiple or duplicate checking while it’s writing the file, so you have data coming from multiple sources?
Quinn Huntsman:
Yeah, you could. I’m trying to think the best way we would do that. I’d always recommend if you have the chance, if you’re just working with one sheet like we are here, to do your duplicate checking if you have the opportunity beforehand. But if you’re working with multiple sources, there’s certainly a way, just off the top of my head, I can’t think exactly how I would build that, but the short answer is yes. Make sure we have all our columns here. Looks like it. Something cool i like to do while I’m building here…again, if this were something I was putting in an enterprise situation, I would rename each one of these set value of cell steps to the column header they’re actually setting just so someone can come in here and look at this and know exactly what the step does.
We’re going to have to do this one more time, so I don’t want to keep everyone waiting on that. As you can see, I’m dragging a box around all these, and I’m going to bring it to the first set value of sell step. I’ll let go. It’s going to highlight them all blue. What I’m going to do is condense these into a step group. That way, it’s not taking up my entire workflow space here. It just allows the robot to look a bit cleaner. The way you do that is after highlighting them, compute to your toolbar, and click group, and you can give the step group a name.
We’ll say set active Excel headers. That might be a little wordy, but just something to give an idea of what’s going on here. Cool, we’ve got our blank, active Excel sheet built ready for us to write to this when we get to that point. One more time, we need to do the same thing for the inactive sheet. I’m going to right click the variable and insert a step this way. This one, I’ll rename. Again, there’s a couple different step configuration panes here. The basic one, you can give it its name. Give some details here about the step. That’s always a good practice.
Choose whether it’s enabled or not. Finders, this is where you would build the tag finders for it. If you were working with a website or something like that, this is more where that comes into play. This is what it allows you to consistently find a node on a website. The action is the main tab here where it’s showing that we’re doing an open variable action step, and that we’re choosing that blank inactive sheet Excel variable that we created, and then there’s some error handling, which for our purposes today, we’re not going to really need to go through any of this, but there’s quite a bit of error handling you can do in RPA.
Again, we need to open our variable here, and we need to build out one more time a blank excel sheet for us to use. One more time, we’re going to step through this. I promise the rest will go pretty quick once we’re done with building the sheet here. This is about as tedious as RPA gets, and that’s saying something because it’s a pretty great software to work with in terms of doing repetitive tasks. A lot of that, you don’t really have to worry about too much.
I think we have address next. Again, I’m just right clicking the cell here, selecting modify, set, and then setting the value here to text value, and just typing in what I want. What I want to note here is that you could also set the value from a variable. Create an expression. Do all kinds of cool stuff there. All right, so we have our full blank spreadsheet built for inactive vendors. Again, one more time, I’m going to group all these up, so it’s a little bit cleaner. I do that here with the create step group icon here on the toolbar.
Nice and clean here. You can see it’s pretty simple, or you can just open this up and tell exactly what’s going on here given that you have an idea of what’s going on here with the Excel variables. Got the hard part of the way now, so last we need to do is open our full vendors list. Again, that’s all our active and inactive vendors. We’ll right click our all vendors variable that contains that data or that Excel sheet. We’ll do open variable. You can see in the window down here, it has set us to and opened the full Excel sheet.
This is actually an Excel sheet that exists on my PC here. You can see it contains all that vendor data, and then here’s where the fun begins. We want to extract all the data for each record here, so we need to create a loop step. What we want to do there is click down in our Excel viewer here. Click the top-left corner of the Excel sheet, and you can click anywhere here in this space. For this next step, you want to right click, and we’re going to select loop. You can see that it gives us option to loop through either columns or rows in the sheet. Each rows have different vendor records, so that’s what we want to do.
The cool thing it allows you to do is actually exclude the first row, so we want to do this because our first row contains the column headers. It’s pretty easy to do that. You can see it’ll start on the second row here. We can check our loop clicker here to make sure it’s going where we expect someone to reset that. Next thing we need to do is we need to extract the value for each one of these columns in this vendor sheet. That’s really easy to do. We just left click in the cell we want to extract, and then to highlight it, and then right click.
We can choose extract. When we hover over extract, it’s showing all the different data types that we have the option to use. When we built our vendor variable or the new vendor variable over here on the right, we set everything pretty much to a short text or long text. We’ll just hover over text. We can see all those properties are available here, and we’re extracting the ID, so we’ll put in our Vendor ID container. We’ll do the same for the name. Again, right click, extract, hover over the type it is, and then you can see all the properties here.
We’ll extract the status, all the address info. This particular vendor doesn’t have values for address two, but we still want to show the robot which cell it wants to hit for address two for each iteration of the loop. By the time it gets to that second vendor record there that you can see has an address two, it’ll extract that from the right place. Do the same for three. Scroll over a bit. All right, here’s how I can tell where…there, for a second, I got lost on which one I had extracted last.
You can look up here to see that if you’re extracting from an Excel sheet that has a ton of different columns, or you can click your variable that you’re extracting to, and scroll through to see the last value you got, so I need to grab the state still and lastly, the country. If we look at our vendor panel over here, you can see that it extracted the correct value that this vendor has for each one of these notes. What I want to do now is add another step group, so I’m going to highlight all these extraction steps to the first one.
They’ll turn blue, and we can group them up again. Let’s call this vendor data extraction. We can minimize it. All those steps are now nicely condensed into one. As we click through, if we click past our vendor data extraction step, that’s when you can see it extract all that data for the first one. If we want to make sure again that all those extraction steps work for each row here, let’s slide over. We can click the next iteration. You can see that it has Cardinal Health for the vendor name, and it’s changing each time we change the iteration, so pretty cool.
What we’re going to do next is we want to test that vendor status. We want to see if it’s either an A or an I, and we want to do things based on what the value is. It’s just going to pick which Excel sheet we write to here, but the way we do that is we want to add a test variable step. We want to point it to our vendor status variable. I’m going to right click the little blue circle here, which is called the in-step. I’m going to insert a step before, select action step. This is showing the long way, if you will, for building action steps.
You can see it’s a blank template first step here, so the action we want to select is not immediately available on this list. But if we go down to all and scroll through, we can see that there is a test variable step right there. Cool. You can either do the configuration from this panel over here. What I’d like to do, just to get it in the center of my view, is right click, and then configure step. It’s also bound to F2 if you want to shortcut it. We need to build our condition. Again, our condition is going to be, “Does vendor status equal active?”
Here’s how we do that. Just click plus. It’s going to tell us to select a variable. Here’s all the variables we have brought into the scope of this robot. We have the vendor status right here, so we’ll select it. Since it’s a string, I’m not going to use equal. I’m just going to do contains. It might work with equals still, but we’ll say, “Does it contain the letter A?” You have some more options here like, “What do I do if it’s empty? Is it okay if it’s empty? Do I need to throw an error if it’s empty,” that kind of thing.
You can also choose to ignore a case. In our spreadsheet here, they’re all going to be capitalized, but if it was a mix of capitalized and lowercase As, you could say ignore case here. We’re just going to click OK. This is pretty straightforward to build this logic here. We have our condition, and then if our condition is either satisfied or not satisfied, none of our conditions are satisfied, because you can have multiple, or all conditions are satisfied, then do whatever you select here. We’re going to just say, “If our condition, meaning vendor status, is active,” it is not satisfied.
Meaning it’s inactive. Then we’re going to do a specified under error handling. We’ll click into the error handling tab here. I’m going to uncheck throw an API exception and log as an error.
Just for the sake of what we’re doing here, we don’t need to have it thrown years or anything like that. Before I can complete this, I actually need to add another step. For now, I’m just going to click OK. We need to add a try step. That’s going to create that branch where we can tell it instead of writing to the active sheet, go down here and write to the inactive sheet.
I’m going to right click this and insert a try step before it. This is just creating a separate branch for us, and we’re going to have steps here that will execute if this condition is not met. We need to hop back in our test variable step one more time. Go to error handling, and then we need to say, “If the condition is not met, what do I do?” Because we told it to do what’s specified under the error handling tab, and so what we want it to do is try next alternative. You can break the loop. You can skip to the next iteration.
You can do all kinds of stuff, but we actually want it to take a series of steps if that condition is not met. We’ll do that. Then try step is fine here because there’s only one, and then when we click OK, you’ll see that it’s actually got an arrow pointing back to the little diamond. Meaning that it’s looking for the nearest try step. It’s saying, “If this isn’t met, jump here. Do whatever it says on this branch.” As we continue here, we are on the first iteration still, so the data that we’ll have in the scope of our vendor data here will be an active vendor.
I’m going to go ahead and build out the steps if it’s an active vendor. If it’s an active vendor, I want to actually do this a different way. Delete this step. I’m going to just add a step this way by right clicking the active vendor sheet and setting it as my current window. Now, that’s the frame we’re looking at. What we want to do next is insert a row. We’ll do last. It’s going to say insert a row at the last position available so that it can update for each iteration. We only need to insert one for each iteration.
Then this part is really easy. We want to set this to contain the vendor data, so we’re going right click the row here. We can actually modify set content of row to new vendor. When we execute that, you can see it sets the vendor data for that vendor. Pretty easy to build out something as complex as this that could be pretty hard to do in a typical software scenario, but with RPA, it’s pretty easy. The last thing we want to do for this branch is return our spreadsheet just so we can look at it in the RPA view if we want. That’s called a return value step. Which value are we returning? We just point it to the active sheet.
We’re going to repeat these steps here for…well, one more thing, we can see that if we jump to the next iteration, it’s going to break. That’s because it’s inactive under, but the next one should be active. You can see that it writes out more data here, so it’s functioning as we want another inactive, so on and so forth. Let’s build out our inactive path here. Again, I’m going to right click my inactive sheet and set it as my window. I’m going to highlight my sheet, and I’m going to insert a new row. As last, I only need one row for each vendor, so click that.
Then it’s as easy as highlighting the row, right clicking, and then hover over modify, set content of row and then inactive sheet. That was incorrect. We want to set it with the vendor. We can back up pretty easily. Right click this. We can see that’s our first instance of an inactive vendor, Cardinal Health, here. Pretty easy to do that. We’ll return all our values, again. We’ll return the inactive sheet, and we are all done. The last thing I want to show you is that we can actually write all this Excel data to a real Excel file on our machine.
The way we do that is we don’t want to build that as part of our loop step here, because we don’t want it happening for each iteration. We just want it to happen once when it’s done with each iteration, if that makes sense. What I’ll do is I’ll click before our loop step. I’m going to add a branch, and so easy way to explain this is it’s saying perform this branch whenever each iteration of this loop is done. In our branch, we need to add a right file step, which is in the file system group here, and just pull up our location. You do need to give it the full path and file name when you do this.
I’ll just copy that from here, paste it, and then give it a file name, and we’ll be done, activevendorlist.xlsx. We’ll select our active variable for the file contents. Click save. I can actually copy this step. We can click the in-step, paste it before, hop in here and just change our variable that we’re outputting. We’ll save that. We can run this in debug mode. You could see it goes through all those records pretty quick, and boom, there’s our new sheets. These two, it looks like, and there it is, you have all of your inactive vendors separated from the active ones.
That is the extent of our reading and writing from RPA demo today. We’d like to open up the floor here at the end to all of you if you have any questions, any specific functions you’re curious about if RPA can handle that kind of thing.
Mike:
It looks like no new questions, Quinn.
Quinn Huntsman:
I do see a question regarding if this recording will be emailed. Do we have an email list we can send this out to after we’re done? I know it’ll be on our website at rpic.com.
Mike:
I responded to that question but [inaudible] call. It will be recorded. It is being recorded, and we will send you a personal note, and you will get early access to it.
Quinn Huntsman:
Awesome. All right. Well, if there’s no other questions, thank you all, again, for being with us here today. We look forward to seeing you, hopefully, for the remaining of our May Office Hours. Again, we’ll be revisiting RPA at the end of May, working with databases and APIs, so that’ll be a good time. Otherwise, we’ll go ahead and call it here. Thanks again for joining us today.