
RPI Office Hours: Perceptive Content / ImageNow Workflow
Join RPI’s John Marney for a live demonstration of Perceptive Content (ImageNow) workflow, including interactive Q&A from attendees.
Transcript
John Marney:
Cool. All right. Thank you everyone for joining in. We have quite a few participants or attendees. This is a bit of a new series for us. This is our RPI Workshop Series. The intention behind this webinar series is that it is a little more technical and focused on some fairly specific content. Many of you have joined us previously for RPI’s Webinar Wednesdays, which are the first Wednesday of every month. Those are continuing and I’m going to talk a little bit about those.
But this is an entirely new series that we’re really excited to started. A little bit of an experiment, so format may change a little bit. But today, the topic is Perceptive Content Workflow. What we’re going to do is I’m going to have a little demonstration and then we’re going to open it up. I have a very short slide deck for you. I promise I’m not going to bore you with a really long PowerPoint. I do that the first week of every month anyway. So, let’s dive in.
Just a little bit about RPI first…by the way, this is being recorded and it will be on our YouTube channel, we send out, et cetera. As far as how you can participate, a couple different things, you can submit questions via text, many of you have already done that via the GoToWebinar questions panel. We’re also encouraging, if you would like to, you can ask questions verbally. Just raise your hand and we can unmute you to ask a question. We can have a little bit of dialogue about it, we can dive right into whatever it is. And then, I think you can also use the chat if you want.
RPI, 100-plus consultants, project managers, developers, architects, et cetera. We’re based out of Baltimore, that’s where our primary ERP practice is headquartered and located. We also have offices in Tampa and, of course, right here in Kansas City. My team in our office here behind me. We run the gamut of professional services, technical, and functional. So, whether it’s a new installation, an upgrade, migration implementation, et cetera, et cetera, we offer.
We are partners with Infor, Kofax, and Hyland. We’re a Hyland authorized solution provider. We have a huge amount of experience with Perceptive Content, Enterprise Search, Brainware, and OnBase. On the solution side, we do a lot of accounts payable automation. We’re going to talk, probably end up talking a little bit about this today. Then of course, into the healthcare with patient records, human resources. On the student side, transcript processing and automation, and all sorts of things.
Many of you know me. You’re looking at me right now. Sorry that you have to see me on webcam, but I wanted to make it a little personal. My name is John Marney. I’m the manager of the Content and Process Automation practice here at RPI. So, that’s all of our work with ImageNow, Brainware, Kofax, Hyland, et cetera. I have over eight years, specifically with ImageNow – that’s what I started with, originally from Perceptive Software. Experts, I guess. Am I allowed to say that about myself? I don’t know, but there it is in design and implementation of various workflow systems. I’m a founding father. I have a now…form of gold.
Okay. Upcoming webinars, next month, in August, we have two. August is kind of our RPA month. Many of you have probably seen the buzzwords in the that as a buzzword in the back industry. RPA is Robotic Process Automation. It is a very awesome tool. The first webinar is Kofax RPA for Accounts Payable, and that’s very solution-process to a tee. The second one, in the afternoon, is more technical or Tips and Tricks on how to implement.
Other than that, we are doing a free RPA workshops here in our office. It’s a two-day course. The first day is focused on training; second day focused on actually standing up RPA in your environment. You get a one-year free demo license that can do everything that the full license can do. And you have RPI Consultants here in the room working with you showing you how to do it. It is on October 8th and 9th. It includes everything, bus to travel. So, you get yourself here and we will show you all of the power of RPA. We’re really excited about this. Attendance is going to be fairly limited for the first run. So, please visit our website to sign up, if you’re interested.
Finally, CommunityLive. Many of you probably looking at attending. We will be there September 16th. I believe, I think that’s Sunday or the Monday…it’s a Monday. We’re having a happy hour at 5:30 Bar 32. That is at the top of the Hilton, which is where the conference is. So, please come see us.
All right. Last slide, What is This Workshop? I’ve talked about a little bit, but it really is whatever you want to speak. It is a little bit of a demonstration. I can go as long with that as you want me to, if you don’t have any questions or anything you’d like to know. But really this is meant to be much more collaborative. It’s training. It can be help desk for you and your issues. It can be a working session where we work through how to solve a problem together. It’s fairly technical. We’re probably going to have a lot of rabbit trails off of the main topic. Hopefully, a little bit of silliness. I can’t do anything too seriously.
That’s the intro. Again, please, please feel free to ask questions. If I have to do an hour of content with no questions, this may be the last one that we’ll ever do.
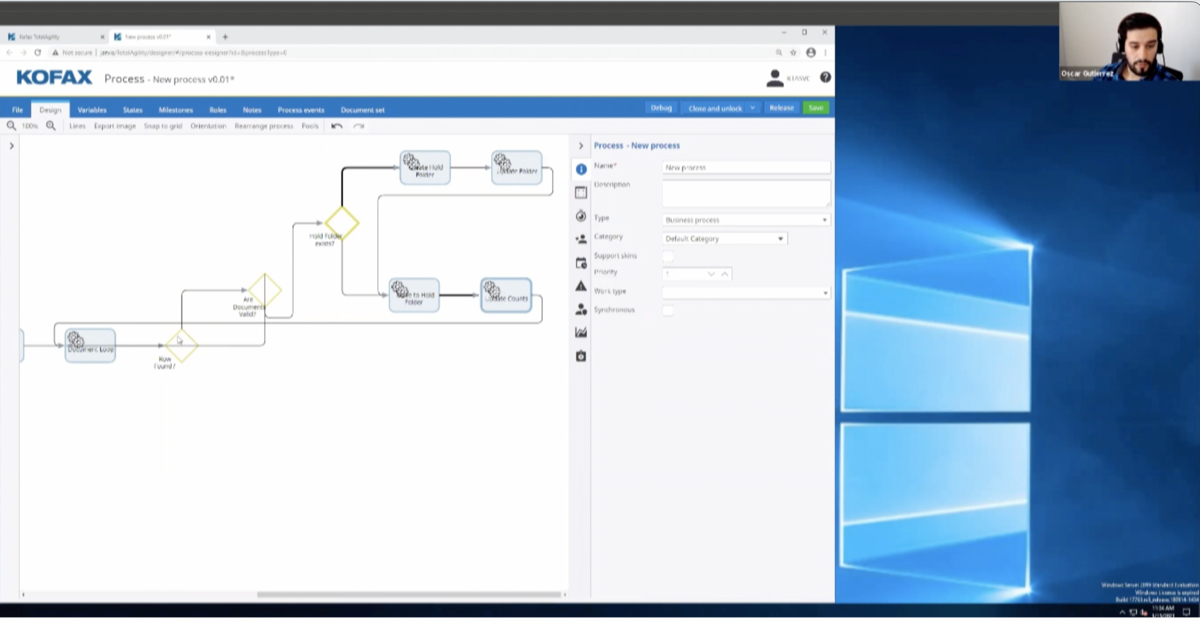
All right. I’m going to hop over to our internal environment here. I’m going to log in here real quick. I’m going to built just a very small test workflow, just to demonstrate the different…really the mechanism of how it’s built, but also to walk through the different types of workflow queues and how it’s done.
This is workflow, which is distinct from tasks, which we often refer to as ad hoc workflow. Tasks have their own probably entire session that can be devoted to them. If that’s something you’d like to see, please let us know. Actually, if there’s any content that you would like to see more thoroughly demonstrated or talked about in a technical manner, please let us know. We have a couple on the schedule for querying and reporting on the ImageNow database and iScripting, which I’m sure is of great interest to many people.
I have a ton of various workflows in here. This is our sandbox for my entire team, so you’re going to see a lot of junk data in here.
I’m going to go ahead and create a new workflow up here on the top right. I’m going to name it John Test and open it up. It will pop open the workflow designer. Important to keep in mind that the workflow designer can only be opened by one person at a time in your environment, or I should say, one workflow can only be opened by one person. So, if you ever leave it open on your workstation and you don’t have auto log off enabled and somebody else wants to go edit it, they won’t be able to. Good practice: always wrap up with you’re going to close your work for time.
A couple of things before we get started with any of the actual build here. By default, it does not enable the Snap to Grid in the grid views, so I always turn this on first thing. There’s first button, Toggle Grid, it puts the grid dots into your canvas. Then, the second button is Snap to Grid, this helps you stay organized and your workbook built. Otherwise you can layer things on top of each other and have things all misaligned. Well, I’m not a OCD type person, I do respect that other people are.
What you see here, there are a number of other workflow options along the top of the workflow designer: for adding comments, for zooming, for drawing routes and what those routes look like. I’m going to turn off my notifications real quick. Just I got my wife talking to me on video.
Then over here on the left, you have these different types of queues. Not all of the queues available are necessarily enabled here. More in a second. Another button, you have routes. And then, another button, we have your actions visualized. And then, here on the bottom, you have the properties of whatever you have selected.
Let’s get in here. I’m going to pull the work queue out into the environment. The work queue is the most basic type of queue that you set up to have users perform actions on documents inside views. The best practices approach, over the years we have discovered some various naming conventions that we like to use that you may like to leverage.
Let’s say I’m creating an accounts payable workflow. Now because I do that all the time and I feel like I can do it in my sleep. I will generally use the departments that I’m building as the first couple of characters. If you are limited to 40 characters here in the queue name, so you do have to be careful what you’re doing with it. Then, in order to keep the process in a linear fashion, when you open the workflow in the client, it does list the queues in alphabetical order. But for most users, especially super users, you have lots of queues, you want that alphabetical order to often reflect the linear process that the document goes. So, you want to think when you’re building, how can I name this queue to be both descriptive of the activity taking place in the queue and what step in the process is it going to take place? So, what we do is we add a number, like 1.0 or something like that, and then what’s happening in that queue.
All right. If I have any actions such as a routing rule, which we’ll probably do a quick build here with those take place in the actions tab, is also where you do iScripts. One important note is that iScripts can only be applied to Inbound and Outbound…I’m sorry, routing rules can only be applied to Within Queue actions; iScripts can be applied to all three.
Then, alarms, which are your automated alarms. We’ll set one of those up.
You can adjust the appearance to this specific queue. However, you typically don’t want to do that, you instead want to adjust it for the entire workflow all at once, and I’ll show you how to do that.
Application plans for performing indexing inside of this queue.
E-forms. You would add…let me go ahead and add a form here. If you do not add this, the form will not be visible inside of the queue, user cannot look at it.
Reasons are for if you’re putting an item on hold, you can customize these reason lists. You can add different List Members inside of here things like contacting vendor, doing performing research. Really just a note to other users why the document is on hold.
Removal rules. You have a few options: archive, remove from workloads, delete from system. Let me step through these real quick. Archives means that the document will no longer be visible inside of the queue; however, it means that the workflow history on that document will be retained.
Now that sounds like it’s a good thing and that you would always want to do that. Why would you never want to retain that workflow history? Well, in a high-volume environment where you’re in a very large workflow, all of that workflow histories are being stored inside of your database. If you always retain every piece of workload histories for the entire life of the system, that can cause your database to balloon. So, you actually want to make a decision whether you want to retain that workflow history for the entire life of that document or not.
Remove from workflow is also removing it from the queue, but actually deletes the workflow history of the document and, therefore, can actually free up some space on the database side thereby improving performance long term.
Then, finally, delete from system. Right? This is where if you ever wanted a queue to just remove documents from the system entirely, you can set it up here. Finally, you can specify the time period the documents have to sit inside of the queue before the removal rule is applied.
You can set up routes on the queue. You can also set up for routes a different way inside of the canvas, so you don’t have to do it here.
Then, finally, you can set up users on the queue. Let’s go ahead and add a user. I have a ton of different test users here. I’m going to add ap processor to this queue. Now you only want to add users to a queue if they need to interact with it in some way.
Now one thing that trips off a lot of people in building workflow for the first time is that, I’m building this inbound queue and I maybe want this, I’ll build this to route directly to the next queue where the users will actually work. And so you might think, well, if users aren’t performing any actions in this queue, I don’t need to happen to the queue. However, if they are capturing into the queue, they actually do need to be added and given this add privilege. If you don’t do that, when they go to capture and it tries to send it to the queue, the document will err and so the user doesn’t have permission.
I’m going to add ap processor, add privilege but no others. If they have add privilege and no others, they will not see the queue, they will not be able to manipulate documents inside of it. So, I did that. AP1.0 Inbound.
I’m going to create a second queue. AP2.0. Let’s call it Invoice Entry. I’m going to add user to that as well. I’m going to give it some different permissions here. I want to give it process privilege, I want to give it the ability to delete documents out of this queue, and archive. All right. 2.0 Invoice Entry.
Now I want to be able to route documents from queue one, queue two. Now typically, I would probably build a routing rule to do this automatically. However, if I wanted the ability to not route manually, I have to use one of these routes and a few different routes. Sequential and sequential auto are basically the same. So, I’m going to start with sequential. This means that a user would have to write it manually. I’m just going to drag it from here to here, right?
Now there are a number of options for formatting here. Our lead consultant, Michael Madsen, had requested that I beg of all of you to never use curved routes which allow you to I have to…I have to reach out to that to curve the route inside the canvas. Let me move it here. I don’t know why he seems to have a special hatred for it. Just to demonstrate curves. Right? Then, you can have them angular or you can have them straight, and those options are all up here.
So, Sequential means that the user can click the route forward button and it moves from P to Q.
Sequential auto is kind of a combination of a routing rule and a route means that it will apply some conditional logic to the route forward. Whereas the sequential will give the user options if there’s more than one route forward. The Sequential Auto will automatically evaluate those options based on the criteria and then will do the document.
I think, well, why wouldn’t I always want to have an auto route? Why would I force the user to want to pick the queue that it goes to? The problem with that is users often need that clarity or the information of where it’s going so that they understand the next step in the process. If you don’t present that information to them and forcing them to choose where it goes, they really may not have the best understanding of the end-to-end.
Parallel routes are…the other two types here are much less used…let me say, they’re basically never used and for good reason. Parallel routes can actually force the documents to split and exist in two queues at once. Parallel routes have to recombine at some point, which means that you are forced to push invoices through parallel processes. It’s fraught with technical problems and there are generally better ways to handle that. But more often than not, we actually would say you don’t want same documents in more than one place at the same time because there may be conflicting actions being performed on them.
Then, there is the load balance, which is useful in that it allows you to spread documents across a number of queues. I’m going to show you actually a tip on some other ways to do that. My questions panel here real quick. Just checking. All right.
I’m going to pull a Super queue out here. Super queue is basically a collection of Work queues, but it is a way to keep them more organized inside of the canvas and add a little bit of automation to the setup. I’m going to make this something like my approval step. Right? Let say 3.0 Approval.
Now I want to have a separate sub-queue for each group. Mostly the same options, which you’ll see that the sub-queue is a new type in here. Sub-queues are basically, say, I want to have this many extra queues inside of this Super queue. I’m going to click New. I can manually create these, just a manual name like Approval 1, but we typically don’t do that. We would either create it automatically based on a user or a new feature introduced, I believe in 7.1.5 or above, is this synchronized queue creation. What this allows you to do is the system will automatically manage the creation and removal of sub-queues based on users inside of your group.
So, I’m going to pick AP Approvers. Then, finally, what do we want to happen with documents inside of those queues, automatically created cues, if that user is removed? Where do we send those orphan documents? I’ll pick the Invoice Entry queue. See how I’ve done those? Okay. So, you can see it automatically created two sub-queues, one for each person inside of that group.
Speaker 2:
We have our first question.
John Marney:
All right.
Speaker 2:
The question is, parallel queues, would you suggest a document that goes to multiple employees for keying in doing data or different tasks or sequential? If sequential, person two has to wait for person one to finish, correct?
John Marney:
If you’re using parallel queues, the idea is no, you don’t have to wait for them to finish. If you don’t use parallel queues, and yes, you are forced to use a sequential linear process. So, you may think, well, if I want to have simultaneous activities on a document, then why don’t I just use the parallel queue? Well, because the documents that image are ultimately you cannot keep that split, you are forced to reconcile differences on those documents at the end of that process, which generally speaking is a challenging thing to do, especially if you’re using e-forms.
I would say that if you want simultaneous actions to be performed on the same document at once, you don’t use workflow to drive that. You use tasks instead. Tasks allow you to have multiple tasks opened by multiple users all working simultaneously on the document. But it’s still only one version of the instead of having to reconcile those changes down the road. It does it automatically as it’s happening.
Our recommendation is to use tasks for any sort of parallel processes. I hope that answers your question.
Speaker 2:
He says “Thank you, cool.”
John Marney:
Okay. Moving right along. So, I have my approval queues, I have two approvers. In most real-world scenarios, the approvers are going to have very specific things that need to come to them and so maybe our…Let me create a route here. Maybe our clerks that are operating in AP2.0 would just select the proper approver. However, to demonstrate the load balancing, I’m going to use task.
All right. Load balance. We’re going to split these. Okay. There are two algorithms, basically, that the load balance route can use. The first is to…It has a special algorithm that it has a little bit of this little black box that you basically decides, well, if these queues have received the most over a certain time period, don’t distribute your documents to that queue.
The second option is always distribute the documents to the queue has the least number of items. That one’s challenging because if you have one really efficient person working a lot of documents, then they’re going to have a fewest and thereby always get the most new documents right out of there. That’s generally not that useful.
The first one is probably better for ax distributing. However, I’m going to show you a way in which that actually might…a trick that I was taught, when I first started working with this, that actually might be a better, a more fair load balance. I’m going to do that by creating routing rule.
Again, please feel free to submit questions. You can do that anytime. Please interrupt me. If we rabbit trail and go a completely different direction, I’m perfectly okay with that. If there’s anything that you want to know more information on, if you have any questions about what I’m demonstrating here, please just throw it out there. I can always return to this. Okay.
I’m going to create a routing rule on this queue to load balance between the AP Approvers. To do that, I’m going to go to Actions, go to Within Queue, I’m going to go to Edit Actions, at the bottom. Create new action. We’ll call it AP Load Balance. All right. So, this is a way to automatically perform load balancing without needing to use build up a load balance route. Create statements, say, Load Balance. You can name this whatever you want. Create a condition. Okay.
There are a ton of different pieces of metadata that existed on document. One of which is the document ID. If you haven’t seen the document ID before, it looks like this. I will show you. The document ID is six characters and underscore…10 characters, or 20, or something? 16? You can view it by going to the document properties, the name that is often the same as the document ID. But to be sure you can go to details and you’ll see the document ID here. You see this is a unique ID generated by the system. It uses I believe only hex characters, maybe. I think it’s all hex characters.
But because this is unique and the last two digits, really probably the whole thing can be letters or numbers, but that ultimately means is you have 36 different characters that can appear inside of this ID. One thing that we can do is actually key off of the unique characters that are somewhat random and split the 36 different possibilities into the number of different divisions we want to send to the parallel queues…or not parallel queues, load balance queues.
Let me create condition. Here I look at the content property, name, ends with. Again, I have 36 possibilities, right? The 26 letters of the alphabet and 10 numbers. I have two different queues. Since I have 36 possibilities, I’m going to divide those roughly in half. I’m going to say if this ends with T. Copy this and paste it over and over. Right? Change these to Or’s. Ultimately, I would say A through T. So, just various letters. I’m not going to do all of them. And I would use those to route to AP Approver. Right?
Then, I can create a second load balance where that name ends with, you know, the other things, let’s say I have all the numbers into a zero, perhaps two, three, apapprover2. Thereby, I can actually get fairly granular with my load balance and if I want to assign more, slightly larger load to one of the sub-queues, I can just I have the flexibility to change the distribution of which characters get assigned to which subject.
Now this is done via a routing rule, which means that the maintenance of that can change. It can be sometimes a little cumbersome. I would typically recommend that you build something like this inside of an iScript instead, which we’ll probably going to do a whole hour on iScript in a future session. But you can do this via routing rule. I’m going to select that routing rule applies to my queues. That’s just a kind of a unique way to approach load balancing inside of canvass.
Okay. Other queue types. So, you have system queues. Let’s call this AP4.0 Export. Let’s say I have this document with information attached to…I want to push it out to my financial system or our business system. A system queue is really basically the same thing as a work queue the only difference being inside of the configuration, you cannot assign users to it. Period. It just want to let you know.
For this reason, I typically don’t use system queues because that is the only difference. People may think because it’s called a system queue and can’t assign users to it that the automated actions lend some sort of preference to these queues that maybe things move faster or are more efficient. Not true. It is really just the same thing that it prevents you from ever assigning a user to it.
If this is a mature workflow and you need to go make changes to this later and potentially sign user to it, I think you’re actually forced to delete the queue and recreate it as a work queue. You don’t need to do that. So, for that reason, I typically don’t create system queues. It just allows more flexibility later to create it. However, you still commonly find these. All the other configurations are the same as you did. Managers and owners can still access this queue. So that’s why you still have the ability to look at forms, have application plans and like that.
A transfer queue, now this is going to have to push me to jog my memory real quick. So, yeah, the transfer queue allows you to automatically push a document into a new OSM or a different OSM. As you may recall, the OSM are your file system structure that actually contain the document images that live on your server. So, as your system ages, you typically want to implement something called OSM automation. Then, the other use case, just to keep the file groups more manageable.
The other reason that you would want to do it is you frequently would push documents of specific drawers to different OSMs. That’s a common setup. That’s for security. It’s for backup. It’s for retention management. There are a number of reasons why you would do that. But this type of queue allows you, when they’re not going to close into it, to move it from one queue to another. So, if you’re assigned a drawer, like AP, the document, by default when the documents created it will be sitting in OSM1 or whatever the default pool is and then this would allow you to push it out to a new OSM.
I don’t know if I…I have a couple extras on here. So, I could say I want this document to just an OSM5.
Speaker 2:
We have a…
John Marney:
Yeah.
Speaker 2:
…couple of questions. The first one is, “Where would I find the ID for the drawer or document keys?
John Marney:
That is a good question. Jordan. The document keys themselves such as the field one through five don’t have their own ID. Drawers have ID. I’m curious actually. I don’t know for sure if you can find those through the central console. Let’s explore. So, I’m going to go look at drawers, open up a…well, I’m not thinking there’s actually a way to do it through the client. So, I know for sure you can pop over to the database real quick. No, for sure the easiest way to do it and the way I would always go find this information. Yeah. It would be to run a quick query on the database.
Okay. These are now the ImageNow database tables. Again, we will have a real fun exploration of these in the future session. But here in the table called IN_Drawer, you will have a list of all drawer names with their IDs. If I do just a quick select on that, you’ll see that you have the drawer ID. That’s the unique ID for that drawer. The drawer name, the drawer description, the department that it exists, and a couple other pieces of information.
That’s the most effective way I know how to get to that data. There may be some other ways to do that.
Speaker 2:
Next question, and it may have already been answered. “So, the OSM’s the same thing as drawers. They were looking for a way to send between drawers. Maybe just review kind of how that…?
John Marney:
It looks like they had a follow-up. Never mind. I think you answered my question. I was looking for a way to send between drawers. It’s a good question either way other. OSM and drawers are distinct. OSMs, I’ll just show, probably just show than tell. Back to my, this is my ImageNow server. OSMs are the actual file system structures that contain the document. Look at my inserver directory here. I have OSMs 1, 2, 3. Those are defaults. That’s what everybody is going to have. Then, I actually have set up a few more for some various technical purposes as sandboxing.
OSM1 is the vast majority of your documents, so it’s going to be huge. This is where the actual images are archived. So, if I just dive into the 3 and find the latest file created, as soon as the images are actually stored as a .osm file, however, it is something else. It could be a PDF, it could be a TIFF. It could be whatever it is inside of ImageNow and so we don’t really have a way of knowing. We can take an educated guess, but most of the things that we store are TIFFs and PDF. Okay. Here’s one with Paint. Look, it’s a TIFF. It’s opened in Paint when I load it, so I know that it’s an image file. However, if I try to open one in Paint that was actually PDF, it would error.
OSM2 is sub-objects, like annotations and e-form XML. Then, OSM3 is for batches. Batches are the temporary documents that exist before it becomes a real document. OSM 2 is going to be a lot smaller than OSM 1 but still have data in it, especially if you use e-forms. OSM3 is typically almost empty. It only contains the documents temporarily.
Your drawers are 100% separate from those. Drawers are metadata that we assign to those documents. The reason I had mentioned them in connection with each other is because it’s frequently, your drawers are sort of per department and you may want to have separate security per drawer. On the actual image files, you may want a separate retention.
Actually, there are many clients who store or have separate OSMs per some specific drawers. And that is where that takes us back to our workflow, that’s why we have those transfers. I hope that answers that or adds some clarity there. What else? Anything else? I don’t see any new questions. Okay. Sorry.
Speaker 2:
Follow-up question. What is the best practice when splitting your OSMs?
John Marney:
Oh, gosh. There’re two main reasons you would do it. The first is the reason I’ve just mentioned, for security in storing different kinds of document. The other reason is just to help with the disk management in general. If you are rotating drives in and out and you need to establish what’s called OSM rotations so that when an OSM reaches a certain size, you spit up a new one. Maybe generally on a new disk, or it’s not necessary, but on a new disk so that you aren’t maxing out the previous disk.
Then, if you have retention policies in place where those documents actually get deleted at some point, I can actually free up the original disk which means you can then cycle back your future OSMs onto the original disk. Thereby it’s really mostly practice for good disk space management.
John Marney:
As far as best practice on when to split, that just depends on the size of your drives and the volumes of documents that are coming in.
Speaker 2:
Poll questions asked, they have very large OSM and they were wondering if they’re able to split by years.
John Marney:
A hundred percent yes. So, you’d want to go ahead as…the first step is to create new OSMs for each year. The easiest way to do that is there are a number of in tool commands. If you’re not familiar with those, they’re documented out on the Hyland portal. Or I can hop over there real quick. It’s too early. It’s 2:45. We may not have time to walk through that today, but we’d be happy to do a follow up session. But there are plans to create a new OSM.
Then, to actually migrate your existing documents into those OSMs, I think probably it would have to be in iScript. There may be some creative, some other ways to do it. There’s an intool command to actually take a document by document ID and migrate it from one OSM into the other. You would have to run that command once per document you want to move. So, one way or the other there’s going to be a batch file that has to run some sort of script to manage that. But it’s definitely doable. It would be a good idea because typically there are a lot of cases where your retention is done by year for I think oftentimes things like students. So, that’ll be a good practice. Cool.
Let’s try to get through the rest of these few types. Back to my test workflow here. Those were great questions, by the way. A lot of fun to just spill my guts about all these things I’ve acquired over the years.
TIFF conversion. Convert form queues are intended, they have a great intention, however they don’t actually work very well. So, if you have an e-form inside of ImageNow and you want to flatten that out and store it as an image which can no longer be edited, there’s some ton of different business cases for why we want to do that and this queue is meant to facilitate that. So, I might have invoice form like I have here where I want to, you know, form conversion…A lot of finding out.
You specify where it goes when it’s successful, where it goes when it fails. You have some conversion options. If you want the JavaScript inside of the form to actually execute, it can do that. When you say which form and presentation you actually want printed. So, the challenge here though is that if you think about any given e-form, the data inside of that form may not lend itself to just being flattened out as is. You may have large text areas or even just normal text boxes where the data continues outside of the visible range, when you flatten the format you don’t get that. You just completely lose that data.
Furthermore, there’d just been a number of issues with how this functions technically over the years, where the image quality that it creates is not that great. And so we’ve had questions from tons of clients over the years, how can we improve this or can we improve the way that this convert form key works? The answer generally is no. We can’t really improve the convert form queue. We actually would build a process completely outside of this queue to take those forms and flatten them out in a much better way. But for simple form, it can still be effective.
Next, on integration queues, important to note, I am actually on version 7.1.5 in our sandbox here. A couple of these have actually changed, some of the things I’m showing. The integration queue is…I can’t remember. I can’t remember if one or both of these have changed. You have integration queues and you have connect queues. Okay.
This is an integration queue. These have actually been changed a little bit. These actually rely on an envoy web service to be set up in the management console in order to connect with outside web services. Envoy was removed in 7.2.2, I believe. They replaced these with a different queue that functions very similar. You see in the Cross-Department Settings, there…one was here. Well, you should have set up envoy. I might have a licensed for it actually. Anyway, envoy is where you set up a web service to be consumed and then the queue is actually how you would then interface with that.
The way this is most typically is and almost all of you probably have is and things like FCC. FCC is file conversion component. That’s what the automated service that takes PDFs or Word documents or whatever you have and converts them into TIFFs so they’re more easily stored and manipulated in ImageNow. FCC actually utilizes this kind of queue to facilitate the passing of the document back and forth.
Question. Okay. We’re moving from version 7.1.3 to 7.2.4. I’m not aware of a 7.2.4. There’s 7.2.3 and 7.3. So I’m assuming it’s 7.2.3. How can we leverage integration server better in our environment? I kind of don’t understand integration server abilities or ways to leverage this application. Well, that’s an excellent question. Integration server, it may be deserving of its entire own session. I’m going to try and spend five minutes on that here at the end so that I can give you some answers on that.
Actually, I’ll jump into it here shortly. The final queue type is connect queue. These are also typically used with various other sub-processes. I believe the place where I would probably see this the most are in our Brainware integrations. You would have a queue that would hold documents while the image is being processed in Brainware or some other platform and you see that it has a route after on the failure.
What this would do is actually push the document out of the queue to somewhere else if it hasn’t actually received a message back from the other system. This is useful when the other system fails in its communication somehow.
Again, I think that the place we typically see this is in Brainware integration or something, and so on. I will say that, by far, that kind of queue, and really any kind of workflow or work queue followed by a super queue, everything else is very specific use case.
Let’s take our five minutes, jump into the integration server. Just to sort of bring this full circle, so any changes made inside of the management console, just as a general tip, you need to restart the ImageNow client before those can be reflected. So, you’ll see that inside of my workflow list here and, yes, we haven’t tidied it out, it’s very messy, I created this John Test workflow…and it is not in this list. So, what I would…actually, let me log back in. And now it will be reflected inside of here.
There’re a couple things that I want to just mention just to again come full circle. So, you’ll see that…Number one, these crazy name queues with these unique IDs, this is for me not naming some of the queues that I created. So, if you do not name a queue inside of the workflow designer, it will display the queue ID instead of its name. That could be confusing to users so I would typically always make sure document it and naming queues.
Finally, you see what I mean by actually naming these in a fashion that allows them to be alphabetical. The only downside there is that ImageNow for the sub-queues use a sub-queue name as the alphabetic order instead of the super queue name. So, you see AP Approver showing up here in the A. These are typically user names in the sub-queues. Those will cause it to be interspersed all the way through. I wish that there could be an enhancement to the product to alphabetize these a little bit differently, maybe by the super queue name instead. But I think all of our wishes for product enhancements to preserve the content are probably just going to fall into a void somewhere. So, not a lot of good wishing.
But the process is displayed linearly top to bottom. They go document toward inbound queue to go to invoice entry, they go to my AP 3.0 approvals, they go to 4.0 export. So, the idea is to give users a linear path through the workload as a process.
The next thing is that the other reason we name things like this, and not just name them purely based on the description of the activity, because it is a little messy to the user. Right? AP1.0. from user perspective, I would probably just prefer to name this queue invoice entry. Right? Let’s get the other jargon. The main reason to do that is for administrative purposes. So, if I open the capture profile to manage these and I want to create a new document capture like a scan profile ImageNow printer and I am looking for that workflow queue that I want to send these documents into, this is a list of every single workflow to you inside your system.
I don’t name these in some sort of logical linear way. It can get extremely cumbersome. If I have multiple types of approval processes inside of my ImageNow environment, I can have invoices, I can have requisitions, I could have, you know, financial aids, I can have admission, I could have all sorts of things, you can have thousands of queues in this list. So, it’s important to keep in mind how you’re naming these things when you start the workflow process.
That is some real high-level workflow build. If you have any questions on that, please feel free to submit. Again, we’re going to take a look at this integration server question, but I would love some feedback on the kinds of topics you would like to see workshops on. I would like a little feedback if you are interested in the things I mentioned already, the clearing the ImageNow database and then iScripting. I think those are those are the things that we typically get asked for the most help with, so I hope that there’s a hunger for that kind of knowledge.
All right. Let’s pop up to the Hyland documentation. Anybody who doesn’t know, this is most useful portal for all of their documentation is public facing, at least for the time being. So, docs.hyland.com. You don’t need to login. There is a section on integration server. Integration server is the rest-based, a restful web services API for inbound and…yeah, just inbound integration to ImageNow. It replaced messaging agent which was removed from the product within the last couple of versions. It is really good. I think that those of us who integrate with it and use it sometimes can’t even appreciate how good it is. For example, OnBase doesn’t have a restful web service to integrate. You generally have to use the DLL integration for the unity API. This thing is available for ImageNow. It’s actually really fantastic. I think it’s really well-documented. Be the newbies, who can go out and get information about this.
I’m on 7.1 file. I’m going to go to the online help. Really there’s quite a bit here, but the meat and potatoes is in your operations. All the API calls that you can make the integration server, they don’t support everything. So, future releases including 7.3, the major features in 7.2, 7.3 and in the future are going to be updates to integration server to facilitate better integrations, but also to facilitate the experience platform.
Let’s say I want to do something as simple as store document. There are versions and so…when integration server was first released, they only had version one of all these and then over time they add features. To retain backward compatibility, they have to still support the older versions of those web service call.
If I want you to store a document on the ImageNow server, I have this post document. If you expand all of the information about this, you can see the different criteria. Usually, the most useful thing is to look at these samples. You see here is a json sample of the information that needs to be passed to create a document. You have your index keys, properties, things like that. So, the question was, how can I better use integration server to integrate with my environment? Well, so that’s a really loaded question and it really just depends on your use cases and what you need to do.
I would say that one way is…In many business applications that we see, many business applications have URL link, say, to web now or something. The users can view a document from inside of the record inside of the business application. Maybe that’s Lawson, maybe it’s PeopleSoft, maybe it’s Oracle EBS, SAP, whatever. Right? Those have their own problems, some related to the clients, some related to the fact that that document may not exist, et cetera. We’re working with a couple of schools right now, just PeopleSoft, who are converting PeopleSoft. Instead of using these either older API calls or URL calls to fetch documents, they’re actually fetching documents through this integration server calls.
What they’re doing is they’re building out this web integration server get document. It can perform searches and return results back to the ERP. It actually fetches the actual document in the image. If you have some sort of workflow system outside an ImageNow, maybe you’re doing some sort of approvals inside of your business application, but you still want to track and move documents inside of ImageNow workflow so that history is reflecting on the document, you could go to the workflow calls…I don’t know which one it is, workflow item maybe. I think its workflow item. You could actually route that document inside of the ImageNow workflow without anybody needing to log in and do it. Really anything that you can possibly imagine you can do most of it through integration server. Yeah. Really the biggest thing is any integrations from any other applications that need to happen probably want to happen through here.
Okay. Let’s see. Did we get any other questions?
Speaker 2:
No. Just a couple of great suggestions on future web series.
John Marney:
Yeah, it’s pretty good. Someone told me next time our baby pictures, I will accommodate it. iScripts would be great demo. Yeah, we’re probably going to do that. I will warn you then, doing an hour of iScript is basically a drop in the bucket. Workshop on creating applications plans, we can totally do that, including we can walk through the newest supported method of using that app get tree script instead of the update data. Cool. Okay.
Well, that’s pretty much all our time for today. Again, this recording will be available and made available and distributed. Invite your friends to the next one. We are planning on doing this every month, so probably roughly a month from today, we’ll have the next one, and we’ll get some information out about what the content will be. I think we’re planning on doing the database query in one. I don’t know. I might shift that to do the iScript one instead, we’ll see.
Well, thank you so much for attending. Please feel free to reach out to us. This is what we do. This is what we live. This is what we love. Always happy to help with your ImageNow and other pieces of software. Well, thank you and have a good day.
RPI Office Hours is a free, interactive monthly webinar where we encourage administrators and end-users to learn more about specific components of your enterprise content management or business process automation software products.
Want More Content?
Sign up and get access to all our new Knowledge Base content, including new and upcoming Webinars, Virtual User Groups, Product Demos, White Papers, & Case Studies.
Entire Knowledge Base
All Products, Solutions, & Professional Services


Contact Us to Get Started
Don’t Just Take Our Word for it!
See What Our Clients Have to Say
Denver Health
“RPI brought in senior people that our folks related to and were able to work with easily. Their folks have been approachable, they listen to us, and they have been responsive to our questions – and when we see things we want to do a little differently, they have listened and figured out how to make it happen. “
Keith Thompson
Director of ERP Applications
Atlanta Public Schools
“Prior to RPI, we were really struggling with our HR technology. They brought in expertise to provide solutions to business problems, thought leadership for our long term strategic planning, and they help us make sure we are implementing new initiatives in an order that doesn’t create problems in the future. RPI has been a God-send. “
Skye Duckett
Chief Human Resources Officer
Nuvance Health
“We knew our Accounts Payable processes were unsustainable for our planned growth and RPI Consultants offered a blueprint for automating our most time-intensive workflow – invoice processing.”
Miles McIvor
Accounting Systems Manager
San Diego State University
“Our favorite outcome of the solution is the automation, which enables us to provide better service to our customers. Also, our consultant, Michael Madsen, was knowledgeable, easy to work with, patient, dependable and flexible with his schedule.”
Catherine Love
Associate Human Resources Director
Bon Secours Health System
“RPI has more than just knowledge, their consultants are personable leaders who will drive more efficient solutions. They challenged us to think outside the box and to believe that we could design a best-practice solution with minimal ongoing costs.”
Joel Stafford
Director of Accounts Payable
Lippert Components
“We understood we required a robust, customized solution. RPI not only had the product expertise, they listened to our needs to make sure the project was a success.”
Chris Tozier
Director of Information Technology
Bassett Medical Center
“Overall the project went really well, I’m very pleased with the outcome. I don’t think having any other consulting team on the project would have been able to provide us as much knowledge as RPI has been able to. “
Sue Pokorny
Manager of HRIS & Compensation
MD National Capital Park & Planning Commission
“Working with Anne Bwogi [RPI Project Manager] is fun. She keeps us grounded and makes sure we are thoroughly engaged. We have a name for her – the Annetrack. The Annetrack is on schedule so you better get on board.”
Derek Morgan
ERP Business Analyst
Aspirus
“Our relationship with RPI is great, they are like an extension of the Aspirus team. When we have a question, we reach out to them and get answers right away. If we have a big project, we bounce it off them immediately to get their ideas and ask for their expertise.”
Jen Underwood
Director of Supply Chain Informatics and Systems
Our People are the Difference
And Our Culture is Our Greatest Asset
A lot of people say it, we really mean it. We recruit good people. People who are great at what they do and fun to work with. We look for diverse strengths and abilities, a passion for excellent client service, and an entrepreneurial drive to get the job done.
We also practice what we preach and use the industry’s leading software to help manage our projects, engage with our client project teams, and enable our team to stay connected and collaborate. This open, team-based approach gives each customer and project the cumulative value of our entire team’s knowledge and experience.
The RPI Consultants Blog
News, Announcements, Celebrations, & Upcoming Events
News & Announcements
Prepare for the Cloud with ERP Change Management
Chris Arey2024-04-17T12:49:59+00:00April 16th, 2024|Blog|
Pay Transparency Laws by State & How to Comply
Chris Arey2024-04-05T17:49:03+00:00April 2nd, 2024|Blog|
Live on CloudSuite: Navigating the Post Go-Live Phase
Chris Arey2024-03-23T10:24:11+00:00March 19th, 2024|Blog|
Ready For it? The Infor OS Portal Rolls Out Next Month
Chris Arey2024-03-06T17:22:01+00:00March 5th, 2024|Blog|
Infor CloudSuite Pricing: Navigating the Costs of an Implementation
Chris Arey2024-02-21T17:36:57+00:00February 20th, 2024|Blog|
High Fives & Go Lives
AP Health Check at Jeffries Creates Path for Increased Efficiency, Visibility
Michael Hopkins2024-02-26T13:51:02+00:00November 30th, 2020|Blog, Brainware, High Fives & Go-Lives, Perceptive Content / ImageNow|
Customer Voices: Derek Morgan, MNCPPC
RPI Consultants2020-12-16T17:50:32+00:00August 14th, 2020|Blog, High Fives & Go-Lives, Infor CloudSuite & Lawson|
Voice of the Community: Jen Underwood, Aspirus
RPI Consultants2024-02-26T06:04:23+00:00March 14th, 2020|Blog, High Fives & Go-Lives, Infor CloudSuite & Lawson|
Voice of the Community: Keith, Denver Health
RPI Consultants2024-02-26T06:01:19+00:00March 14th, 2020|Blog, High Fives & Go-Lives, Infor CloudSuite & Lawson|
AP Automation Case Study at Nuvance Health
Michael Hopkins2024-02-26T13:48:07+00:00March 4th, 2020|Blog, High Fives & Go-Lives, Infor CloudSuite & Lawson, Knowledge Base, Kofax Intelligent Automation, Other Products & Solutions, Perceptive Content / ImageNow|
Upcoming Events
RPI Client Reception at CommunityLIVE 2019
RPI Consultants2024-02-26T06:09:32+00:00June 20th, 2019|Blog, Virtual Events, User Groups, & Conferences|
Free Two-Day Kofax RPA Workshop (Limited Availability)
RPI Consultants2024-02-26T13:24:38+00:00June 13th, 2019|Blog, Virtual Events, User Groups, & Conferences|
POSTPONED: Power Your Logistics Processes with a Digital Workforce with Kofax
RPI Consultants2024-02-26T13:29:29+00:00May 29th, 2019|Blog, Virtual Events, User Groups, & Conferences|
You’re Invited: Customer Appreciation Happy Hour
RPI Consultants2024-02-26T06:27:45+00:00March 14th, 2019|Blog, Virtual Events, User Groups, & Conferences|
RPI Consultants Sponsors 2019 Michigan Manufacturing Operations Conference
RPI Consultants2024-02-26T13:53:21+00:00January 30th, 2019|Blog, Virtual Events, User Groups, & Conferences|