This is a demonstration of the OnBase Unity Client. For this demonstration we will be using OnBase Foundation EP1. I am also going to log in with the manager account. The manager account does have access to everything in OnBase, so this will vary depending on your users. Let’s go ahead and get logged in.
Once you’re logged in to the OnBase Unity Client, you are directed to your home screen. You are able to change what your home screen looks like and we will go over that later on. Along the top here, we have different options, file, home, help desk, briefcase. These options will change depending on your OnBase version, your modules and the licenses you have as well as your security. In our ribbon up here we do have different options, which will also change based on your user security, your licensing and your modules.
The first thing I would like to do is create a new form. I went up here to the ribbon and I selected forms. From there, on the left-hand side I can see any form that I have access to to be able to create. For this demonstration, we have provided the type of form next to the name of form, so we have an HR interview guide which has an [inaudible 00:01:23] form, and then we have an HR time off request, which is a unity form. I’m going to go ahead and redo a request for materials form. I can select on the item here on the left and then it’s going to ask me for the following information. Notice I am just keying everything in.
On the requested delivery, I am able to populate a calendar for people to select their date. Along the side, I can select add, and then I can either enter in the item I’m requesting, item name of chalkboard. Do people even use those anymore? I only want one. Nobody uses them, so they’re only $20. I have a dropdown for vendors, so this is an office supply warehouse vendor. Now you’ll notice my total over here is $20 and my grand total down here is also $20. I’m going to go ahead and add another item. The second item I’m going to order is chalk to be able to write on our chalkboards. I would actually like five of these pieces of chalk. They are $2 each. They are also coming from the vendor of Office Supply Warehouse and you’ll notice my total for the chalk, five times two is 10. That automatically updated for me and I cannot click in here and change anything in this field.
Also, now I have a chalkboard for $20 and five pieces of chalk for $10, and my grand total is $30. I can click here. If I would like to sign this form. Typically, I would recommend doing this with a signature pad attached to your computer. I’m going to go ahead and apply this signature, and I’m going to hit submit. I do not want to create a new form, so I will select no. Forms are very useful, obviously, to replace a paper form with electronic form, and then these can be routed in OnBase and stored and retrieved at any time.
Now that I’ve shown you how to submit an electronic form, let’s go ahead and look at how to import a new document. I’m going to go to the import green arrow right here. Off to the left-hand side, I’m going to go ahead and narrow down the type of documents I want to be able to select from by selecting a document type group. A lot of organizations will set up a document type group more so by a department than anything else, so you’ll notice in here we have accounts payable, accounts receivable, human resources, information services and things like that. I’m going to go ahead and select accounts payable. Then I can select my document type. I’m going to go ahead and import a AP, so accounts payable packing slip.
Now I have two options up here at the top. I can browse to a location on my desktop to go ahead and find a file, or I can use a device that’s attached to my computer such as a scanner or camera to upload the file. For today, I’m going to select browse. I already have something selected here in my pictures. I’ll go ahead and open that. Let’s pretend this is an AP packing slip, and then I can provide the metadata for this packing slip. For example, these keywords, I would say I have a PO number 123, a vendor number of 951, a vendor name of Hyland and my invoice number is going to be 426.
If I no longer wanted to upload this document, maybe I realized I did it earlier today or just don’t want to do it anymore, I do have a cancel option up here. If I was uploading multiple pages, I could go ahead and remove all my selected pages that I have one page, five pages, or I could select to remove all pages. I, of course, can rotate the document left or right, but everything looks good, so I’m going to go ahead and select import. Once a document has been uploaded successfully into the system, you will see this window appear. This gives you additional information to see on your document.
Now if I select keywords, off to my right-hand side I will see those same keywords I just typed in on these documents and we have other features as well such as cross-reference. If I had something else set up in the system, maybe an invoice, I could go ahead and use this packing slip to cross-reference the invoice that has the same metadata on it. Now that I’m done uploading, I can go ahead and hit cancel. However, I don’t have anything in here, so I’m just going to go ahead and hit home. I’m back to my ribbon up here at the top. Let’s go ahead now and retrieve that document I just scanned through document retrieval.
I’m going to hit our magnifying retrieval. Again, I want to sort by my department, so I’m going to go ahead and hit the document type group and select accounts payable. I’m going to find my AP packing slip. I know that I imported this document today, so I’m going to do a date range of today and select find. Most systems will require that you do enter either a date, or keyword or sometimes both so that way you’re not retrieving a bunch of documents all at once. Here’s my document that we just imported in. If I did not know what day it was on, maybe I didn’t even know the PO number or the vendor number, I didn’t know any information, but I thought maybe it was like the PO number was 12, and I can’t remember the last digit. I can go ahead and hit 12, and then use the wild card, do a find and it would find any packing slips that have a PO number of 12.
In addition to using the import option to put documents in OnBase, we can also use batch scanning. I’m going to go ahead and select our batch scanning option. Again, this is visible to me because I have a license and the security to use it. I can select any of our scan queues here off to the side. A scan queue is just narrowed down the type of documents that are particular person is able to scan to. I’m going to pick our AP vendor invoices, and then on the right-hand side I have a couple of different options. scan mode. We have no index, which means I’m just going to put a bunch of documents in the system. I’m not going to tell OnBase what type of documents they are. I’m not going to give them any keywords. I’m just going to scan everything in them, and then eventually I will go back and actually index these documents.
I could do pre-index, which means I’m going to tell OnBase a couple pieces of information right now, and then I will go back later and fully index the documents, or I can select the full index option, and that means I will be indexing everything right now, and I will not be going back to make any changes. If I wanted to change the document type of the item I’m scanning in, all I have to do is select the dropdown and pick a different document type. We only have one configured for this system today, so again, you’ll notice here we have a document date. We can always change the date. It automatically defaults to the day that you’re doing the scanning, but maybe you received this invoice a week ago and you’re just a little behind on your scanning. You can go ahead and change this date, and then you can enter in the keywords like we did on the import screen. Once you have everything filled in, you would just hit scan.
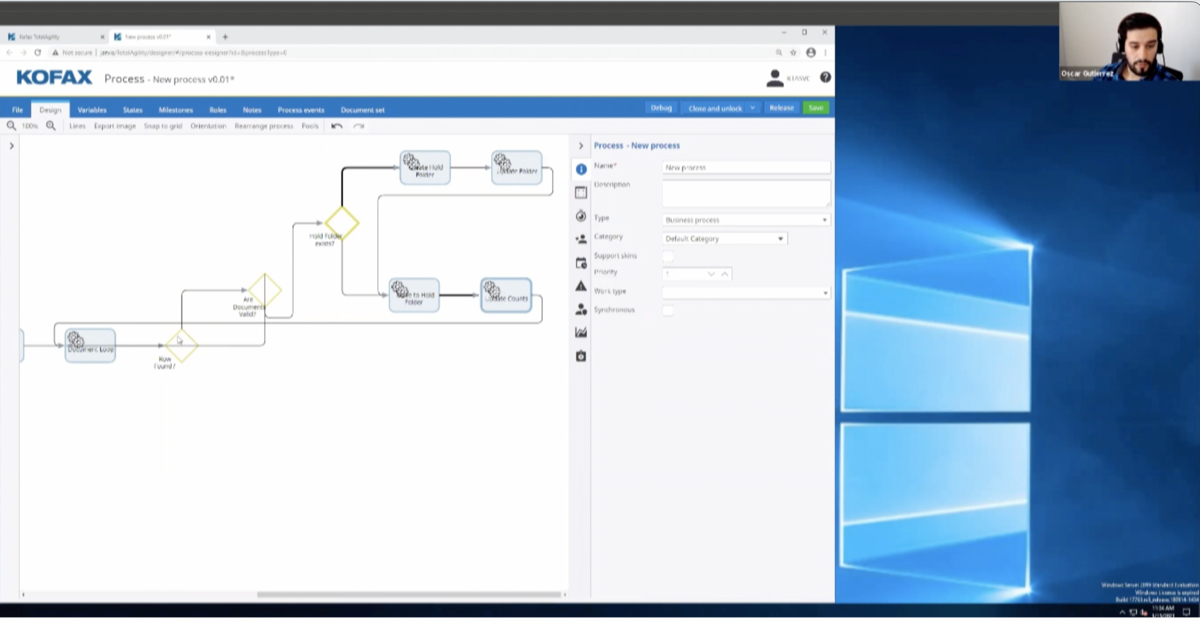
I’m going to go ahead and go back to the home screen. The next item I wanted to show you is our workflow. OnBase workflow is a very powerful tool. It is a way to move documents through the system electronically. If it is routing an invoice for approval or maybe a resume for somebody to review, it allows you to route those items using routing logic. It provides notifications to the users and you’re able to keep things moving in a timely fashion. Nobody loses documents. It’s all security based, and it is all audited. Right now, I am in a life cycle called AR outstanding invoices. I’m going to go ahead and look at a workflow queue called past due invoices, one through 30 days. When I click on this queue, you’ll notice my documents over here are only showing two. That also is identified here in the name of the queue that there are two documents pending my review.
If I click on a document, you’ll notice the image on the screen will change. Along the top here on the right-hand side, it’s telling me how many pages there are for this document, how many notes are on this document. Notes are very important because somebody may be trying to type in a message for somebody else to look at. This one here, for example, is an AR call note. You can name your notes anything you would like, and you’re able to type in a description on them. This says a customer says they will pay invoice on the next check run. This is a great way to communicate back and forth with each other without actually writing sticky post-it notes, or emails or anything else. Then it’s visual and everyone in the system is able to see it.
I have looked through my document, everything looks great. I have a few actions I can do up here. I can use a task that says called customer 30 days. When I hover over this task, it gives me a description of what the task will do. I can use this task that I want to dispute the invoice, or I can use a task to go ahead and email a copy of the invoice. Let’s go ahead and use the called customer 30-day task. This now allows me to apply a note. You’ll notice that some of the information is already typed into this note. These are things that you are able to set up in advance, that every time you use this note, this message will always appear and then you can add to it.
It would help if my caps lock was not on. I’m going to go ahead and select okay. The system is going to go ahead and update, and now you’ll notice there’s only one item left in this past due invoices, one to 30 days. Another thing I wanted to show, like I mentioned earlier is our home screen. We can set that home screen up to be a personal page that is organized per each individual. If I want to always go to this past two invoices, one through 30 days, I can right click on my workflow queue and I can say add to personal page. Same thing with any other queue in here, past due invoices, 31 to 60 days. Add to personal page.
Let’s go back to her home tab. The next thing I would like to show you is the custom queries. Custom queries are another way to retrieve documents with more configured search criteria. I’m going to go ahead and select our custom queries, and I want to do a custom query for an AP document search. Here I can type in the type of information I’m looking to do the search on. This is, like I said, very similar to document retrieval. I’m going to go ahead and type in our PO number a 123 and select search, but you’ll notice this time I did not have to select any document types. The system automatically knew to bring up a packing slip and a purchase order just because I typed in that PO number of 123.
The next thing I would like to show is the file cabinets. Again, in our main ribbon I can go to file cabinets. Along the left-hand side, I have the folder tree of all the different file cabinets we have. Imagine your metal file cabinets you have in your office with all the green or manila folders in them storing documents for you. Same thing, only electronically here. Let’s select the HR employee file cabinet. As soon as I select that, you’ll now see I have options of employees to choose from, so let’s go ahead and choose Andrew Lincoln, employee ID 102.
Same concept. I go to a file cabinet. I open a drawer and then I have multiple folders within that file cabinet. Our electronic folders for our employee file cabinet for Andrew Lincoln is an application information, employment documents and performance reviews. You’ll notice I’m in the application information. My folder icon here is yellow. My screen is highlighted yellow and also my tab over here is yellow. That’s how I know I’m on this one. I can select a different folder just by clicking on it here on the left-hand side. Now you’ll notice this purple-ish blue color. Now my screen is purple, blue and my tabs over here is purple blue. If I wanted to go to the performance reviews, I could again hit the folder on the left-hand side or hit the tab over here on the right-hand side.
Of course, as you know, performance reviews typically are yearly. Now within this performance review folder, I have sub-folders for all the different years, 2007 2008, so on and so forth. Let’s jump back into the application information folder. Within this application information folder are all my document types down here on the left-hand side. Anytime any document for Andrew Lincoln is scanned in the system, you can set it up to automatically file to this folder.
In this folder right now, it’s saying I have one of seven documents. I have a cover letter, resume, application, so on and so forth. You’ll notice one thing though that’s pretty much stands out, is this writing here in red. Referenced letter not found. This is a great visual to know that you have a folder and it’s missing a document. Anyone in your HR department can open up a folder for an employee and see, oh no, we’re missing the employee’s resume, we’re missing a reference letter, whatever file or document you need. Folders can be very powerful as you probably have noticed. As also shown, you can have folders within folders.
Let’s go ahead and go back home. Another powerful tool that a lot of organizations have been using is the reporting dashboards, so we’re going to select our reporting up here. On the left-hand side, we have the different reports that we’re able to access and run, so we’re going to go ahead and select our AP invoice processing workflow. I will advise that sometimes reports could take a little while to run depending on how much information the report is going to display, so here’s our AP invoice processing workflow. It’s giving us quite a bit of information, bar charts, pie charts, invoice amount, process per employee. These reports are all customizable. OnBase system admins are able to create them. You can add any type of information you would like on them, but it’s just good to know that this is something that is viewable for your users while they’re in the Unity Client already.
You do have some additional options here in your ribbon. You could share this with somebody. You could send it, so maybe you wanted to email it to somebody or even add it to your personal page. You could copy the information to a clipboard. You could print it or you could export it to data. Again, you’ll notice every time I hover over one of these icons, it tells me what each icon is doing. Let’s go head back to our home screen and now to our personal page.
Here’s our personal page that has all our tiles on it that I’ve set up for myself. Again, this is per each individual. The nice thing about your personal page is you can move things around however you would like. I want everything to kind of be just in my eye view, so I don’t have to scroll at all. This a workflow queue that I just added while we were on this demonstration of past due invoices, 31 to 60 days, is a really important queue. I’m going to go ahead to this configuration option, and I’m going to change the color of this queue to more of this red color just so it really stands out when I’m looking at that. Oh, my goodness, I have four items that is in this queue currently. I could also right click on this personal tile and I could delete it. I could rename it, or I could choose my different color from here.
When you click on your queues, it will then open up the documents for you. This AP search tile will take me to the custom queries. This tile, you’ll notice this folder icon, so it will take us to the file cabinet. This HR benefit change request, because of these three bars, will take you to a form. This icon here indicates it’s a workflow. The numbers down here will indicate how many items are in each of these workflow queues. Again, this is just a high-level overview of the OnBase Unity Client. Everything is based off of each individual system, what you’re licensed for, what you have access to, and what you have set up. I think this was a great start, and I hope you all enjoyed. Thank you.