Cailen Myers:
Hello, everyone. Thank you for joining the OnBase Form Solution webinar. I just want to start with a few housekeeping items before we get started. All our webinars are recorded and are made available on our website. All lines will be muted because we are recording this.
So, if you have any questions, please post them in the GoToWebinar question panel and I will definitely get to those at the end of the webinar for you. So today, we’re going to talk a little bit about some form options available in OnBase Unity Forms, Image Forms and the HTML forms.
We currently have a 2020 OnBase webinar series. We started in the beginning of the year. So, we have a couple upcoming webinars left, one for OnBase in the HR environment and then OnBase case studies and success stories. So, if you’ve not already done, so please sign up for any of the upcoming webinars.
Or of course, you are welcome to watch any of the webinars we’ve already done for the year at our website. If you’d like to see any additional webinars, please feel free to reach out to us and let us know and we’d be happy to set those up. And just a little bit about myself.
So, if you have not been following our webinar series, my name is Cailen Myers, I am a senior consultant for RPI. I have over 10 years’ experience with OnBase designing, implementing, supporting, upgrading, you name it, I think I pretty much have done it.
I do specialize in healthcare. And then, also the integrations with EMR and ERP systems. I do have quite a few OnBase and EPIC certifications. And on a more personal note, I am a mom to three Siberian huskies, one of them being a puppy, so she takes up a lot of my time and energy.
But when I do have extra time left, I do enjoy baking and scrapbooking. So, I think that’s enough about me. Let’s go ahead and get started. So today, like I discussed, I would like to talk about our HTML Forms, Unity Forms, Image Forms, and then we’ll just have a little bit of an overview and open it up for any questions that you may have.
I would like you to know that all our webinars are not produced nor endorsed by Hyland. This information that we’re sharing today is current as of April of 2020. And then, the advice and the content contained within the webinars is for educational purposes and based solely on the experience of the RPI consultants.
So, let’s go ahead and get started talking about HTML E-Forms. So, in order to use the HTML E-Forms in OnBase, you would need an E-Forms license. You would have to create the HTML forms externally outside of OnBase. Of course, you would need some type of OnBase client to access these forms.
And then, in the configuration rates, you would need the HTML Forms product rights. The E-Form module gives users the ability to complete and submit HTML based E-Forms into OnBase, I’m sorry, into the OnBase document repository. When the form is submitted, OnBase automatically indexes the document by pulling keyword values from the E-Form keyword fields.
Because these documents are created OnBase, E-Forms of course will help reduce the paper usage associated with scanning and importing the paper-based forms. So, there are really four steps to creating an E-Form. Of course, it takes a little while to two.
But when creating an E-Form, you would create the HTML form again with an external editor. Then from the clients, you would import the HTML form into the SYS HTML Forms document type. So, you would need access to that document type.
Then you create a new document type or you can use an existing document type that has a default file format of electronic form. And then, the last step is to configure the form as an E-Form for the document type. Just a couple limitations when configuring the E-Forms.
To ensure proper encoding, map all keywords associated with an E-Forms document type on the E-Form template. These mappings can be head and keywords if you do not want all of them all the keywords to display on E-Form. If the HTML form is a Unicode, HTML form ensure that the form is imported with an HTML file type.
And then, specific currency data type should not be used on documents of the type E-Form or virtual E-Form. This data type is not supported on either of those document types. So, when referring to creating the HTML form outside of OnBase, there are many different programs you can use to create these, notepad, an HTML editor, Microsoft Expression Web, any of those will work to go ahead and create the E-Forms or HTML forms.
E-Form templates contain input fields that are mapped to document keyword types and other system values. E-Forms can also contain information that is not mapped to keywords or stored in the database. The information is stored with the form and is available for viewing but is not available to be searched on the documents.
Just a couple of limitations when configuring your E-Forms. So, when mapping fields in a form that contain either keyword data or non-keyword data, the name attribute must be used in order to store the data. If you have more than one field with the same name property, the first instance will overwrite the value in any subsequent instances.
And then, the E-Form document will continue to use the HTML template revision that was used when the E-Form was created. Information entered into properly configured form fields is saved as keyword values or system values on the E-Form.
And then, the method of identifying keyword types and values in the HTML form depends on the HTML editor. So, a little bit about the HTML forms and the template for these forms. So, before beginning, any of the form field mapping, the form must be created first.
Regardless of whether you use a text or HTML editor, all information on the HTML E-Form must be contained within form tags. The form tags must include, so the form method equal post. So, go ahead and take a look at that on the screen for the E-Form to submit correctly in OnBase.
If these tags are not included, the E-Form submit button acts as a reset button instead of submitting button. So, we definitely don’t want the form to reset, we would want it to be able to be submitted into the database. And I just have an example on the screen here of the correct form tags to use when creating an E-Form.
Form fields such as text boxes, checkboxes, radio buttons, multiple select boxes, those can all be mapped to keyword types. And there’s two ways to map the form fields to those keyword types. So, you can map the form field to a keyword type number, or you can map the form field to keyword type name.
In most cases, I would recommend using the keyword type number. And that’s mainly because in OnBase, you can always rename a keyword type name, but the number will always stay the same. So, for consistency and for having less maintenance to do on an HTML form, I would definitely recommend using the keyword type number.
And then, mapping to a keyword type name is really only recommended if the form must be imported into multiple databases. Because then of course, the other databases may not recognize that keyword type number. So, what we’re talking about when we say keyword type number is this format here.
We would have the OBKey_KeywordNumber_#. So, I have a display here on the screen of where you would see that keyword number. So, for example, I have check date highlighted. And in the top right-hand corner you’ll see the keyword number of 114.
So, the OBKey in the format is the keyword value that is mapped which must start with the document management system code. So, the OBKey is really the document management code. You’ll notice that OBKey is followed by two underscore characters which I know it’s hard to tell on the screen when you’re using a key word number.
The keyword number is assigned to the keyword type when the keyword type is created. So again, the keyword number would be that 114 that I’m showing there on the screen. And then, the number is the occurrence of the keyword on the form.
So, for example, the first use of the customer name or the first use of check dates would be mapped to 114_1. And then, if you were going to use that value again, you would use the OBKey_checkdates_2.
So, the number at the end would increment every time you’re going to use that instance. And then, the keyword type. So, if you’re going to use a keyword type name on your form, the format would be the OBKey. So again, for the document management system code, _keyword_type_name_#.
So, any codes use to map keywords, including keyword name itself are not case sensitive. When you’re using the currency keyword type, the E-Form formats currency according to the user locale. So, unless the format for the currency has been applied, the keyword type during has been applied to the keyword during the configuration.
So, just keep in mind again the different formats if you’re using the keyword number or the keyword type. And then, the nice thing about HTML forms is you are able to use the tween signatures on your E-Forms. You can add these HTML forms to reading groups in document knowledge transfer.
You can add them to Workview. And you can also use them when doing custom queries. So, instead of just having the normal OnBase window for your custom query, you could actually use your HTML form or your E-Form that you created to display the criteria for your custom query.
Next, I would like to talk about the OnBase Unity Forms. So, many customers use OnBase Unity Forms in conjunction with OnBase Workflow to implement paperless business processes. Some Unity Forms I’ve seen used in the past would actually be some expense reports, vacation request, purchase requisitions.
There’re many different case scenarios, I’ve seen them in HR for onboarding. The possibilities are endless pretty much if you have a paper form and you’re able to convert it electronically, Unity Form is a good option. So, for Unity Forms, you would need a Unity client license.
And then, the browsers that are supported for these forms are listed here. So, you do have your normal IE 11, Edge, Chrome, Firefox and Safari. Again, I have wrote down the steps to configuring Unity Form. Of course, it takes a little bit time to create, but all you need to do is create the document type associated with the form.
Configure user rights for the Unity Form, access the designer in the Unity client, then you would create the form template, configure the form security and publish the form. So again, six pretty easy steps. The lengthy part of course, would be to actually design the form that you would like.
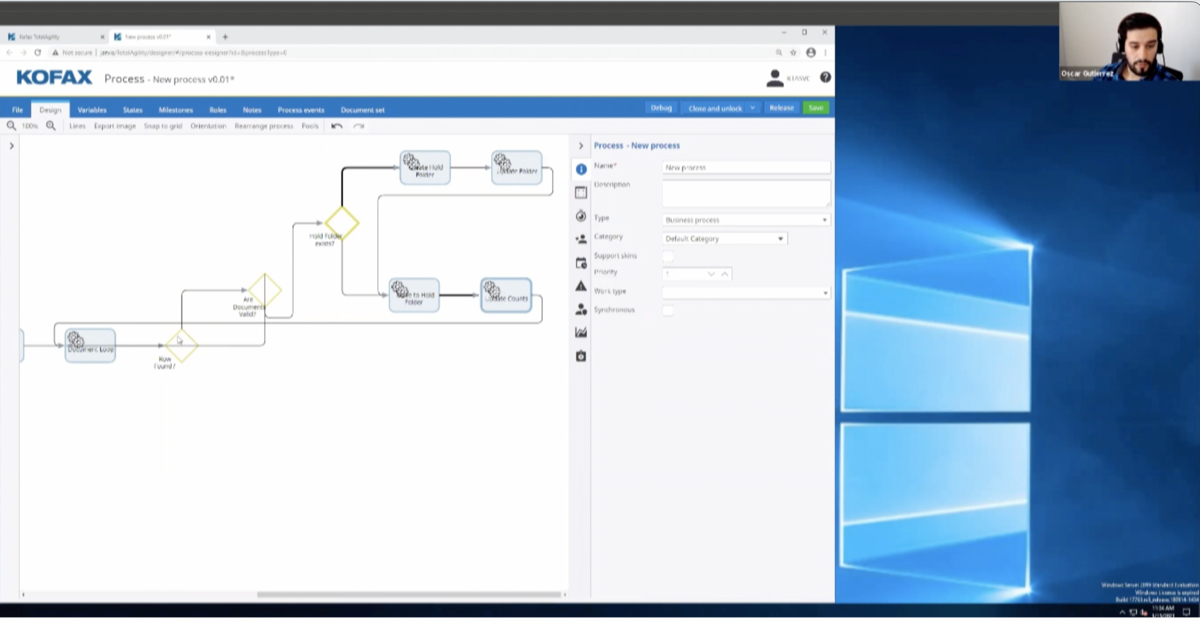
So, I did create a demonstration of Unity Forms and how they’re built and then also what they look like for a user once you’re filling them out. So, we’re going to go ahead and go to our demonstration. Hello and thank you for joining the OnBase Unity Forms demonstration.
In order to design an OnBase Unity Form, you would have to log in to the OnBase Unity client. Once you log into the OnBase Unity client, you would then need to select File, Administration, Form Designer. There are many options on the toolbar. But to create a new form, you would select Create.
You would then select the Unity Form, or you could select Image Form if you were creating an image form. But today, we’re going to do a Unity Form. You can filter by the document type groups. And I’m going to pick an insurance claim. From there, then you can filter by the document types.
And today, I’m going to select this claim for the incident scene diagram. You can then type in your template name. This is the name of the form that users will see when they go to select the Unity Form that they’re filling out. I’m going to just name my form a scene diagram.
You have options to select different themes. There are some preset themes and then there are themes that you’re able to create on your own. The ones that are preset will say a system next to them. And I’m just going to use the first one here.
And then, the last thing I want to mention is there’s this checkbox to add keywords. If you check the add keywords checkbox, then any keywords that are associated with a document type of insurance claims will automatically be added to the form.
So, I’m going to go ahead and check it for today and select OK. My form designer will then open. And you’ll notice that the keywords associated with the document type have all been listed on the screen already for me. So, we have insurance, insured name, policy number, claim number and date of loss.
When you create a new Unity Form, the submit button will also always be on the form, but that is something you can go ahead and remove at any time. First, I’m going to select a section. So, you can hit the section button and then slide it onto your form.
You’ll notice right now this section is called untitled section. So, let’s go ahead and change that information or label to name it claim section. Then the ID field also, we should probably add some type of information because we want it to be able to see what ID we’re using when we’re creating a custom action or any reports.
So, now we’ve created our claim section. On the claim section, there’s a couple options, we can make it read only. So, people are able to see this section but not able to fill it in. We can set the default visual state, so it can be expanded. So, as soon as they open the form, they see everything in the section.
Or we can make a collapse, where they would have to hit the section to expand everything. In this narrow, we’re going to leave it expanded so everybody can see it. And we’re also going to uncheck the box, so nobody’s able to collapse this section.
So that way, all the information will always be visible on the form when it is open. You can also set security around a section of who’s able to fill it out or see that particular section. You can add panels to section area. All I did was click the panel button and then click on the area within the section where I want to add the panel.
Again, we should really change the ID type to be something else. So, we can call it claim panel. And then, right now we’re only seeing one column in our section. In order to add multiple columns, let’s go ahead and click the edit pencil next to the columns, select how many columns we want.
So, for today, we will select two columns. And you’ll notice there’s a message in the preview windows saying that the total width cannot exceed 100%. So, if you did the math, column one and column two are over 100%, so that’s why that error is popping up.
So, for this demonstration, let’s just make them both 50% so they’re equal, but you can make the width of these columns any length that you would like. And now, let’s move some of our keywords that prepopulate on the forum because we checked that box into our panels on our Unity Form.
So, I have moved claim number down to the claim section. And I have moved the data loss keyword down to the claim section as well. Now, we are left with our insured name which is a select list option. And we also have our policy number which is also a select list.
We have our data loss textbox and our claim number textbox. Next, we can go ahead and add checkboxes to our form. So, I’m going to select the checkbox option and drag it on the form where I want. I can label our checkbox anything we would like.
So, let’s just say we’re going to make a checkbox to identify the driver was 16 years or older. I’m going to go ahead and type that into my label area. And now, I’m going to add another checkbox. So, the same thing. I want to change the label of this checkbox to be something else.
So, let’s name it Driver 21 and older. And just for less confusion, actually, let’s name it Driver 16-20. And again, let’s go ahead and update that ID back. So that way, if we’re doing any custom actions, we know what checkboxes we’re looking at for both of these checkboxes.
So now, we have two checkboxes on our form for drivers that are 16-20 years old and drivers that are 21 and older. Let’s test drive this form before we move forward. So, you’ll notice as I check the box for drivers 16-20 and driver 21 and older, I’m able to submit the form without any issues.
But that doesn’t make a whole lot of sense because I can’t have a driver who’s both 16-20 or 21 and over. So, in order to get the checkboxes to work where if you select one, the other one cannot be selected, you would have to use a custom action.
Custom actions are great for this type of scenarios. However, it does add a lot of extra work. So, let’s go ahead and add a radio button group instead. So, I can create radio buttons for my different options. So, I’m going to create three radio buttons.
Again, one could be maybe labels. Let’s see what we should label this 16-20. And then, maybe another one could be labeled 21-30. And then, the last one, we can go ahead and label this one to be over 30. When we have them all configured, we would go ahead and hit enter and then finish.
Now, you’ll see I have radio buttons. So, if I did a test drive on these, if I select this 16-20 radio button and then I tried to select the 21-30, the 16-20 radio button is no longer checked.
So, radio buttons are great when you only want one value to be selected. It’s a lot easier than creating our custom actions when using checkboxes. So, let’s go ahead and close our test drive. And let’s go ahead and get rid of these checkboxes because we’re not going to need them any longer, because we created the radio button group instead.
And like I mentioned before, it’s always best, of course, to change the label of the radio button group. You don’t even have to leave the radio button group in the label, you could call it anything you wanted. And then again, let’s update the ID.
So that way, we know when we’re creating custom actions or any type of reporting what this ID is actually for. I do also recommend making the first letter of every word capitalized just because it’s easier to read. So, DriverAgeRadio button group is a lot easier to see than if you had everything lowercase because you cannot add spaces in the ID field.
There’re some other options here. You can change the orientation to be horizontal. So, if you wanted the age or the radio buttons to go horizontal on the screen, instead of vertical, I like the vertical look for this form. If you needed to change anything, you would select the pencil next to the configure radio button to update those values.
But I think everything looks okay on this on the radio button groups. So now, let’s go ahead and make the claim number required. So that way, when we fill out the form, we have certain criteria that’s needed before we can hit the submit button.
So now, that I’ve went to the bottom of my textbox here and check the require button, you’ll see a red asterisk next to the claim number. And I can do that pretty much on any fields that are on my Unity Form. The next thing I’m adding is a paragraph.
Paragraph is nice because you can add just exactly what it says a paragraph, system additional information on the form. So, I’m going to go ahead and add the paragraph to the top of the Unity Form, hit the edit button next to the empty paragraph.
And then, I’m going to start typing in what I want my paragraph to say. So, maybe this is a legal document between company X and the driver. This is a really nice view, and this looks very similar to how most Word documents look. When configuring a paragraph, you can add a hyperlink, so maybe it’s going to take you to the insurance company’s website.
You can go ahead and change the font color. Let’s select this pretty tealish blue color. Maybe I really want to call out that it’s a legal document so I can make it bold, I can underline it, I could have italicized it. I can change the font size. I can even change the type of font.
So again, all the functions you’re used to when creating a document. And then, of course, we can cancel if we don’t want to save what we just did. Or we could go ahead and save these changes to this paragraph. So now, it’s at the top of the screen.
It looks exactly how I just built it in my edit area. We do have an option to add an image. So, if we would like to add an image of something, maybe you want to add your insurance company’s logo or some other type of image, you could go ahead and select that.
The images do need to be uploaded into OnBase prior to selecting them on this form. We could also add a signature onto our Unity Form which is probably a good idea for making a claim, because we would probably want the signature of the driver.
So, let’s go ahead and add the signature area up where it says insured name and policy number. So again, I’m just clicking in the box where I want it. I could update my label to say driver signature or just driver, anything I want to call it. I can update my ID information.
Again, maybe capital, sorry, I meant to put a D not an F, capital D for driver, capital S in signature. I could also remove the 19 if I wanted, that’s not necessary. And then, for this instance, I did make it required so you’ll see the asterisk.
On the Unity Forms, there are some other options like calculated field. So, let’s just say I’m adding all the amounts of damage that’s done. So, I need a new windshield for $500. I need a new mirror for 200, all these different amounts in these fields could then be calculated to a total.
So, if I had five things, each $100 apiece, they could calculate to $500. There’s a submit button so you can always remove the submit button on the form and add a new one. There’s an option to be able to print this form depending on how you have your environment set up.
There’s a drawing capability. So, on an insurance form, that might be a good idea, because you can have a drawing of a car and then you can allow the users to draw on that image so they could mark up where the damage was done. Or maybe you want an attachment option, so you can attach pictures that you’ve taken of the damage to the car.
There’s a barcode reader which really does not have much value to probably an insurance form right now, but maybe there is a use case for that. I’m sure there is for hospitals. And then, of course, there’s also the logic to capture if this is a computer or a person filling out the form.
So, let’s go ahead and test drive this one more time with our required fields on here now. I’m only going to use the radio group button, submit the form and everything that is in red is required. So, let’s add a claim number. Let’s go ahead and add a signature which does not really look like one.
Let’s apply our signature. And now, let’s go ahead and submit the form. And you’ll see that the form was submitted, and everything’s been processed correctly. If I’m happy with this form, I can go ahead and publish the form. I can assign user groups to it who I want to be able to see it.
I could create a URL if I wanted to be able to access this form externally or even just outside of the OnBase Unity clients. But for today, we’re just going to actually go ahead and look at an existing form that’s already been created in the system.
So, I went to my home screen, in my personal page. I can then select forms to create a new form. You’ll see here I have quite a few forms to choose from. Some of them say image form, some of them are just the regular forms. So, let’s see what one I want to choose.
I have HR, employee relations, information systems, what was back at the top? Accounts payable and contracts. I think I would like to go with this vendor incident report form. I’m going to go ahead and select that. I can go ahead and type in a short description.
I don’t see any required fields on this form. So technically, I could submit this at any time, but let’s go ahead and fill out the fields here. I have the vendor drop down, so the select list. And I’m going to go ahead and pick Fast Travel for my vendor. And what type of issue did I experience.
So, let’s say this is a billing issue. Maybe I was overbilled or who knows, some type of billing problem. And this is associated with PO# 123456. When I select the date of incident, I actually get a calendar to view which is a lot easier than having to remember a date, now you have that visual.
And I can check if this is emergency. So sure, why not. Let’s check that. I can put in a little bit more information into the description, so this is a multiple text box. So, I can type in something like that they overbilled me for my travel or just overbilled me, whatever you want to write in here, it is a free textbox.
I don’t want to put anything in the admin area, so let’s go ahead and submit the form. I get a visual that my form has been saved. And now, I’m all set. So again, to access the OnBase Unity Form Designer, you do you have to go through the Unity client as of right now.
In order to fill out a Unity Form, you have multiple methods. You can log into the Unity Clients without a form. You can fill out a form on the web client. And you can also use a URL to open a form. Okay. So, thank you so much for watching the Unity Forms demonstration.
The Unity Forms is a pretty powerful tool. I know that was a long demonstration, but there is a lot to show and I really only touch a small part of it. So, the next form option I wanted to share with you are our Image Forms. Images. Image Forms are nice because it’s actually taking the actual image of a form.
And then, using the same functions that you use with the Unity Client can make this form editable or configurable or into a form that’s able to be filled out. So, the Image Forms, you would need an Image Form license, the Unity Client license, and then the same browser as apply for these image forms.
Again, six super easy steps to create these image forms, right? So, we’re going to create the document type associated with the form. We’re going to configure our user rights. We’re going to access the designer in the Unity Client. We are going to create the form template, configure the form security and then publish the form.
Image Forms can be created, retrieved, viewed and modified in the Unity Client and Web Client only and only when you are licensed for the Image Forms. So, let’s go ahead now and go to the Image Form demo. I promise you it is not as long as the Unity Form demo.
Hello and thank you for joining me for the OnBase Image Form demonstration. In order to access the OnBase Image Form Designer, you would need to log into the OnBase Unity Client. So, let’s go ahead and log into the OnBase Unity Client using the manager username and the password for the manager account.
Once you log in, you should be taken to your home screen. So, to access the designer, we’re going to go to File, Administration and Form Designer. From there, we can open an existing template, or we can create a new template. So today, we’re going to go ahead and create a new template.
We have an option of creating a Unity Form or an Image Form, so we would select image form. We can filter by our document type group. So, I’m going to go ahead and select human resources with a document type of wage notification form image form.
And then, I can go ahead and provide the template name. So, let’s maybe name it just wage notification and then we can go ahead and select OK. So, notice we have just a blank screen here. So, the first thing we need to do is select our background image for our Image Form.
So, we would go to the pencil over here on the left-hand side to find the image that we’ve already uploaded into our clients. So, I’m going to select the pencil to get my options of images I want to use. I can scroll through the list of any images I already have or I can type in a particular image if I remember what I called it.
So, I’m going to look for the NY pay change. There is a preview window on the right-hand side of the screen, so that’s the form I want to use. I do have options at the top to zoom in, zoom out, cancel, refresh. If I didn’t import a document prior to creating the Image Form, I could go ahead and do that now or I can just select, Select. So that way, I can start actually building this form.
So, you’ll notice on this form there are some fields for name, phone, things like that, so we can add text boxes to those. There are some checkboxes. But of course, the image form does not understand that these are real checkboxes that can be checked.
There’s an area for signatures. So, let’s go ahead and start with our textbox first, and we’re just going to do phone number because it’s easy. So, I’m going to drag my textbox to the phone area. I can make my box larger by using the mouse. I have all my design options still on the left-hand side.
So, I can rename my sorry, one second. Let me click on that, there we go. I can rename my textbox ID or my label. I would recommend doing both. So that way, when you’re creating any reports or custom actions, you know exactly what fields you’re adjusting.
I always also recommend making the first letter of each word capitalized because it’s just easier especially in the ID box where you cannot use any spaces. Just think it makes a little bit easier to read. And then, you can always remove the number at the end of the ID because that’s not necessarily something you need.
But I definitely do recommend renaming the ID field to anything you’d like. I particularly like to keep the control name, so a textbox and just add something in the beginning of it. For the mailing address, I can use a multi-line text box because we know addresses can be pretty lengthy.
There’s not a lot of room on this form, but we need users to be able to add multiple lines and maybe not just one line. So again, I moved my multi line text box into my employer information. I’m going to update the ID field. I can update the label field if I want.
So, let’s move on now to our checkboxes on the form. Like I said, the image form does not know that these are checkboxes today. So, let’s go ahead and add checkboxes over the checkbox that’s already on the form. So, I’m going to add a checkbox to my notice given.
We really probably want to tweak where these checkboxes are at. So that way, you don’t see a box over a box. But just for this purpose, we’re just going to leave them where they’re at, for right now. So, we have two boxes for our notice given. And let’s go ahead and test drive what we’ve done so far.
You’ll notice I can’t test drive because I get an error message. So, let’s go ahead and open that error message one more time. Sorry about that. It said that the form does not contain a submit button. Let’s go ahead and add that submit button.
So, you’ll notice that the submit button did not automatically populate on this Image Form because it didn’t know where to add the submit button. So, I’m going to add it on the right-hand side of the form and let’s retry this test drive. Perfect.
So now, I have my mailing address multi textbox. I have my phone. And they have my checkboxes next to notice given. I cannot do anything else on this forum because I did not draw any of the controls over anything else. And again, like I said, you’ll notice that there’s an overlay of boxes because I did not actually line up the boxes correctly.
So, in our mailing address, I can type in anything I want. You’ll notice when I hit Enter, it goes to the next line. I can scroll up to see my lines. So, we know that there are multiple lines on this textbox. So, that looks great. If you want to play around with it, like I said, you can use your mouse to make the checkboxes a different size, maybe move them around a little bit.
Of course, might be a little bit of a tedious activity, you can also make this form a little bit larger which might be a little bit easier to see where your boxes are at. We can go ahead and add a signature. You’ll see this form is asking for the employee’s signature.
So, we can definitely add a signature box on this form which is always a great idea. The signature box is of course taking up more room than we want just like the checkboxes did. This is a lot of configuration on this end. So, how can we go ahead and change this box?
We can use our arrows. We can make our image a little bit larger or smaller. You’ll notice when we’re doing that though, some of our other boxes already moved, so we definitely want to change those. Or we can go ahead to the left-hand side where our properties are at.
We should probably update our ID while we’re over here. And then, we could change the height, width, tap left, right. We can change all our values over here on the side. So, this is also a nice way to do it for the signature boxes. Any values we want, it’s probably going to be a little bit more of a guessing game for people just changing it, going back and forth to see where we’re at ends up going once we change it.
But now, you’ll notice my box is a lot smaller. So again, with the Unity Forms, it is just a lot of configuring where everything should be and the size of it. But just like before or, I’m sorry, just like on our Unity Forms, we can add a textbox anywhere we want on this document.
So, I’m going to go ahead and add it now to the employee’s rate of pay. So now, we have checkboxes. We have text boxes. We have multi line text boxes. The form’s really starting to come together. But because there’s so many options on this form, we’re not going to go through all of them today in this demonstration, but I just wanted to show you how easy it is to build one of these Unity Forms.
So, let’s look at one now that’s already been built. So, I’m going to go ahead and just close out of this. I’m going to act like now an individual going in to complete a new form. So just like on our Unity Forms, I need to go to the top. I need to select create forms.
And I need to find a Unity Form or, I’m sorry, I need to find an Image Form in this list. So, it’s a really good idea. When you’re creating these forms to put some type of indication on them what one is an Image Form and what one is a Unity Form.
So, let’s go ahead and select our Image Form. And this form I actually did a while ago which is why it looks a lot prettier than the demonstration, I did a few minutes ago. But you’ll notice here we have a select list for our employer name. So, we can select 9 Second Foods.
Once we did that, we have an autofill keyword setup for it. So, filled in all our information for that vendor or for that employee or employer. So, that’s less typing for us to do, less mistakes, looks a lot better. We can then go ahead and use our checkboxes.
We set up custom actions behind the scene. So that way, we can only check one of the checkboxes for this option here. In this scenario, you really are going to probably have to use checkboxes instead of the radio buttons because the form already has checkboxes on them.
We have the employer rate, again, which is just a normal textbox. You have the allowances taken, so we can select anything. Let’s just do none for right now. Is the pay weekly, biweekly, other? We can select anything in that checkbox. Then let’s go ahead and sign the document which I’m just going to use the mouse because I don’t have a signature pad, so my signature is not going to look very good.
So, I apologize for that. Very large E there I just created. And let’s go ahead and apply the signature. And then, you’ll notice on the form because I opened the form today on April 1st, that is the date that automatically populated in the date section.
And then, because I am logged into OnBase as a manager, the preparer’s name shows up as manager. In OnBase, if I had a title associated with my name, that would show up as well, but the manager account does not. So, if everything is filled out on this form, I can go ahead and submit the form.
Or I can keep adding additional information to the form. But it looks like everything’s filled out. So, I’m going to submit the form and it is not filled out. I actually have a primary language that’s a required textbox. So, you can still use text boxes or, I’m sorry, you can still use required fields on this form.
So, I typed in English. Now, I can submit the form and it’s saved successfully. I’m not going to create any new forms. I know that was a lot to go through in a pretty short time. But Image Forms is really just a way to add the controls of a form onto an image of a document. Okay.
So, thank you so much for going through that demo with me. I know we’re getting close on time, so just a few more things to wrap up. I just wanted to go over everything we talked about. So, our HTML Forms really are used for capturing keywords and data, right?
We have the Unity Forms where we can capture data. We can add additional logic, images, markup tools, hyperlinks. So, the Unity Forms are definitely more configurable, nicer to see, have additional functionality. And then, you have the Image Forms.
So, the Image Forms are really when you want to take a form that does not belong to your organization. And you want to make it electronic for people to fill up, government forms, physicals. Anything that again, the company really doesn’t own, you can modify it, that’s really the case scenario for the Image Forms.
So, a couple questions came in. If you have any additional ones, please go ahead and put them into the GoToMeeting now. One of the questions was from Adam regarding if the printing of Unity Forms has been improved. Previously, they did not look at all like the form and it was just text.
So unfortunately, when you print the Unity Forms, it really has not improved. There’s a lot of things that printed on the form that you probably don’t want to see. The pages don’t really get divided up very nicely either if your page one of your Unity Forum is longer than a normal 8 x 11 page.
So, there is definitely still some improvements needed on printing the Unity Forms. Another question from Stephanie is, it possible to take an IRS form and use it as an Image Form? So, any Image Form or any form can be converted to an Image Form.
I definitely recommend using forms that do not change a lot just because obviously you do not want to keep creating these templates or having to change these templates. But you can definitely take any form that you would like to mark it up as an Image Form.
And then, Stephanie also added or even with state text forms, can you use the Image Form? So, you can definitely, again, use any form that has to pretty much stay in its original state to make it an Image Form to add your boxes, add your signatures.
Again, I would just make sure that you are selecting forms that are not constantly changing and that will get used a lot within your organization. A lot of healthcare places will use them for the CMS, Medicare, Medicaid forms. But really completely up to your organization.
So again, thank you so much for joining. A little bit about RPI if you have time to stay on. We do offer free automation assessments. So, if you’re looking for some enhancement opportunities with your current solution or maybe identifying some new solutions or solutions for departments.
Or maybe even you just have a list of licenses and modules and you don’t know if you’re using them, what they’re for, anything that you would like us to assess your system, we’re happy to do that. Again, free assessments. So, feel free to reach out to us.
We do have some additional resources on our website. So, as I previously explained, all previous webinars and upcoming webinars are recorded and are available. There is an OnBase knowledge base. And then, we do have some more information about our OnBase professional services.
As I alluded to earlier, we do have a 2020 OnBase webinar series. So, it started in the beginning a year, it goes until the end of April. So, there are two more sessions. If you’d like to sign up for those, please do so. Or you can definitely watch the recordings on our website.
And then, RPI. There are currently over 100 of us full time consultants that does include project managers and architects. We are based in Baltimore, Maryland. We do have offices in Phoenix, Arizona, Tampa, Florida and Kansas City. We do offer technical and professional services.
So, technical strategy, architect, new installations, upgrades, migrations, manage services, staff augmentation, project and change management. We have quite a few services available, again, they’re listed on our website or you’re welcome to reach out to us for more information.
We are a Hyland Authorized Solution Provider. So that means we are able to provide services and licenses for Perceptive Content, Enterprise Search, Brainware and OnBase. We do have industry and solution expertise. So, accounts payable, human resources, education, healthcare, higher education, we have the experts on hands and willing to help if anyone needs it.
And again, I know this was a long webinar, but I really want to thank everybody for joining today. I really appreciate it. I’m going to stay on just for another minute or two if anyone has any additional questions. Again though, if you need anything, please feel free to reach out to us. And other than that, I hope everybody is staying safe and staying healthy. All right. Thank you so much. Have a great rest of the day.