Pitts P.:
Welcome to Webinar Wednesdays here at RPI. Thank you for joining our OnBase Workflow webinar. Just a few housekeeping items before we get started, this webinar will be recorded and posted online on our website after it’s finished. The slide deck will be sent out to all those who have joined the call, and that will also be available online. As we go through the webinar, if you have questions, please enter them through the go-to chat interface. We have a moderator standing by. They’ll interrupt us for questions or we’ll wait till the end to kind of ask them all at the same time.
This is part of our Webinar Wednesdays, so this is our last webinar for today. The next set of webinars will be in August, August first. We’ll be going over our best practices for testing, so I’ll be doing that one with Sean here, and then after that, at 1:00, we’ll have the Brainware for Transcripts webinar, and I think Derreck should be heading that one off.
As I mentioned, my name is Pitts. I’m a senior solutions architect here at RPI. I’ve been working with the Perceptive Content suite for about six years now, primarily within the clinical healthcare space, so I know a lot about the healthcare solutions and products that are around the Perceptive solutions, and I love my dog, Tofu.
Derreck Mayer:
And I am Derreck, a senior consultant here at RPI. I’ve been working with Perceptive Content and other ECM products for a little over eight years now, with an emphasis on accounts payable, back office, higher education, and client site training. In my free time, I do a lot of podcasting.
A bit about what we are going to be going over today, we’re going to start with a bit about who we are, RPI Consultants as an organization. Then, we’ll move onto an overview of OnBase Workflow, the product, what it is, and what it’s meant for. We’ll dive into a demonstration video of OnBase Workflow. It’s a two-part demo. The first part, which is the majority of the demo, focuses on the administrative side of things, so creating a basic life cycle, and then it ends with a short user demo. Then, we’ll dive into the administration side of things. We’ll talk about primary features and components in a little more detail, and then we’ll finish things off with some available resources for you and some considerations to make, as well as opening things up for questions, which Pitts mentioned earlier.
A bit about who we are, RPI Consultants consists of over 80 consultants, project managers and technical architects, throughout the United States. We have three primary locations. There’s Baltimore, Tampa, and then Kansas City, Missouri, which is where we are here today. We cover a wide range of available services, including design and implementation of solutions, support, ad hoc support agreements, advanced support, and we have experts in upgrades and transitioning from different product suites.
Pitts P.:
Perfect. All right, OnBase Workflow. OnBase Workflow is an automation engine that you can tie into OnBase that allows you to present those appropriate items to users, or even automate parts of your workflow where appropriate. Like all ECMs, Workflow’s a core product within OnBase. It’s considered typically the first add-on for your OnBase solution.
Just a quick note before we get too deep into this, OnBase Workflow is a very complex topic. It’s very broad. It can do a whole lot of things. This webinar is going to serve as just an introduction to the topic. We have further webinars planned, and of course, if you have any ideas or anything that you’d like us to expand on, definitely let us know.
The idea with OnBase Workflow is that it helps improve and standardize your business processes. The idea is that those existing processes that you have, typically they’re paper based, we want to digitize those, put them into OnBase, so then, we can drive those across the organization in a standardized manner. Another point with the Workflow is that it helps introduce automation when it’s appropriate. With the Workflow, we could use scripts or use different rules that we’ve built to kind of automate this process and remove a lot of those routine tasks.
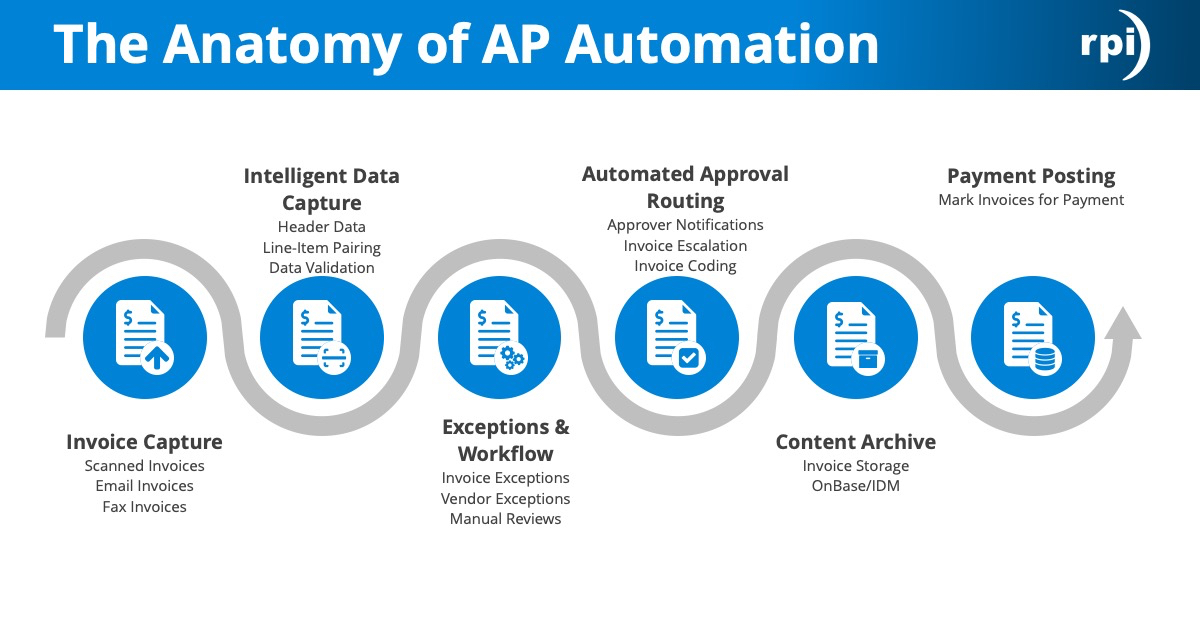
Some use cases with OnBase Workflow’s AR solutions, AP solutions. We could route invoices back and forth to those specific approvers that are needed, or even within the human resource space for hiring or employee reviews. We can create an employee packet, items like resumes, cover letters. Those can all be routed together as users dictate whether or not we want to hire this employee or not, and then once that decision has been made, we can even route those through into an onboarding process and even enrollment for benefits. OnBase Workflow, it’s a pretty powerful tool.
What we have here is just kind of a high level review of what OnBase Workflow can do for you. At the very left, the immediate entry, this is something that OnBase calls an initial queue. This is kind of where everything starts. As items are captured into the Workflow, we could do any translation or manipulation that we would need to on the existing documents as they come through, before we actually route them forward into kind of the next step here, which is an automated evaluation.
At this point, we build our rules. We evaluate the document, the metadata and route them to the appropriate users as we will need to. Once those users get those documents, the third step, the Assisted Decisions part, here is where we represent the documents or the items to the users so that they could make those decisions kind of determine where they need to go next. We can do that through a series of tasks or maybe just a simple user intervention that’s needed here, but ultimately, the outcome that we’re looking for is to archive these documents within the Workflow. That’s kind of what’s illustrated all the way at the far left over there. Whatever action that was taken, we could archive those into whatever they need to go. We can set index keys so that you can find them later, so in the event that an invoice is rejected, we can store those in a specific area as opposed to all the ones that were approved.
It’s the main core feature with OnBase Workflow. At the very, very top, it starts with life cycles. Life cycles are what OnBase considers a holistic approach to the workflow, so this has everything from queues to rules to actions. You would typically have a life cycle for, let’s say an HR onboarding process. Everything that’s related to onboarding will be rolled up into the onboarding life cycle, and then if you wanted to spend additional workflows up like an HR benefits workflow, that would be its own life cycle and such.
We mentioned routing documents through the Workflow. You can route documents, WorkView data objects, even folders through the Workflow, so any of those items are eligible for routing themselves. Again, the idea is to improve and standardize that process so that this could be rolled out enterprise-wide and then we could use those predefined actions or not to kind of dictate where things need to go.
Then, the final note here is life cycles. We like to group those life cycles together because within the OnBase product, it allows you to see those real time document and process statuses based on the life cycles. We’re also be able to kind of report based on the life cycle as well, so that kind of helps you determine what needs to be its own life cycle versus just a couple of queues within existing life cycles.
All right. Of course, those of you who are already are on OnBase will be familiar with some of these terms but a lot of our user base and a lot of organizations out there are still using Perceptive Content or ImageNow and you’re interested in moving over to OnBase by Hyland, and there are some terminology differences. You’ve heard a few terms today like life cycle. Life cycle is a … Basically, it’s a workflow process inside of ImageNow. Instead of my workflow queue, it’s just queue. That one’s pretty simple. When dealing specifically with AP solutions, i.e., super queue in ImageNow is an approval queue inside of OnBase Workflow. This is an automated queue that is created using the users that are going to be part of that approval process, so this is specific to an AP process.
Instead of routes, this is kind of a big one, instead of routes in it that you have in ImageNow, they’re called transitions here in OnBase Workflow. That’s kind of a big one. Routing rules in ImageNow are used for a variety of things. You can use it to move documents around, get them out of workflow, change custom properties, that sort of thing. This is broken up into multiple features and components inside of OnBase Workflow, specifically rules, actions, and timers. These, you’ll get to see all of this in action in our demo that’s coming up here shortly, at least the rules and actions, you will.
Tasks are ad hoc tasks. Those are pretty straightforward. Then, finally for the advanced automation, ImageNow uses iScript. That’s the proprietary script from Perceptive Content. OnBase Workflow uses Unity Script, which is their scripting program for advanced customization and automation.
All right, so then we have some software and hardware requirements. As far as these software and hardware requirements are concerned, this is all going to be handled by other OnBase products, so workflow life cycles are created and managed inside of OnBase Studio, so you will need OnBase Studio for anyone who’s going to be administering an OnBase Workflow, so whatever the software requirements are for that, the hardware requirements are, it’s going to be the exact same thing.
As far as the user end, in order to access these life cycles and access the queues and the objects within those queues, you’ll either need the thick Client, the OnBase thick Client or you will need the Unity Clients, either one of those. Then, of course, we have licensing, right? One of the questions, of course, is going to be what licenses do you need? There are a lot of options when it comes to which licenses are compatible with OnBase Workflow. For example, we’ve kind of narrowed it down to these four main concepts, these four main categories of licenses, and there’s different ones underneath each of these, as I’m sure some of you are aware, so as long as you have a license suite that fits into one of these categories, then you’ll be good to go for using OnBase Workflow. If you do not, then you’ll just need to get something that fits in here depending on what your organizational needs are, but this is what would be required for OnBase Workflow licensing.
Okay, so like I said, we are going to have a demonstration video here. The beginning parts of it, the majority of it will be creating a OnBase life cycle. This is a AP process. This is a invoice approval process, so you’ll get a chance to see what that looks like here, and then, we will be back.
Demo Video:
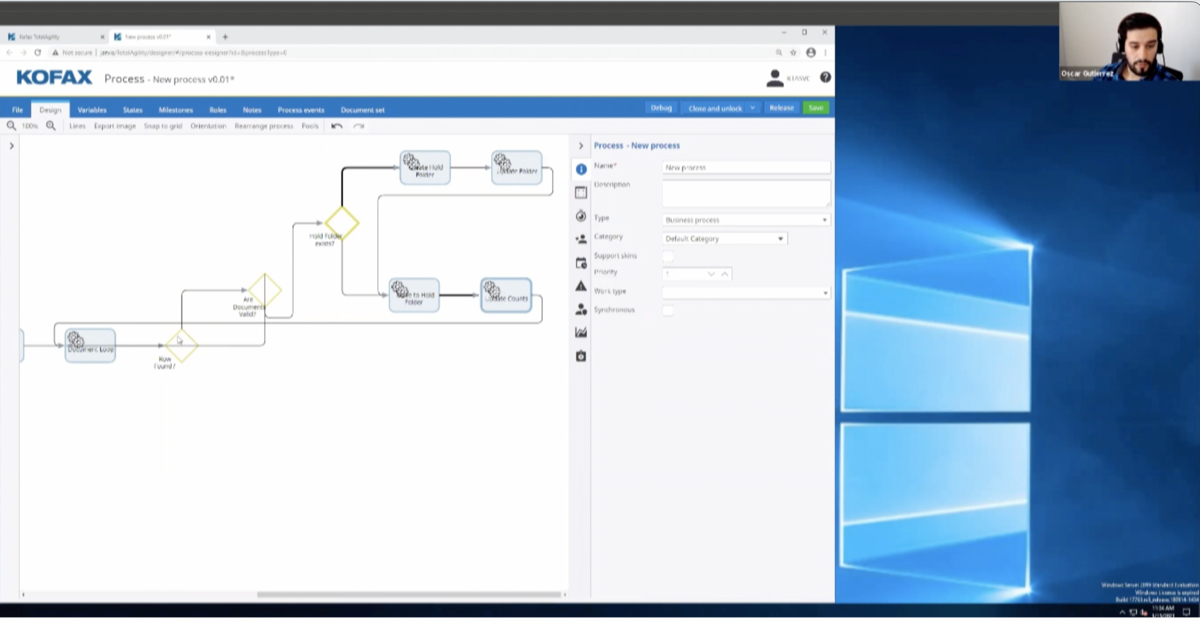
In this demo, we’ll be looking at how to create a basic life cycle inside the OnBase Studio. The life cycle we are going to create is an AP vendor invoice approval workflow. We begin in OnBase Studio. From the start page, I’ll select create a life cycle to begin. I’ll provide the workflow and name, vendor invoice review, and ensure that I’ve selected the Create a Unity Life Cycle as this provides additional functionality from the most basic of life cycle workflows.
For the purposes of this demonstration, we are only going to have three workflow queues. By default, we are provided the initial queue, so I’ll create two more: AP review and AP Manager Review. On the next screen, I’ll select the AP vendor invoice document type and add it to our life cycle. The last configuration here is access. I’ll add two different user groups to this life cycle workflow: AP associates and manager.
After clicking next, I can see a summary of this configuration as a final opportunity to notice any mistakes or changes that might be required. Clicking finish will create our new life cycle. Now that the life cycle exists, we need to set up the queues in a logical way. We begin with all of our queues stacked on top of each other. I will align them in a nice triangle setup so we can easily see each queue and understand the flow begins at the top with the initial queue, and then flows down to the others.
To configure a queue, I just double click on it. This brings up the Properties pane for the queue on the right. I will add a description and help text for the initial queue. After that, I’ll go to the Icon tab, and select a unique icon for this queue. Since this is an automated queue, there’s checking for the invoice amount. The Analyze icon should work just fine. I’ll then save my settings. It is important to save your changes often.
Next, I’ll select the AP review queue and configure it by entering a description and help text. I will also select a unique icon for this queue. It is a standard user queue, so I’ll select a nice person icon. I want to do the same thing for the AP Manager Review queue too, except provide its own description, help text, and unique icon.
After configuring both user queues, I will save my changes. Now, I want to connect my queues with transition routes. This is done from the Design tab on the ribbon. I’ll select transition, and then ensure that I have the initial queue selected. Then, I will drag and drop the transition route from the initial queue to the AP review queue. After it’s set, I’ll select transaction again, and draw the route from the initial queue to the AP Manager Review queue.
At this point, we can begin setting up the custom configuration for each queue beginning with the initial queue, which we noted in the description is an automated queue. In this case, I’ll navigate to the Repositories pane on the left, find our vendor invoice review life cycle, expand the initial queue, and select System Work. I want this queue to route documents based on the invoice amount, so we need a rule. I can create a rule by accessing the Life Cycle tab on the ribbon and selecting the rule button.
I will name the rule, is this invoice at or over $1,000? Pressing enter will submit that value. With the rule created, I can configure its properties on the right. First is the rule type. We want this rule to evaluate the invoice amount, which is a keyword, so I’ll select check keyword value. The keyword type-in question is invoice amount, and the operator is going to be greater than or equal to. Finally, I’ll enter 1,000 into the Compare To field. This configures my rule to check the invoice amount, keywords value, and determine if it is equal to or greater than $1,000. I’ll save this configuration.
With the rule configured, I need to determine what happens after the rule is evaluated. I’ll select True from the pane on the left, and return to the Life Cycle tab on the ribbon. From here, I’ll select the Action button. I will name this first action, Send to Manager. Over on the Properties pane, I’ll set the action type to transition item, which essentially means to route the invoice. The destination queue is going to be AP Manager Review because that is where we want the invoices to go if the invoice amount is equal to or more than $1,000.
I will save this, and then select the False Condition. With On False selected, I can add an action called Send to AP Review. This is also a transition item type, but I want the destination to be the AP Review queue for invoices under $1,000. With the initial queue’s configuration now complete and saved, it is time to set up the Approve and Deny tasks on the other two queues. The ad hoc tasks in this case we’ll allow users to approve or deny an invoice. I will begin with the AP Review queue by selecting Ad Hoc User Tasks under that queue on the left.
On the Life Cycle section of the ribbon, I will select the Ad Hoc Tasks button. Here, I want to create a new ad hoc task. I will name it and provide help text. I will assign all our users to it and finish the creation of the task. With the task created, I’ll set the icon. This task is for an approval. I’ll select the check mark and save my changes.
Next, I need to set up an action for this task. This action will replace the status keywords value with approved before. I also want the invoice to exit the Life Cycle after this, so I’ll create a second action called Exit Workflow. This action type is Remove Item from Life Cycle, and the Life Cycle in question is the vendor invoice review. I will save my changes.
Now, it is time to set up the denied task in Actions. It’s going to be very similar to the Approve. I will create a new ad hoc task called Deny. I will assign our users, and set a unique icon, an X mark since this is a Deny. Then, I’ll create new actions for this task. The first deny, we’ll set the keyword status value to Denied, clearing out whatever value was there before, similar to the Approve task. However, instead of creating the Exit Workflow action all over again, we can reuse the one we created for the approved task. All we have to do is create a new action under the Deny task, but instead of entering a name, select the dropdown, and choose the Exit Workflow action. This feature allows us to reuse different actions when they are needed in multiple scenarios.
We can take this a step further in the AP Manager Review queue. Instead of creating a new ad hoc task, I’ll select Use an Existing Ad Hoc Task. Doing this displays the two tasks we created for the AP Review queue: Approve and Deny. I will select the Approve Task and finish that. It is added with all these actions and configurations. I will do this a second time but select the Deny Task. This is a quick and efficient way to reuse configurations. I do not need to modify the tasks or actions for either of these Approve or Deny scenarios. I will save my changes before closing out of the OnBase Studio.
Now, let’s say you are a user and need to review invoices for payment. We can do this from the Unity Client’s workflow section, which I have up here. I’ve got an approval workflow selected, and you can see that a single document currently resides in the AP Manager Review queue for this life cycle. Why? Well, the invoice amount is for $1,183, which is more than the $1,000 rule we had put into place during the earlier parts of this demonstration. With the document open, I can review the image, its data, and even the notes that’s applied to it. There is a note here, and it points out that the PO is missing for this invoice. That’s a significant piece of information.
I now can either approve or deny this invoice. Given that it is over$1,000 and we have no matching PO, I am going to deny this invoice. Per our design, the document is set to a status of denied, and finally, it is removed from this workflow life cycle. This concludes our OnBase Workflow demonstration video. Thank you.
Derreck Mayer:
All right, so that is our demonstration on OnBase Workflow. Next up, we’re going to be diving into some of the administration topics, the features in a little more deep of a level. Again, remember, this is an introductory webinar so we will provide more detail in future webinar series, but this is to give a high-level at the most common and significant features of OnBase Workflow.
Pitts P.:
Perfect. Kind of at the start of OnBase Workflow, that all starts with the OnBase Studio. As you noticed in the webinar, this is kind of where all of the configuration happens for these workflows. The OnBase Studio is a very robust workflow design utility. Some of you might be familiar with Perceptive’s Workflow Designer. This is on a whole different level. This allows you to kind of do everything you would need workflow related all from a single client. Here on the left, you see, is the Repositories.
This is kind of the biggest change when coming from Perceptive to OnBase. The Repositories show the life cycles in a way where everything is broken off by a tree, so at the very high level, you have your life cycles, and then inside of those life cycles, you have all the queues. Inside of the queues, you’ll have all the rules and the actions pertinent to those specific queues as well. It’s just a different way of looking at it, but it kind of gives you a holistic view in a tree format, so that’s what’s on the left is a repository.
In the center, you have your diagram. This is just drag-and-drop, should be very similar to the Perceptive process, and then all the way on the far right is the Properties pane. This is dynamic, and it’ll change based on whatever item you have selected. Again, a very robust tool. It allows you to generate test documents right from the designer. You can even create documentation manuals as you would need to, and then, one of the coolest features here is you’re able to compare the life cycle.
If you have multiple life cycles, you could duplicate a life cycle for a similar process, make the changes that you would need, and then there’s a function here that allows you to kind of open both of them up and do a comparison. The comparison is done against the repository view, so with that tree view, as it lists out all the items that are inside of the workflow, it gives you a very clear comparison as to what is added and what is removed between the two processes.
Kind of taking this a step further, we talked a little bit about routing rules and how that looks within the OnBase platform. Here in OnBase, it’s based on rules and actions, so this is very similar to the routing rules except you can do a lot more than just setting custom properties and routing items. The rules are the conditional statements, so this dictates if this matches the condition, then what do we need to do? That what we need to do part is the action, so this determines the outcome based on that rule.
The actions are stackable, so what you saw Derreck do within the demo there was that we would … If a certain condition was met, we’re just going to route those documents to that specific queue. On top of this, we can set database lookups, we can set log notes, we can even execute some specific scripts. Again, they’re all stackable but ideally, at the very end is where you would do that route action. We can stack these as we would need to. Another really cool thing with these is that they are reusable across other queues and even other life cycles, so you would just need to build your rules or conditions once, and then you could apply those to as many queues as you would need, and that would be duplicated as dictated.
Derreck Mayer:
Okay, so then we also have tasks and advanced features. The tasks you saw in the demo, we used some ad hoc tasks. The goal of tasks is to provide user interaction points where in our example, they can approve or deny the payment of an invoice. This can be done in a lot of different solutions. One of the examples Pitts used earlier was an HR solution. You’re interviewing for a new position, and you’re looking for applicants, someone … You could create something up here where someone sends something off for hire or maybe declines somebody’s interest, declines a resume that’s been submitted or something along those lines.
This is done using the ad hoc task creation. Again, you can reuse these tasks multiple times as you saw on our demo. We created the Approve task, and that would allow user to approve an invoice for payment, and then that document with Exit Workflow, you could then reuse that task in another queue. We used it in both the AP Review and the AP Manager Review queue. It’s basically the same tasks as far as the user is concerned, but we needed it in two different locations for two different scenarios.
There are other automation options as well, specifically things like email notifications and configurable timers. If you have workflow processes that either, A, are not used very often, so users are not checking them on a regular basis and need to be notified when something does enter those processes, or maybe you have a life cycle that is very, very important, and those queues need to be processed as quick as possible. These are automated ways you can inform your users that work needs to be done.
Finally, we have Unity Scripts. As mentioned before, that’s the customized automated script option where you can create really advanced functionality. As Pitts mentioned again, things like database lookups. You could do some really cool custom stuff with Unity Scripts right inside of your life cycle.
Pitts P.:
Yep. Now, we wanted to go through some resources and considerations, specifically if you’re moving from a Perceptive workflow into an OnBase Workflow. The first thing here is kind of migrating your AP solution into OnBase from Perceptive. A couple things to note here, some of you might be using a Legacy approval matrix process where we have a nice script looking at a CSV or some sort of matrix to determine where that document needs to be routed based on the approval level. All of this could be imported directly into OnBase and managed within that OnBase Designer.
Approval matrices are managed all within the Unity Client. We could even handle the auto-approval path support. I know previously, that was all done through iScripting. We had to kind of hard code all of that logic in there. Now, all of this can be done through the GUI in the Unity Client. Another thing to note here is that the OnBase Workflow integrates very easily with all of the other OnBase solutions.
A couple of months ago, we did a webinar around Microsoft Outlook integration. Those workflow components, depending on what queue this document is in, that banner is going to change, the ribbon is going to change based on that specific queue. The integration is very tight with the other OnBase products. Another thing that we can do is route Unity forms into the workflow. Users might start those Unity forms out of their browser, but as we submit those into the workflow, we can trigger specific actions and even route them to the appropriate users that they would need to.
Like we mentioned, this is an introductory webinar. There’s a whole bunch of other material online for you to look at. The OnBase community portal, around the workflow specific module, is very robust. It’s one of most use modules on the OnBase platform. Then, there’s the module reference guide as well, and that’s just the official documentation that OnBase has for this specific module. Again, I think it’s well over 1,000 pages, so that’s very robust as well.
Just kind of in summary, OnBase Workflow provides the automation, electronic routing for your existing ECM solution. It’s kind of a way to present items to users when it’s appropriate, and it’s a way to kind of automate a lot of the tasks that are already being done in your paper process. It’s one of the most robust workflow tools that we have ever worked with. All of it’s designed to be kind of point-and-click, so no development is needed, but if there is specific functionality that’s not there that you would need, there is Unity Scripts, so that’s kind of a way to build on top of the existing platform, making it virtually limitless as far as configuration options are concerned.
Now, we’ll be taking questions. We have a moderator standing by for questions. Feel free to key those into the GoToWebinar interface. All right. Any questions?
Moderator:
All right. We have a couple questions coming in. First, can you route Unity forms in workflow like you do documents?
Derreck Mayer:
Yes, you can. Yeah. Unity forms, if you saw our webinar on Unity forms, can actually be created to submit directly to a life cycle into a queue inside of a workflow process, so you can absolutely do that. It can act as a document. You can attach associated documents to those Unity forms and route through whatever life cycle process that you need.
Moderator:
All right. Next question that just came in, can you do database lookups within the workflow actions?
Pitts P.:
Yeah, certainly. Database lookups, you could do those within the action specifically so again, that is the routing rule component for OnBase. You set your rule, and then the action. We could do database lookups to pull back specific pieces of metadata to sign to keyword sets, and you can even do those within Unity Script so, if it’s a more complicated query, maybe it’s an Oracle database or we’re stitching a bunch of tables together or something, we can do those through a script as well to give you that same functionality.
Moderator:
We had someone else write in, did you actually say that workflow can create documentation?
Pitts P.:
Yes. That is one of the more impressive features of OnBase Workflow. You’re able to … There’s a single button in one of the ribbons that allow you to create documentation. It pulls up a wizard asking you whether or not you wanted admin documentation or end user documentation, and then it’ll actually spit out a document with a title page and a table of contents, and kind of a summary of all the configurations that have been made within that specific life cycle. It’s not ready to go as it comes out, but it does give you like 90% of the way there so you’re able to kind of modify that as you would need, but definitely, just a few clicks and you’ll get what’s equivalent to a design document in the Perceptive world.
Moderator:
All right. Then, the last question that came in is about a copy of this webinar being available. Yes, a copy of this webinar will be available shortly after today. As a registrant, you will actually get notified first that the recording is available for you to watch online. That is all of our questions.
Derreck Mayer:
Perfect.
Pitts P.:
Yep, and then yeah, before we leave you, we just wanted to let you guys know that there are additional resources out there. We have a knowledge base online that has a lot of this information on there. All of our webinars are going to be available at rpic.com/webinars. This is upcoming webinars. Previous webinars, ISTS webinars, Lawson webinars as well, and then here’s a quick list of all the recorded webinars we have around the OnBase platform. We did an introduction to OnBase, Planning Your Migration from Perceptive to OnBase, talk about Unity Forms, Approval Manager, and even like a couple months ago, we did our Microsoft Outlook integration. All right, thank you.